Expanding your store’s reach internationally requires more than just great products—it’s about making the shopping experience as convenient and pleasant as possible no matter where your customers are located. That’s where a WooCommerce language switcher comes into play.
With a WooCommerce language change solution, you can localize your product listings, enabling you to connect with a global audience. In just a few clicks, your store can offer customers the option to browse in their preferred language, enhancing their shopping experience and boosting your international sales!
In this guide, we’ll show you how easy it is to make a multilingual store in WooCommerce. Furthermore, we’ll explain how this connects with product feeds, helping your listings get showcased on major sales channels like Google Shopping, Bing, and Connexity.
So let’s begin!
Table Of Contents
- I. What Are The Benefits Of Making Your E-Commerce Platform Multilingual?
- II. How To Change Your WooCommerce Store Language?
- III. How Do You Set Up A Multilingual WooCommerce Store?
- IV. Supercharging International Sales With Product Feeds
- V. Using AdTribes Product Feed Elite To Change WooCommerce Language
- Frequently Asked Questions About WooCommerce Language Switchers
- Conclusion
I. What Are The Benefits Of Making Your E-Commerce Platform Multilingual?
Making your e-commerce platform multilingual opens the door to massive growth opportunities. Here’s why:
- Reach a global audience: Offering multiple languages makes your store available to customers across the globe. The more people who can view your products, the greater your sales potential.
- Better customer experience: When shoppers browse your product listings in their own language, it creates a more comfortable, personalized experience that can boost purchases and customer loyalty.
- Increased sales: Providing a smooth shopping experience results in more satisfied customers. This can drive higher conversion rates and encourage repeat purchases.
- Stronger brand trust: Customizing your content for different regions demonstrates that you understand your customers’ needs and are dedicated to offering them an excellent shopping experience. This helps establish trust and reliability with global audiences.
- Improved SEO: A multilingual site helps you rank in search engines across different regions, driving more organic traffic from non-English speaking countries.
- Competitive advantage: When you create a multilingual store, you set it apart from competitors who may only cater to a single language. This gives you an edge in international markets.
Going multilingual not only grows your audience but also boosts visibility and helps you outshine the competition!

II. How To Change Your WooCommerce Store Language?
One way to appeal to customers from a certain region is to set up your WooCommerce store in their language. In this section, we’ll discuss the two ways you can do this.
1. Change WooCommerce language: frontend and backend
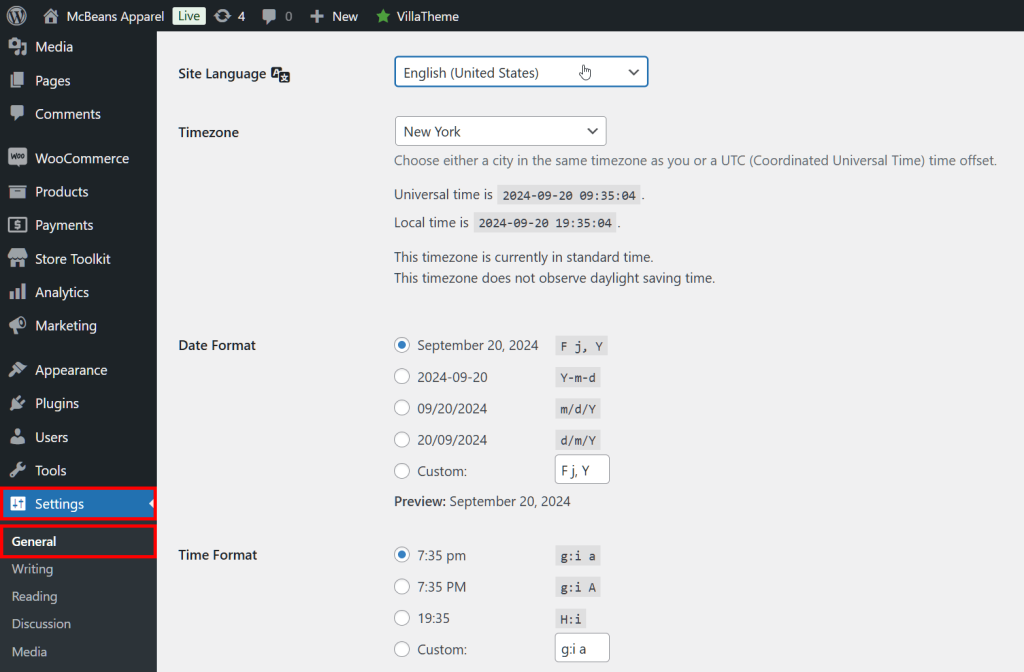
To select a single language for both your customers and website administrators, go to the WordPress Admin Dashboard, then navigate to Settings > General.
Scroll down to the bottom of the page and find the Site Language option. Here, you can use the dropdown to choose your preferred language from an enormous list. This will be the language displayed on both the frontend (customer-facing) and the backend (admin panel).
For example, in the image below, we selected English as the entire website’s language. This setup is ideal if you have an English-speaking team and intend to serve only English-speaking customers.
As you can see from the image, you have many other options to choose from, as well, including your store’s timezone, its date and time format, and the start of the week.
Don’t forget to click the Save Changes button to implement your settings!
2. Change WooCommerce language: backend only
The backend language is the one your store administrators will use when managing orders, products, and settings. If your team members speak a different language than your customers, you can change the language of the backend into their native tongue.
First, use Site Language to choose your entire website’s language as discussed above.
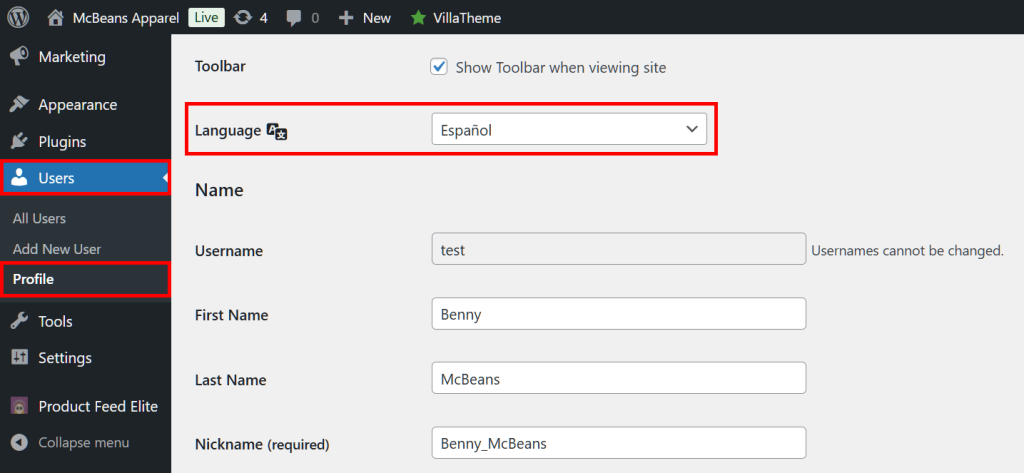
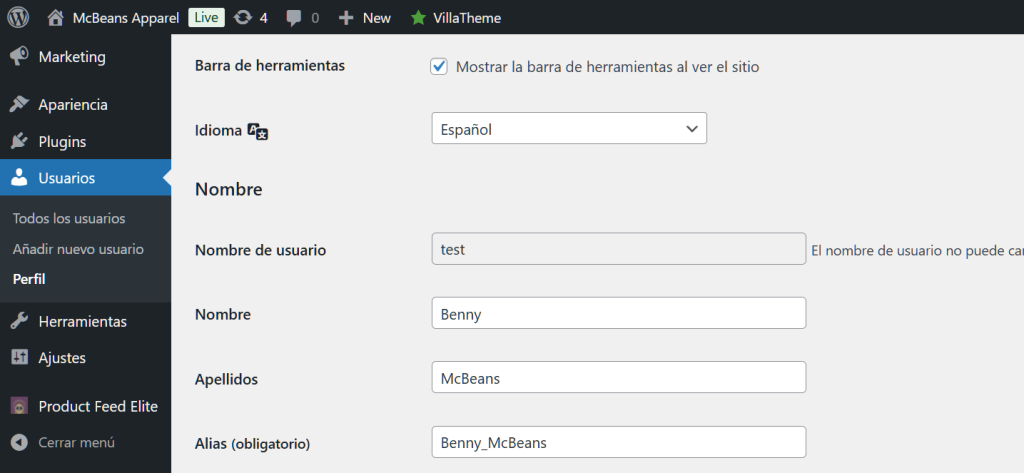
Then, from your From your WordPress Admin Dashboard, go to Users > Profile. Next, scroll down to Language and choose a new language from the dropdown. Lastly, click Update Profile at the bottom of the page to save your settings.
Basically, this will translate the entire backend into your selected language.
While both methods let you cater to customers from a specific region, they don’t allow you to serve customers from multiple regions at the same time. To do that, you’ll need special WooCommerce extensions, like WooCommerce language switcher plugins.
Which brings us to…
III. How Do You Set Up A Multilingual WooCommerce Store?
The best and easiest way to give your WooCommerce store a multilingual functionality is to use plugins with the ability to change WooCommerce language.
Here are some popular WooCommerce extensions that can enable you to make a multilingual store:
- WPML (WordPress Multilingual Plugin): A widely used plugin that allows you to easily translate pages, products, and other content into multiple languages.
- Weglot: This extension offers automatic translations and is easy to set up, with a user-friendly interface for managing multiple languages.
- Polylang: A free plugin that helps translate your store’s content, allowing you to run a multilingual WooCommerce store efficiently.
- TranslatePress: A visual translation tool that lets you translate your entire store, including product pages and checkout, directly from the front end.
These WooCommerce language change plugins provide the flexibility to reach international customers by making your store available in multiple languages.
Overview: Adding a WooCommerce language switcher to your store
Adding a WooCommerce language change extension to your store is easy. To show you how it’s done, we’ll use Polylang as an example. After all, you can acquire it for free!
Simply implement the following steps:
Step 1: Add a plugin for translating text
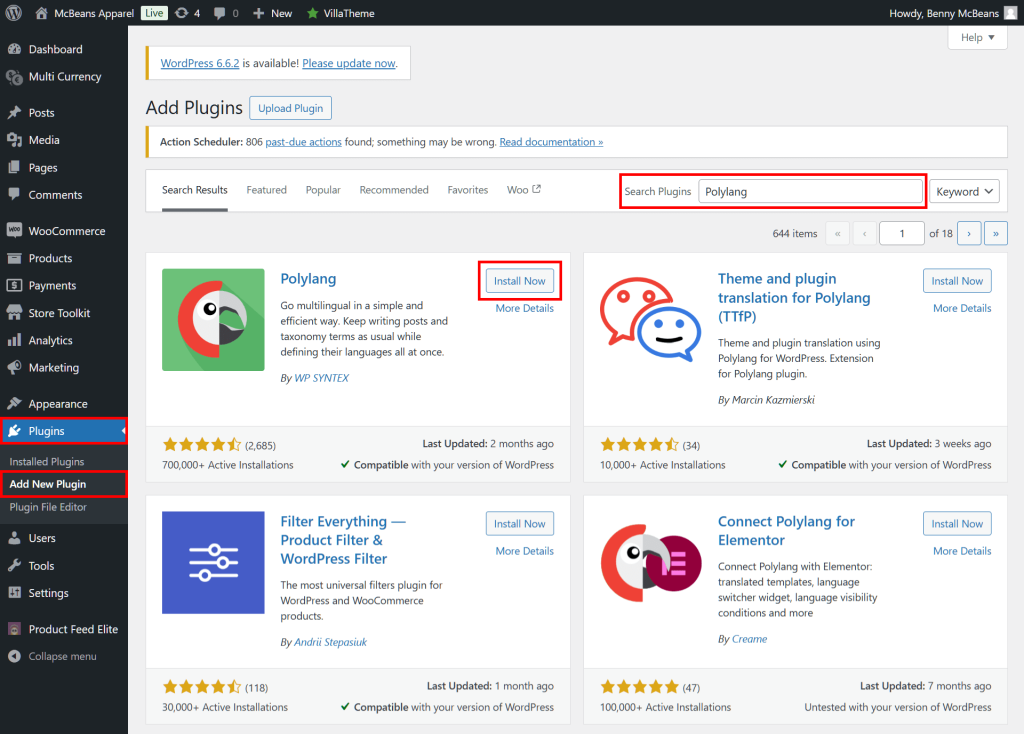
Go to your WordPress Admin Dashboard, then navigate to Plugins > Add New Plugin.
Then, in the Search Plugins entry field, type “Polylang.” Once Polylang has appeared in the list of plugins, click its Install Now button followed by the Activate button.
Step 2: Configure your settings
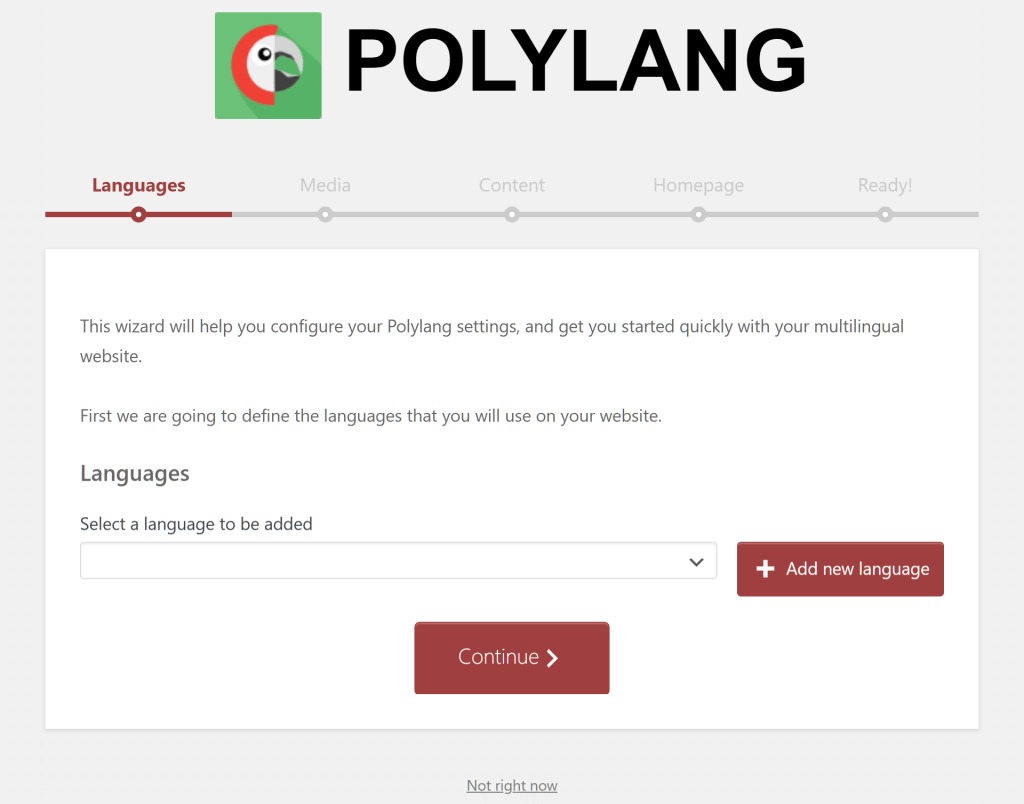
If this is your first time activating Polylang, the extension will help you configure various key settings through a setup wizard.
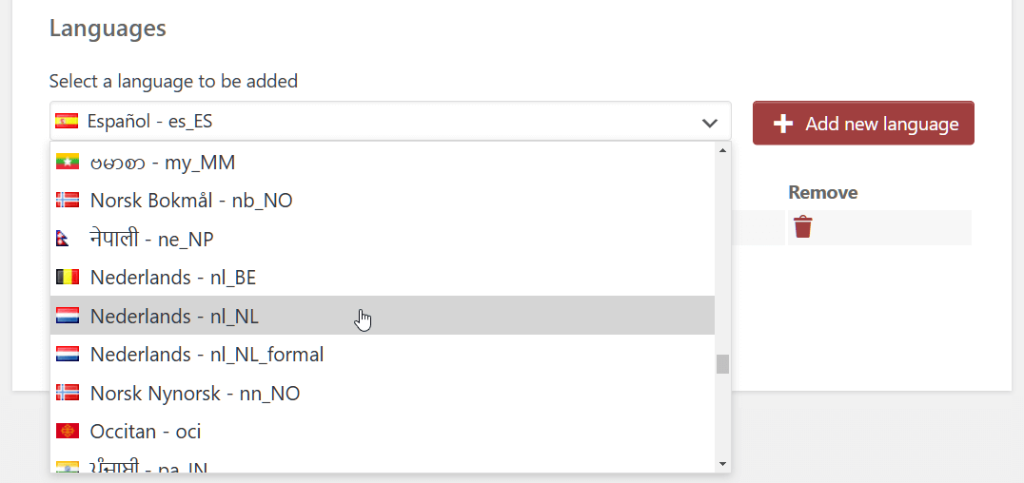
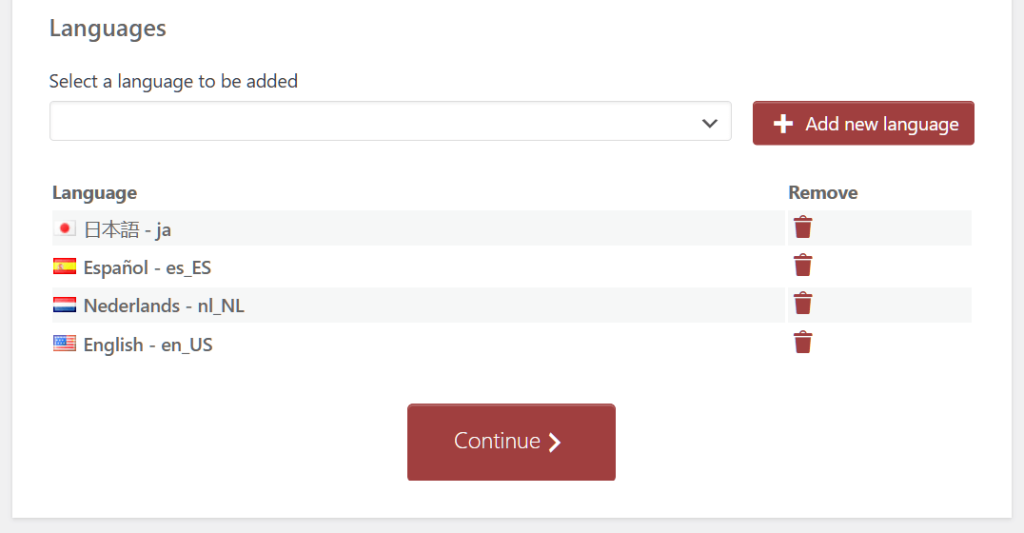
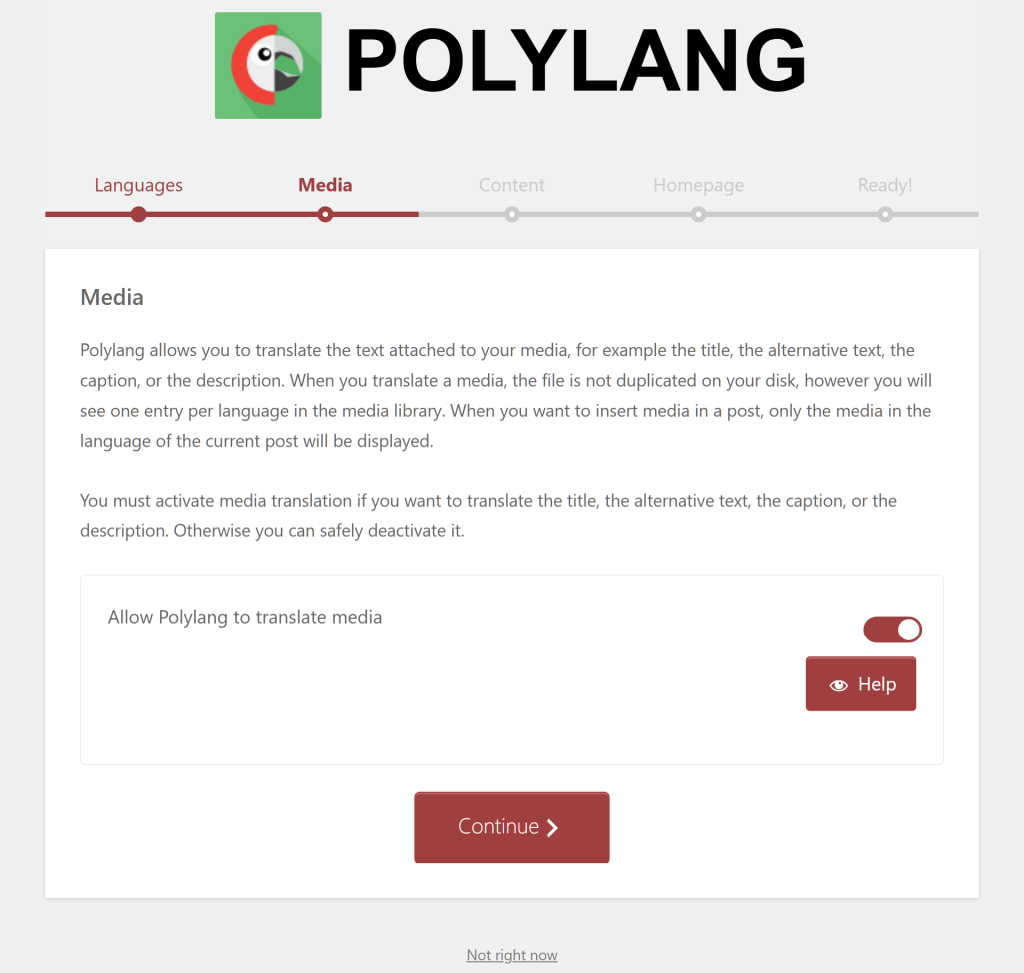
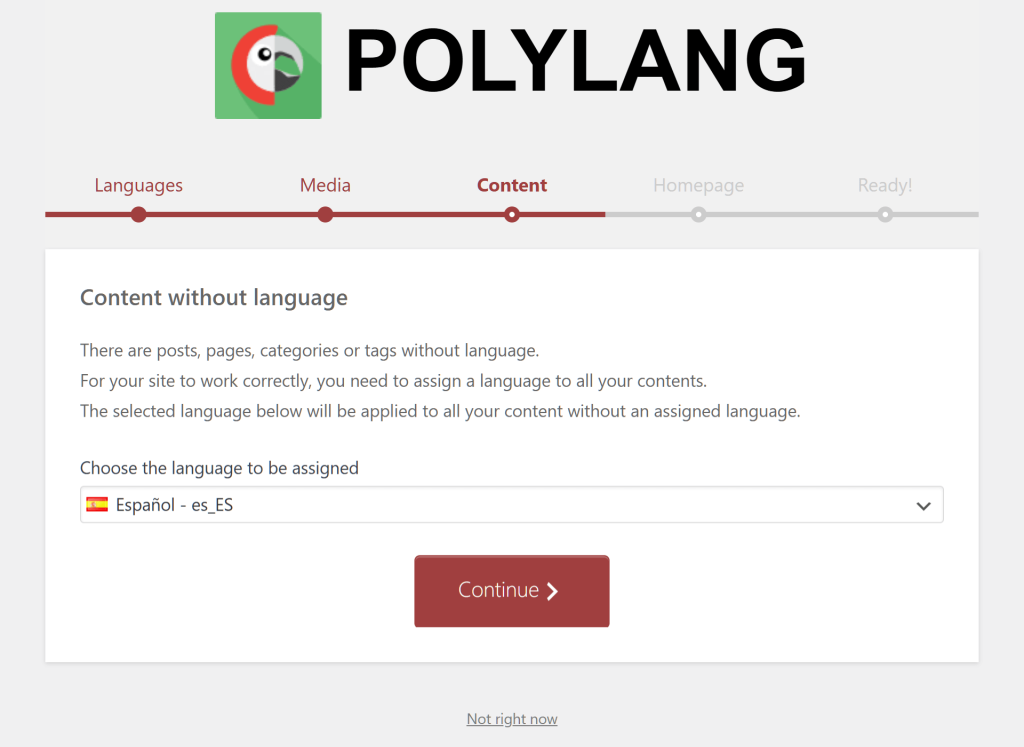
The setup wizard is simple to complete. You just need to select the languages you want to add to your store (including your default language), decide whether to translate media-related text (like image titles and alt text), and choose a language for any content without an assigned language. If you’re unsure about any of these settings, the setup wizard offers helpful Polylang guides to assist you.
Take note that once you’ve activated Polylang, you can change these settings at any time.
Step 3: Explore and configure other settings
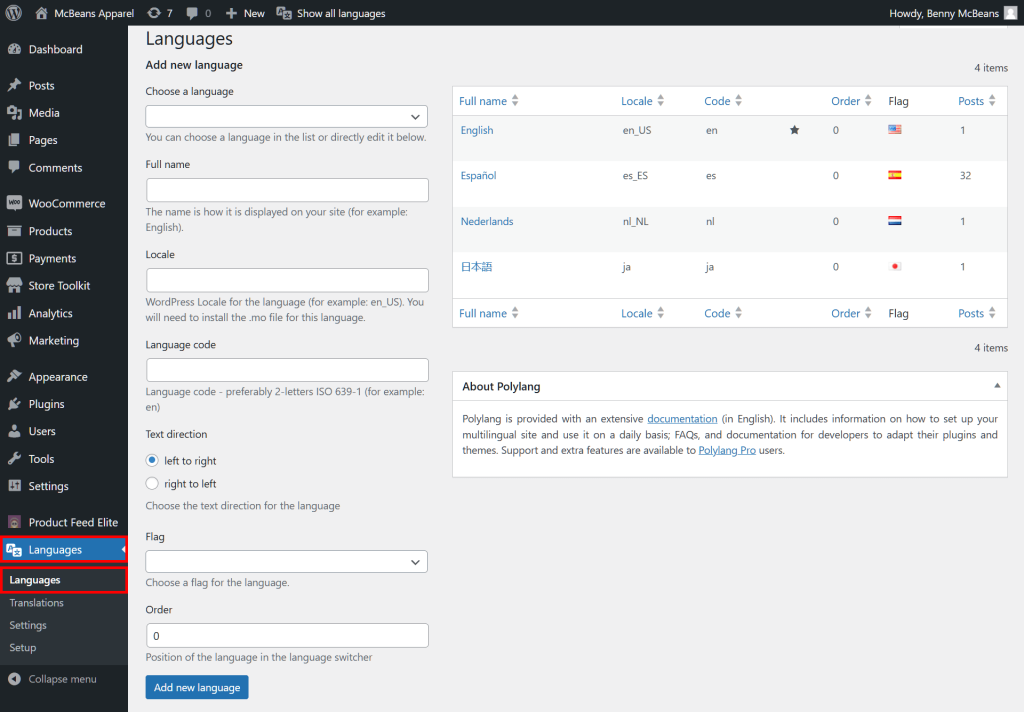
If you skip the setup wizard, you can modify your store language settings by heading to your WordPress Admin Dashboard, then clicking Languages > Languages. Here, you can add or remove languages. You can also find extensive documentation if you want to master Polylang.
Visit Languages > Settings or Languages > Translations for more advanced settings, and Languages > Setup to return to the setup wizard.
Step 4: Set up a language switcher widget (optional)
When you add a language switcher widget to your site, you can provide your customers with a straightforward way to choose their preferred language.
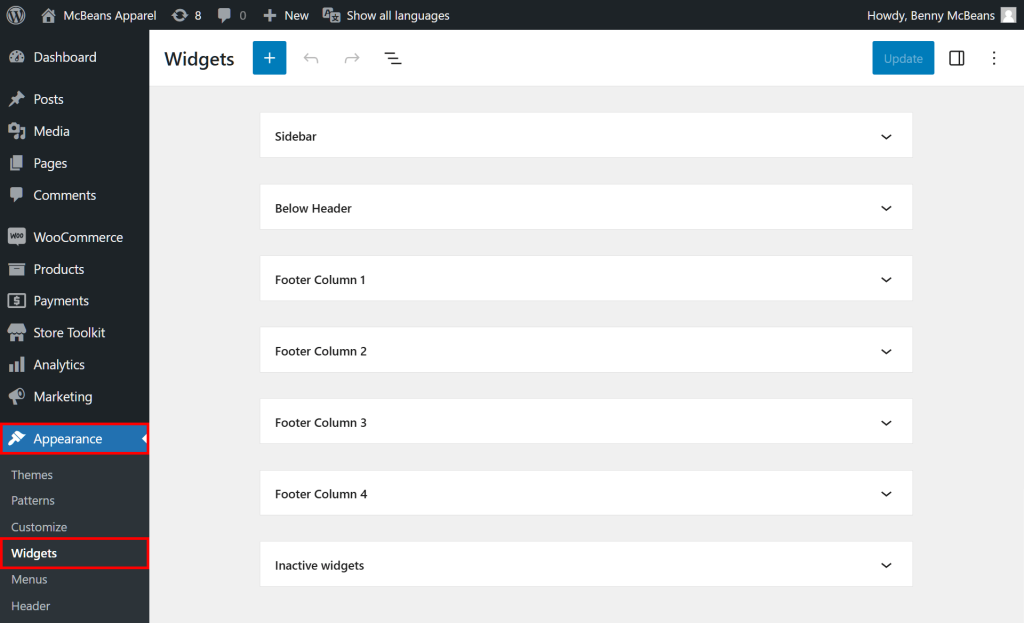
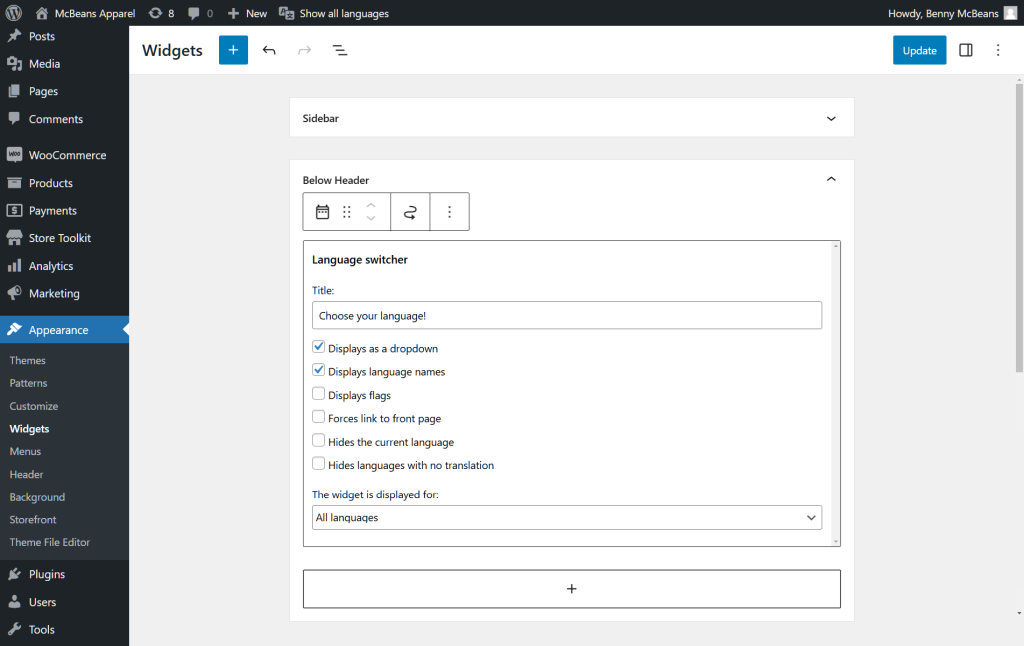
In your WordPress Admin Dashboard, click Appearance > Widgets. Then, choose where you’d like the switcher to appear. For instance, you can place it in a sidebar, below the header, or one of the footer columns.
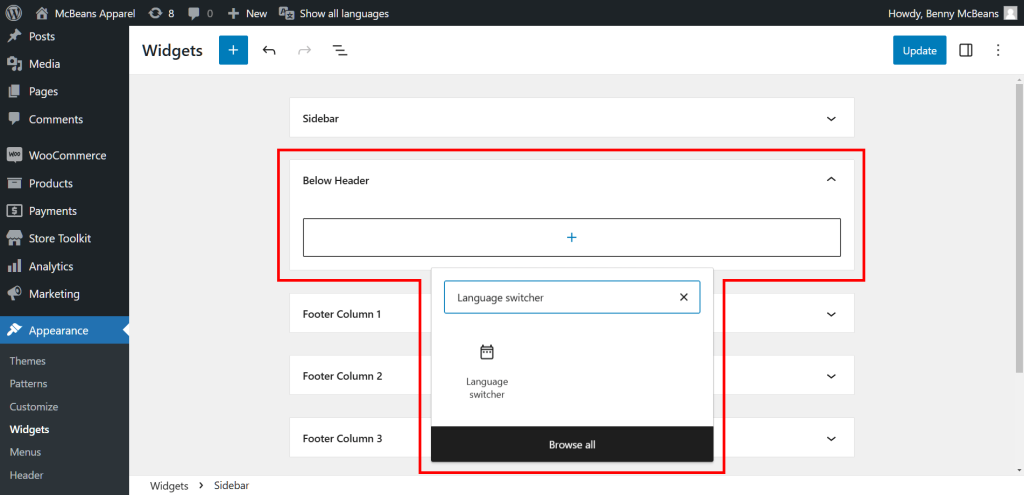
For example, what if you want the widget to appear below your header? Then, click “Below Header.” Next, click the + button to insert a block, and enter “language switcher” in the search bar. Now, click on “Language Switcher” to place the Polylang language switcher in the block.
You now have options to determine how the switcher functions and appears. For example, you can set the switcher to appear as a dropdown menu or to display the languages as names or flags:
When you’re done, don’t forget to click the Update button to save your progress!
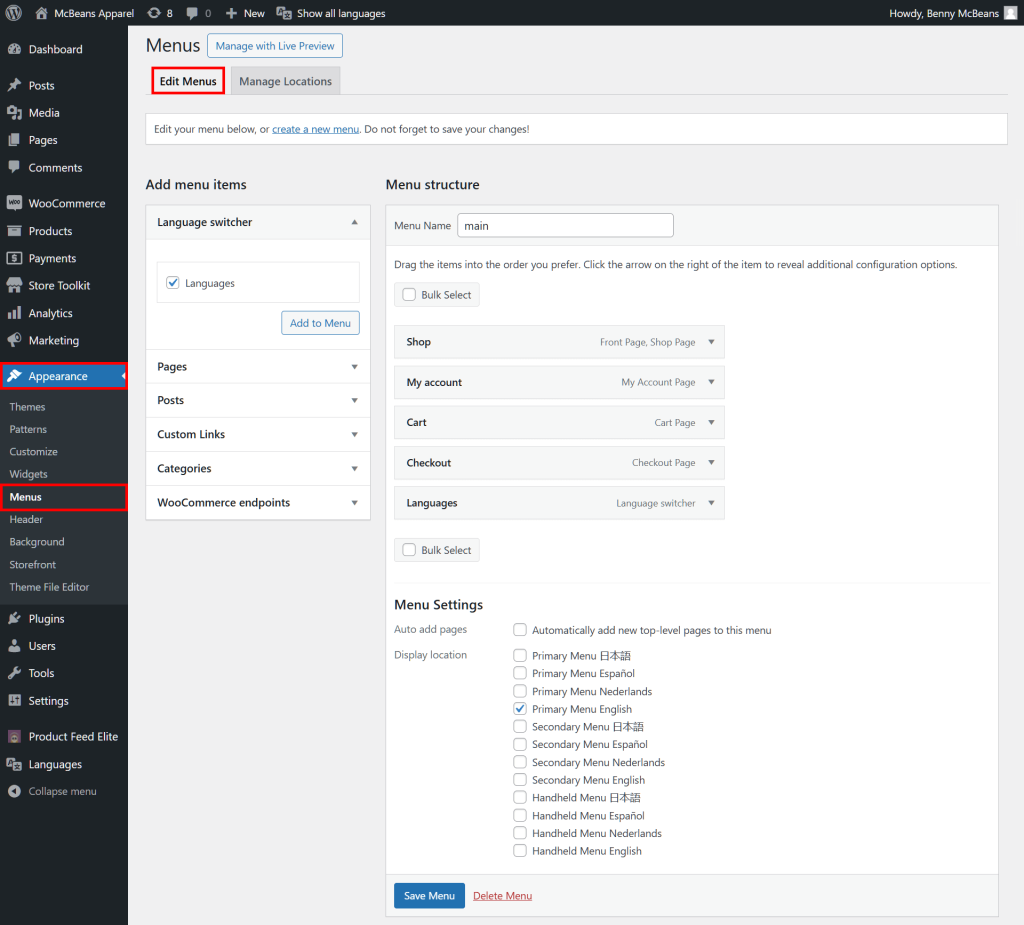
Step 5: Add the language switcher to the navigation menu (optional)
If you wish, you can even add the language switcher to the navigation menu. In your WordPress Admin Dashboard, click Appearance > Menu > Edit Menus. Next, find the Language Switcher option, click the Languages checkbox, then the Add to Menu button to add it to your menu. Finally, click Save Menu.
With this setup, your store becomes instantly more accessible to customers around the world.
How to boost your reach even further…
For an even more powerful way to expand your reach, consider combining product feeds with your WooCommerce language change plugin. This dynamic duo ensures that your products are not only displayed to a wider audience but also in the customer’s preferred language, offering a fully localized shopping experience.
IV. Supercharging International Sales With Product Feeds
How do product feeds help drive global sales? Let’s break it down!
1. What’s a product feed?
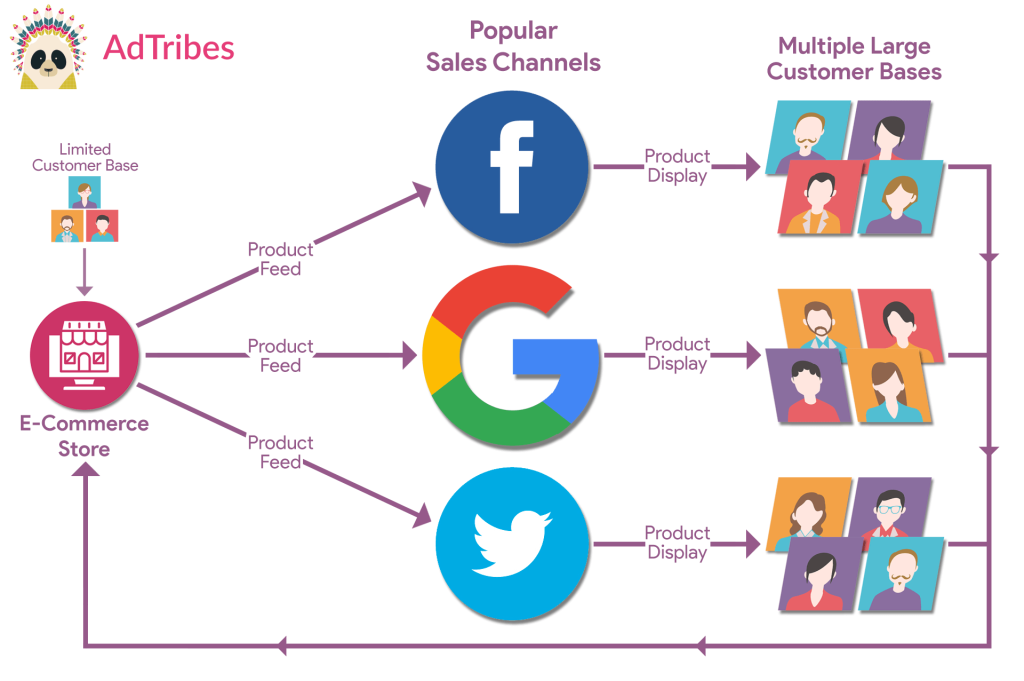
A product feed is like your store’s cheat sheet—a file packed with all the essential details about your products, including titles, descriptions, prices, availability, and even language. When you send these feeds to platforms like Google Shopping or Bing, they use that data to display your products to shoppers around the world. The magic happens when your product feed adapts to local languages, giving international customers a shopping experience in their native tongue.
For example, on Google Shopping, your feed can automatically adjust based on a visitor’s location, ensuring they see your products in their preferred language. This smooth experience increases the chances of converting international shoppers into loyal buyers!
Hungry for more information about product feeds? Then check out our complete guide, “What Is A Product Feed And How Do You Create One? *(Ultimate Guide)“
2. Why use product feeds?
Product feeds are the key to expanding your reach. After all, they help you get your products on major sales channels like:
- Google Shopping
- Bing
- TikTok
- Connexity
- … and more!
With feeds, your products are displayed across multiple platforms, from social media to comparison shopping websites. This visibility boosts your chances of attracting shoppers who wouldn’t have found your store otherwise. Plus, real-time updates on prices and stock build trust and make the shopping experience even better!
3. How do you create product feeds?
Creating feeds is easy with the right tool.
AdTribes Product Feed is a powerful WooCommerce extension that simplifies feed creation. It supports various sales channels, making it easier to showcase your products across multiple platforms.
Both the free and premium versions of AdTribes boast many powerful features. However, the latter comes with complete integration with various powerful tools, including several WooCommerce language switchers.
V. Using AdTribes Product Feed Elite To Change WooCommerce Language
Once you’ve purchased, downloaded, installed, and activated AdTribes Product Feed Elite, you can unlock its seamless integration with these powerful WooCommerce language switchers:
- WPML (WordPress Multilingual)
- TranslatePress
- Polylang
These plugins will enable you to set up automatic translation, ensuring that your product listings and content are consistently localized for your international customers.
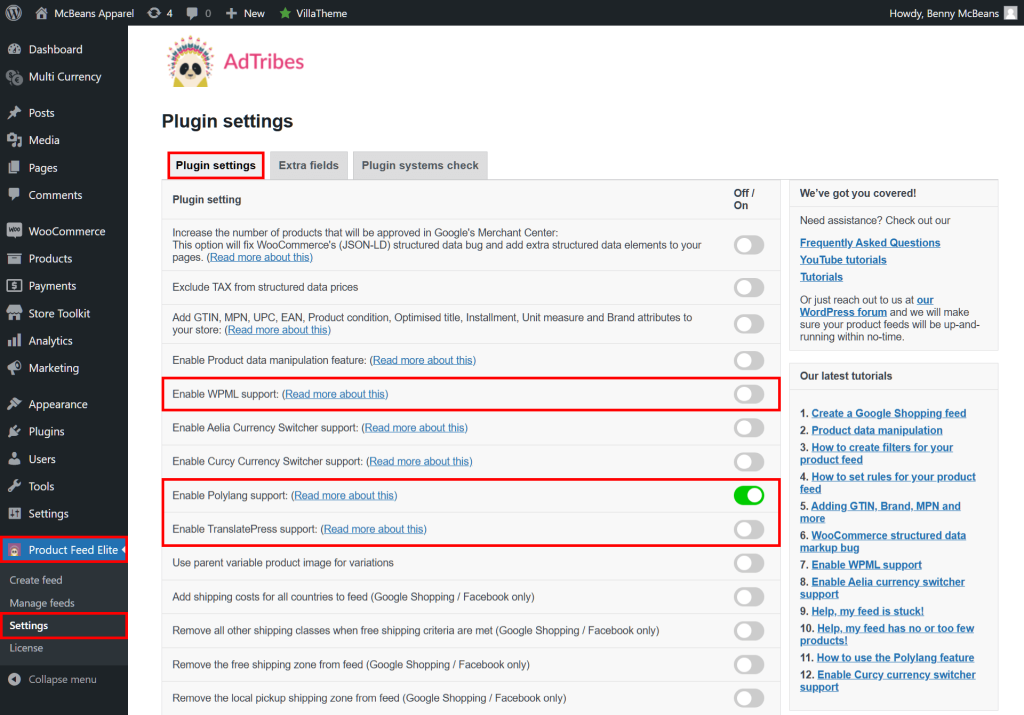
To get started, you’ll need to enable these features. Simply go to your WordPress Admin Dashboard and navigate to Product Feed Elite > Settings > Plugin settings. From here, activate one of the WooCommerce language change plugins to localize your store’s content as shown below:
For our example, we’ll enable Polylang.
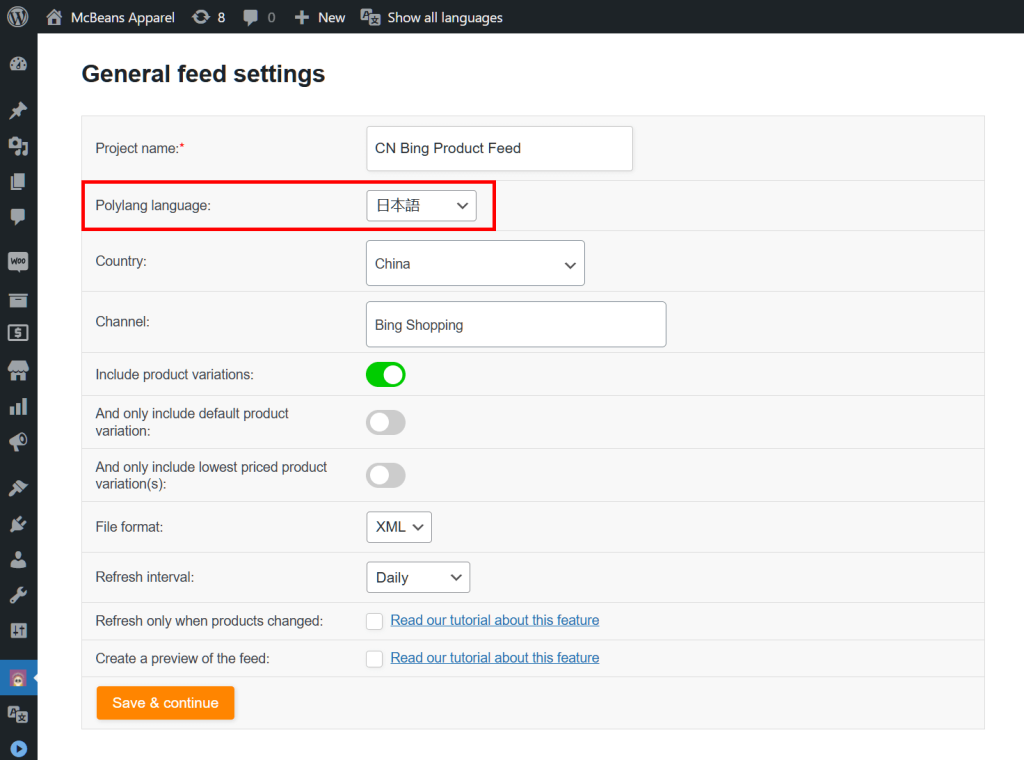
Next, go back to your WordPress Admin Dashboard, and head to Product Feed Elite > Create Feed. This takes you to the General feed settings page, where you can start the feed creation process.
As shown below, you now have access to Polylang. Simply click the dropdown menu and select a language from the list you’ve added to your store. Be sure to choose the language that corresponds to the country you’re targeting with the feed for a tailored shopping experience.
And that’s it! Once you finish creating your product feed, AdTribes will use your selected language to display your product details. Additionally, it will ensure the language appears correctly throughout your listings, creating a localized experience for your customers.
You can generate as many product feeds as you require, targeting different countries, sales channels, and more. Just be sure the language you select matches the country you’re aiming for in each feed to maintain consistency and optimize the shopping experience.
For more information on AdTribes Product Feed Elite’s integrations with these WooCommerce language change plugins, check out the following articles:
Frequently Asked Questions About WooCommerce Language Switchers
It’s time to answer some commonly asked questions about how to change WooCommerce language!
1. What are WooCommerce extensions?
WooCommerce extensions are add-ons that enhance the functionality of your WooCommerce store. They can help you customize your online shop, improve user experience, and streamline operations.
Extensions can cover a wide range of features, including payment gateways, shipping options, marketing tools, inventory management, analytics and reporting, subscription management, and more.
Extensions can be found in the WooCommerce marketplace or from third-party developers, allowing you to tailor your store to meet specific business needs.
2. Can I change the WooCommerce language?
Yes, you can change the language of your WooCommerce store easily within the WordPress or WooCommerce settings. Furthermore, by using language switcher extensions, you can create a WooCommerce multilingual store that can translate your site for customers from various regions.
3. Does WooCommerce support multilingual functionality for international customers?
Yes, WooCommerce supports multilingual functionality, allowing you to create a store that caters to customers in different languages. By using plugins like WPML, Polylang, or TranslatePress, you can easily translate your site, including all the product listings, pages, and other content it contains. This enables you to provide a seamless shopping experience for international customers, helping you reach a broader audience and increase sales.

4. How do you create a multi-language WooCommerce site?
To create a multi-language WooCommerce site, follow these steps:
- Choose a Language Plugin: Select a multi-language plugin that fits your needs, such as WPML, Polylang, or Loco Translate. Then, install and activate the plugin through your WordPress dashboard.
- Configure Plugin Settings: Go to the settings of your chosen plugin and configure the languages you want to support. Basically, this includes selecting the default language and adding additional languages.
- Translate Your Content: For each product, category, and page, use the plugin’s interface to translate titles, descriptions, and other relevant content. Some plugins allow you to duplicate content for translation, while others provide a direct editing option.
- Set Up Language Switcher: Add a language switcher to your site, typically in the header or footer. Basically, this allows visitors to easily select their preferred language.
- Translate WooCommerce Pages: Ensure that essential WooCommerce pages (like the cart, checkout, and account pages) are also translated. Most multi-language plugins will handle this automatically.
- Test Your Site: Navigate through your site in different languages to ensure all translations are accurate and that the shopping experience is seamless.
- SEO Optimization: Optimize your site for SEO in multiple languages by ensuring each language version has appropriate meta tags and URLs.
By following these steps, you can create a fully functional multi-language WooCommerce site that caters to a diverse audience.
5. What are the best multi-language plugins?
Some of the best multilingual plugins for WooCommerce include:
- WPML (WordPress Multilingual Plugin)
- Polylang
- TranslatePress
- Weglot
The best choice depends on your specific needs, such as ease of use, budget, and the level of control you want over translations.

Conclusion
When you add a language switcher to change the WooCommerce language of your online store, you open the door to new opportunities. After all, this powerful tool helps you connect with a broader audience, enhance the shopping experience, and boost international sales. And with the right setup and product feeds, your store can thrive in the global marketplace, attracting shoppers from diverse backgrounds and making their purchasing journey seamless.
To recap, this article explored the following major concepts:
- What are the benefits of making your e-commerce store multilingual?
- How do change language in your WooCommerce store?
- How do you set up a multilingual online store?
- Supercharging international sales with product feeds
- Using AdTribes Product Feed Elite to change the WooCommerce language
Embrace the potential of a multilingual store today and watch your business grow! Display the language your customers prefer to build trust, encourage loyalty, and enhance your profits!
Do you have any questions about how to change the language of your e-commerce platform and create a WooCommerce multilingual store? Let us know in the comments below!
