The Filter Builder in Product Feed Pro is a powerful tool that allows you to customize your product feeds by including or excluding products based on a wide range of conditions. By setting up filters, you can ensure that only the products you want appear in your feed, making it more relevant and optimized for your target audience.
This guide provides a step-by-step walkthrough of how to create filters using the Filter Builder interface.
Note: We have introduced the Filters Builder in the Product Feed Pro version 13.4.6. This moves the Filters creating feature to a separate tab in your feed step that was previously combined with the Filters and Rules step. It also enhances the UI/UX and expands functionality, now allowing you to easily chain multiple include/exclude filters and create conditional groupings with OR logic for more flexible filtering.
What is the Filter Builder?
The Filter Builder is a visual tool that lets you create powerful Include and Exclude rules for your product feed.
- The Include section allows you to define filters to specify which products should be included in your feed.
- The Exclude section lets you set filters to specify which products should be excluded from your feed.
Both sections support adding multiple conditions and combining them with logical operators (AND/OR) for flexible, advanced filtering.
Accessing the Filter Builder
To access the Filter Builder:
- Navigate to the feed you wish to edit or create a new one.
- Go to the Filters tab/step
Understanding the Interface
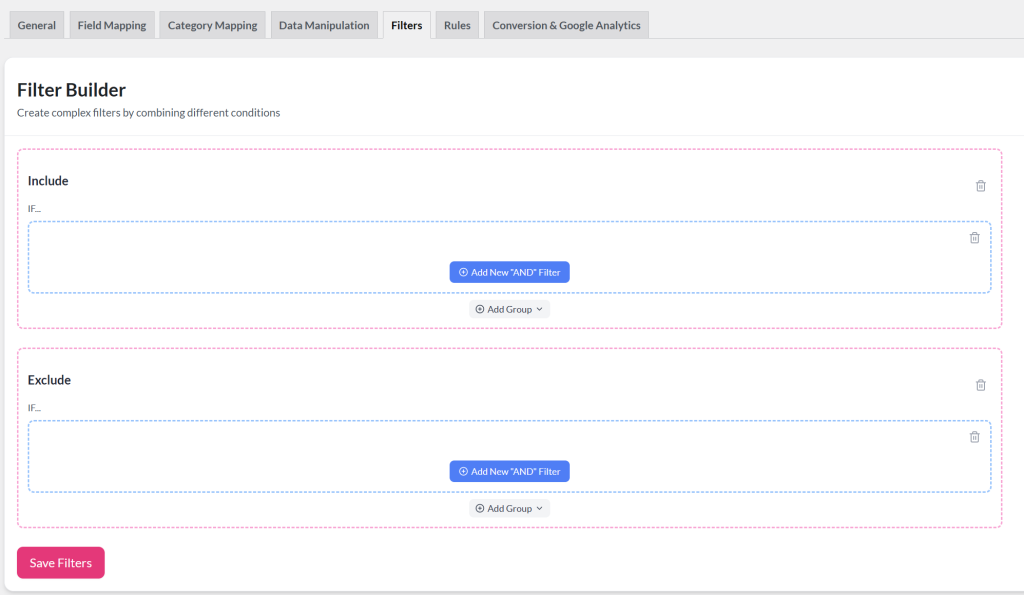
The Filter Builder interface makes it easy to build complex filter logic visually. Here’s what each element does:
- Add New “AND” Filter button: Add individual filter conditions that must all be true within the same group (logical AND).
- Add Group dropdown: Create separate groups of filters, which can be combined using logical OR. Each group can contain multiple “AND” filters, giving you full control over advanced logic like “(Condition A AND Condition B) OR (Condition C AND Condition D)”.
- Delete icons (trash can): Remove unwanted individual filters or entire groups at any time.
- Visual Layout: The Include and Exclude sections are organized into clearly labeled panels, so you can quickly find and edit your filters.
Creating Include Filters
- Under the Include section, click Add New “AND” Filter
- A new filter row will appear, typically with dropdowns for:
- Attribute (e.g., Product Price, Category, Stock Status)
- Operator (e.g., equals, contains, greater than)
- Value (e.g., 10, “Shoes”, “In Stock”)
- Select the attribute you want to filter on
- Choose an operator that matches your filtering logic
- Enter the value that products should match to be included
- To add more conditions within the same group (logical AND), click Add New “AND” Filter again.
- If you need to add a separate group of conditions (logical OR between groups), click the Add Group button and repeat steps 2-5 in the new group (according to your needs).
Example:
Include products if:
- Category equals “Summer Collection”
- AND Stock Status WooCommerce equals “instock”
This means only products in the “Summer Collection” category that are also in stock will be included.
Creating Exclude Filters
- Scroll to the Exclude section.
- Click Add New “AND” Filter to start adding conditions for products you want to remove from the feed.
- Configure the filter by selecting the attribute, operator, and value.
- Similar to the Include section, you can add multiple filters or groups to fine-tune your exclusion logic.
Example
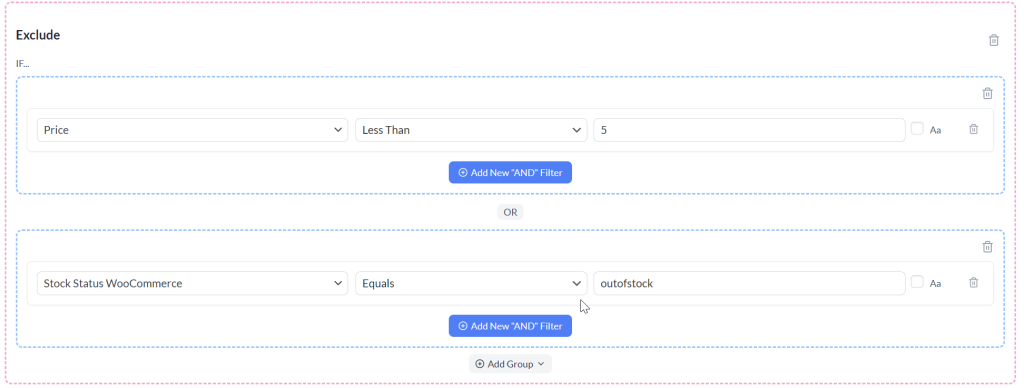
Exclude products if:
- Product Price less than 5
- OR Stock Status WooCommerce equals “outofstock”
This setup will remove cheap products under 5 currency units and any out-of-stock items.
Tips for Building Effective Filters
- Use Include filters to narrow your feed down to specific products you want to showcase.
- Use Exclude filters to weed out unwanted products, like discontinued items or those not relevant to a specific campaign.
- Combine filters and groups carefully:
- Filters within a group use AND logic.
- Multiple groups use OR logic.
- Test your filters on a small product feed first to ensure they behave as expected.
Saving Your Filters
Once you’ve configured all your filters:
- Review the Include and Exclude sections for accuracy.
- Click the Save Filters button at the bottom of the Filter Builder.
- Generate or update your feed to apply the new filter rules.
Filter Use Cases
Explore these common scenarios to see how to create filters tailored to your needs. These guides provide step-by-step examples and practical tips:
- How to Exclude Out Of Stock Items from Product Feed?
- How To Remove Variations From Your Product Feed When They’re Out Of Stock
- How to add filters based on product creation date
- How to Add Featured Products to Your Product Feed?
- How To Exclude Hidden Products From Your Product Feed?
- How To Include Only A Couple Of Products To Your Product Feed?
- How To Create A Product Feed For One Specific Category
Need Further Assistance?
If you need any further assistance or having issue with filters, feel free to create a new ticket to reach out support team.
Please note that the ticket support system is exclusive to Product Feed ELITE users.
If you’re using only the Product Feed Pro plugin, feel free to open a new topic in the WordPress.org forum.


Comments
CS = case sensitive
IS = when creating a rule this column is filled with a dropdown so you can say. If attribute Y is (something) than attribute X IS (something)
All the best,
Joris
Comments are closed.