
If you want your WooCommerce products to show up correctly on Google Shopping, Facebook, and other channels, the plugin’s settings control how every feed is built. This guide explains each setting in Product Feed Pro and Product Feed Elite, what it does, and when to turn it on, so you can configure your store once and trust your feeds.
To learn more about the plugins themselves, see the Product Feed Pro and Product Feed Elite product pages.
The settings live in Product Feed → Settings, split across a few tabs. In Product Feed Pro you’ll see three tabs: General, System check, and Export / Import. Product Feed Elite adds an Extra fields tab after General. Most day-to-day settings are on the General tab. The System check tab is where you confirm your server is set up correctly and grab a debug log for support.
Accessing plugin settings
- Log in to your WordPress dashboard.
- Navigate to Product Feed → Settings.
- Open the General tab for the main settings.
- Open the System check tab to review server status and download a debug log, or Export / Import to move feed configurations between sites. In Product Feed Elite, the Extra fields tab also appears after General.
General settings (free)
These settings are on the General tab and are available in Product Feed Pro.
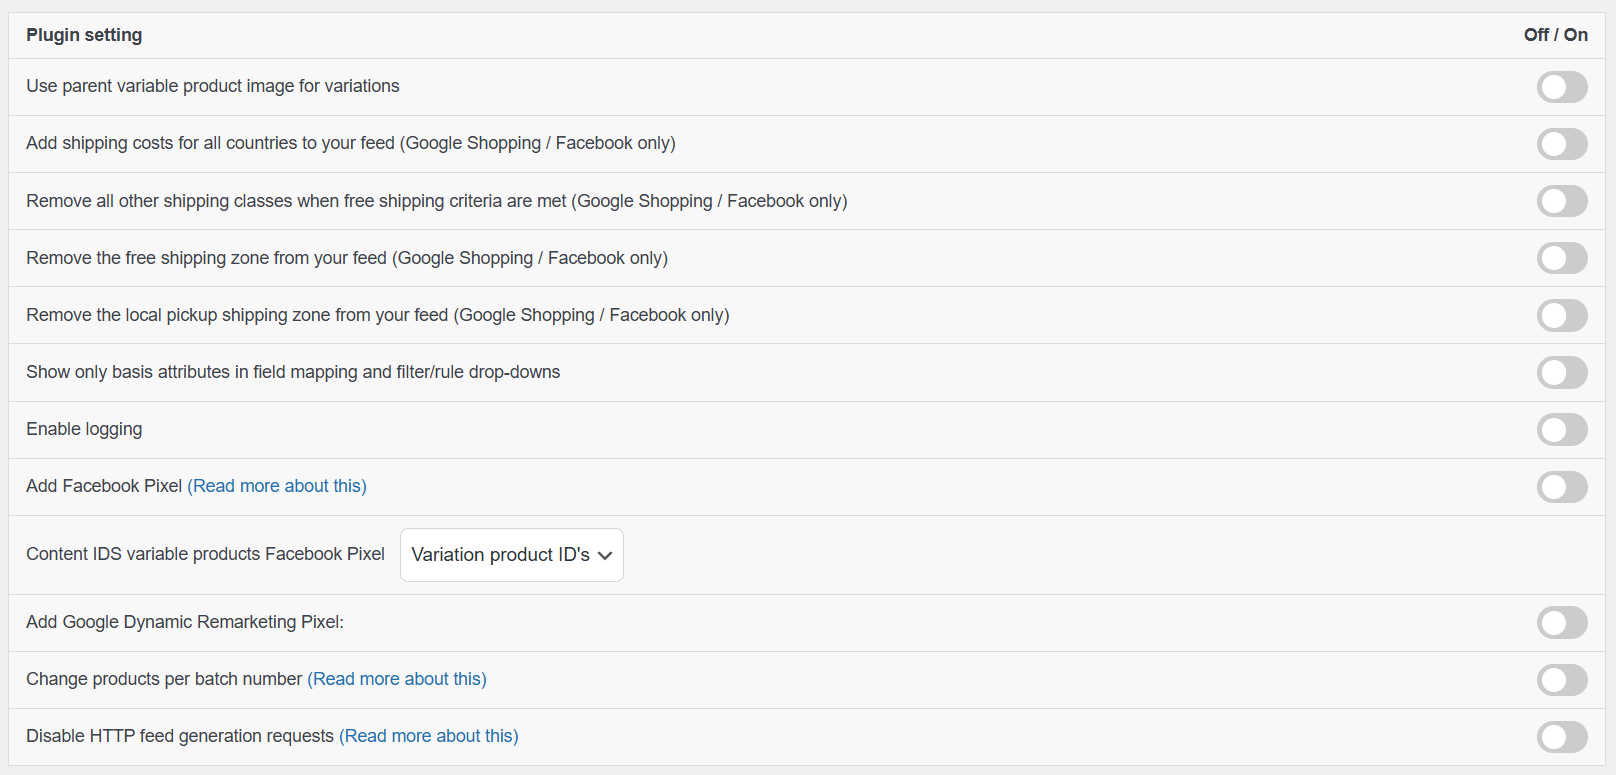
Use parent variable product image for variations
This setting replaces each variation’s image in the feed with the parent product’s main (featured) image.
Use it if variations share the same appearance or do not have individual images. Keep it disabled if each variation needs to display its own unique image in the feed.
Enforce minimum 500×500 image size on Google Shopping and Facebook Catalog feeds
Google Merchant Center and Facebook Catalog reject product images smaller than 500×500 pixels. Turn this on to keep undersized images out of those feeds so they don’t trigger disapprovals.
Enable it if your catalog has small product images and you run Google Shopping or Facebook campaigns.
Add shipping costs for all countries to your feed (Google Shopping / Facebook only)
Adds shipping methods from all shipping zones to every feed automatically.
If you only want to include all shipping methods in a specific feed, leave this disabled and enable “Include all shipping countries” in the General step while configuring that feed.
Choose this option when you want global shipping data applied across all feeds by default.
Remove all other shipping classes when free shipping criteria are met (Google Shopping / Facebook only)
If a product qualifies for free shipping, all other shipping methods are removed from the feed for that product.
This ensures only the free shipping option is submitted, avoiding conflicting or unnecessary shipping costs.
Remove the free shipping zone from your feed (Google Shopping / Facebook only)
Excludes the free shipping method from being included in the feed output.
Use this if you do not want free shipping details submitted to marketing channels or if free shipping is managed separately within the platform.
Remove the local pickup shipping zone from your feed (Google Shopping / Facebook only)
Prevents local pickup methods from being added to the feed.
This is helpful if local pickup is only available in-store and should not be advertised in external shopping feeds.
Show only basis attributes in field mapping and filter/rule drop-downs
Limits the available attributes in mapping, filters, and rules to essential fields.
This keeps the interface cleaner and easier to navigate, especially for smaller catalogs or users who do not need advanced attribute options.
Enable logging
Records feed generation activity and errors in log files.
Turn this on when troubleshooting issues, and disable it once debugging is complete to avoid unnecessary log data.
Add Facebook Pixel
Integrates the Facebook Pixel directly into your store for tracking visitor activity and conversions.
Content IDS variable products Facebook Pixel
Choose how product IDs are passed to Facebook:
- Variable product ID – Sends the main variable product ID
- Variation product ID’s – Sends each variation’s unique ID
If you sell variations separately, select Variation product ID’s to ensure accurate tracking and ad matching.
Add Google Dynamic Remarketing Pixel
Adds Google Ads dynamic remarketing tracking to your store.
Enable this if you run Google Ads remarketing campaigns and want to show personalized ads based on products users viewed or added to cart.
Change products per batch number
Defines how many products are processed in each batch during feed generation.
Increase the number if your server can handle higher loads or if feed generation is slow. Decrease it if you experience timeouts or your hosting environment has limited resources. Adjusting this setting can help balance performance and stability.
Disable HTTP feed generation requests
Stops the plugin from triggering automatic HTTP requests to generate feeds.
This should only be used if you manually generate feeds or if your hosting provider blocks or restricts external HTTP requests.
For a detailed explanation of how this works and when to use it, see What does “Disable HTTP feed generation requests” do?
Premium settings (Elite)
These settings appear on the General tab when Product Feed Elite is active.
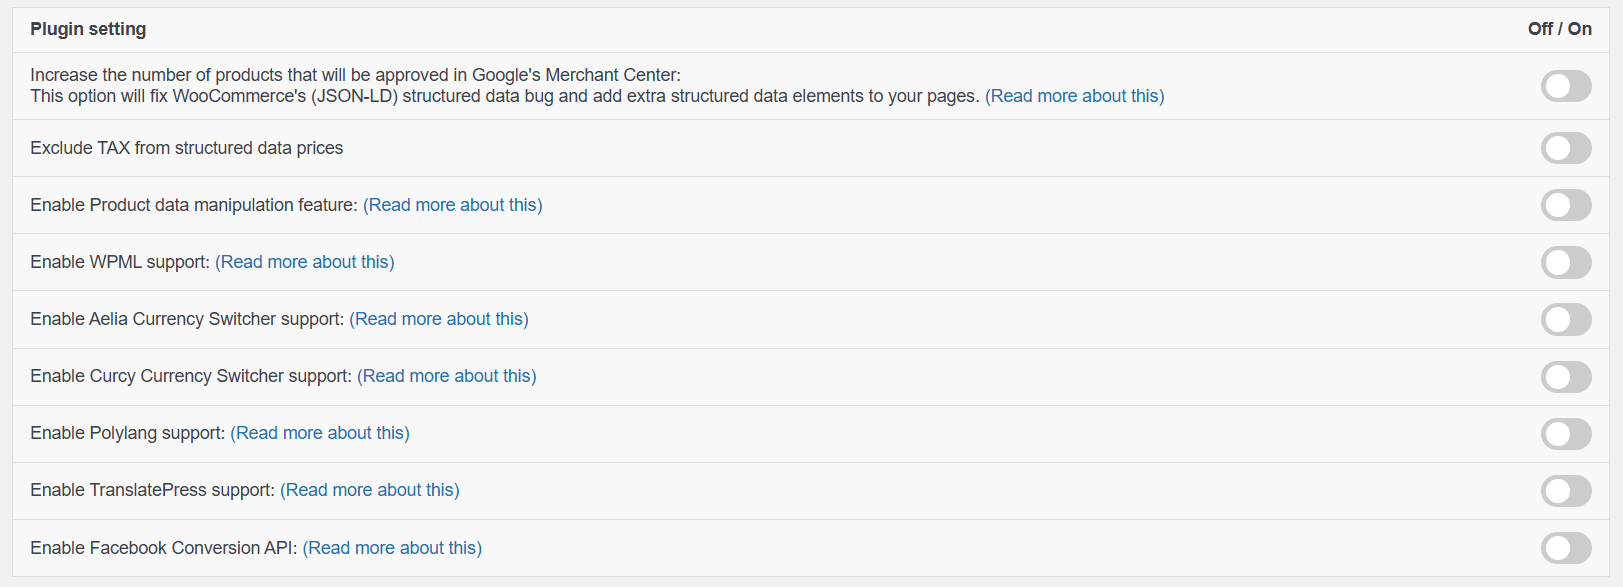
Increase the number of products that will be approved in Google’s Merchant Center
The full setting label reads: “Increase the number of products that will be approved in Google’s Merchant Center: This option will fix WooCommerce’s (JSON-LD) structured data bug and add extra structured data elements to your pages.”
Enabling it fixes known WooCommerce JSON-LD structured data issues and adds extra structured data elements to your product pages, which helps improve product approval rates. It’s recommended for stores running Google Shopping campaigns.
Learn more: The WooCommerce structured data bug.
Exclude TAX from structured data prices
Removes tax from the price shown in structured data.
Use this if your Merchant Center account requires tax-exclusive pricing or if you operate in regions where base prices must be submitted without tax.
Enable Product data manipulation feature
Unlocks advanced feed customization tools that let you modify product attributes before export, create custom rules, and dynamically adjust field values. It’s best suited for advanced feed optimization and complex requirements.
More details: Product data manipulation.
Enable Facebook Conversion API
Sends the same purchase and browsing events as Facebook Pixel directly from your server to Facebook, which improves event matching when browser-based tracking is blocked (ad blockers, iOS restrictions, cookie consent).
Enable it and paste in your Facebook Conversion API access token to start sending server-side events alongside your existing Facebook Pixel.
For the full setup walkthrough, see How to Set Up Facebook Conversion API with Product Feed Elite.
Enable Aelia Currency Switcher support
Adds compatibility with Aelia’s currency switcher so feed prices reflect the correct converted currency.
Use this if you generate feeds in multiple currencies or need currency-specific feeds for different regions.
More details: Aelia Currency Switcher support.
Enable Curcy Currency Switcher support
Ensures feed prices align with the currency selected through the Curcy currency switcher.
Enable this if Curcy manages your multi-currency pricing and you require an accurate currency-based feed output.
More details: Curcy Currency Switcher support.
Other settings
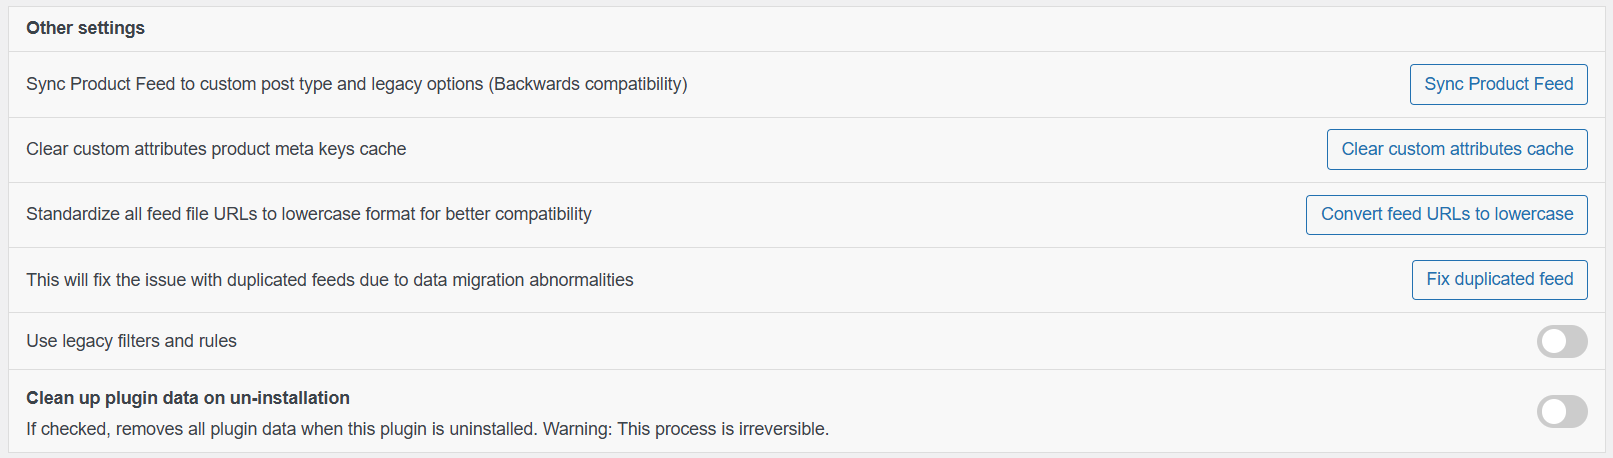
Sync Product Feed to custom post type and legacy options (Backwards compatibility)
Used to maintain compatibility with older plugin versions.
If you’ve upgraded from a previous version and notice missing or inconsistent feeds, click Sync Product Feed to migrate and align existing data with the current structure.
Clear custom attributes product meta keys cache
Clears the cached list of custom product attributes.
Use this after adding new custom fields or attributes to ensure they appear correctly in field mapping and feed configuration.
Standardize all feed file URLs to lowercase format for better compatibility
Feed URLs by default contain a mix of uppercase and lowercase characters, but on some servers, feed files are stored using lowercase filenames. This mismatch can lead to duplicate feeds or inconsistent access due to case sensitivity.
This option converts all feed URLs to lowercase to ensure consistency between the stored file name and the public URL.
Click Convert feed URLs to lowercase if you notice inconsistent URL behavior.
Regenerate Action Schedulers
Re-creates the scheduled feed refresh tasks for all active feeds, including custom refresh interval feeds on Product Feed Elite.
Use this if automatic feed refreshes have stopped running, for example, after a server migration, a plugin conflict, or an Action Scheduler cleanup. It does not change any feed data or configuration, and it’s safe to click more than once: it re-registers each feed’s refresh schedule rather than adding a duplicate one.
Click Regenerate Action Schedulers and confirm the prompt. A confirmation message reports how many active feeds had their refresh schedule re-created.
Fix duplicated feed
In some cases, the system may generate empty or duplicate feeds, as shown in the screenshot below.
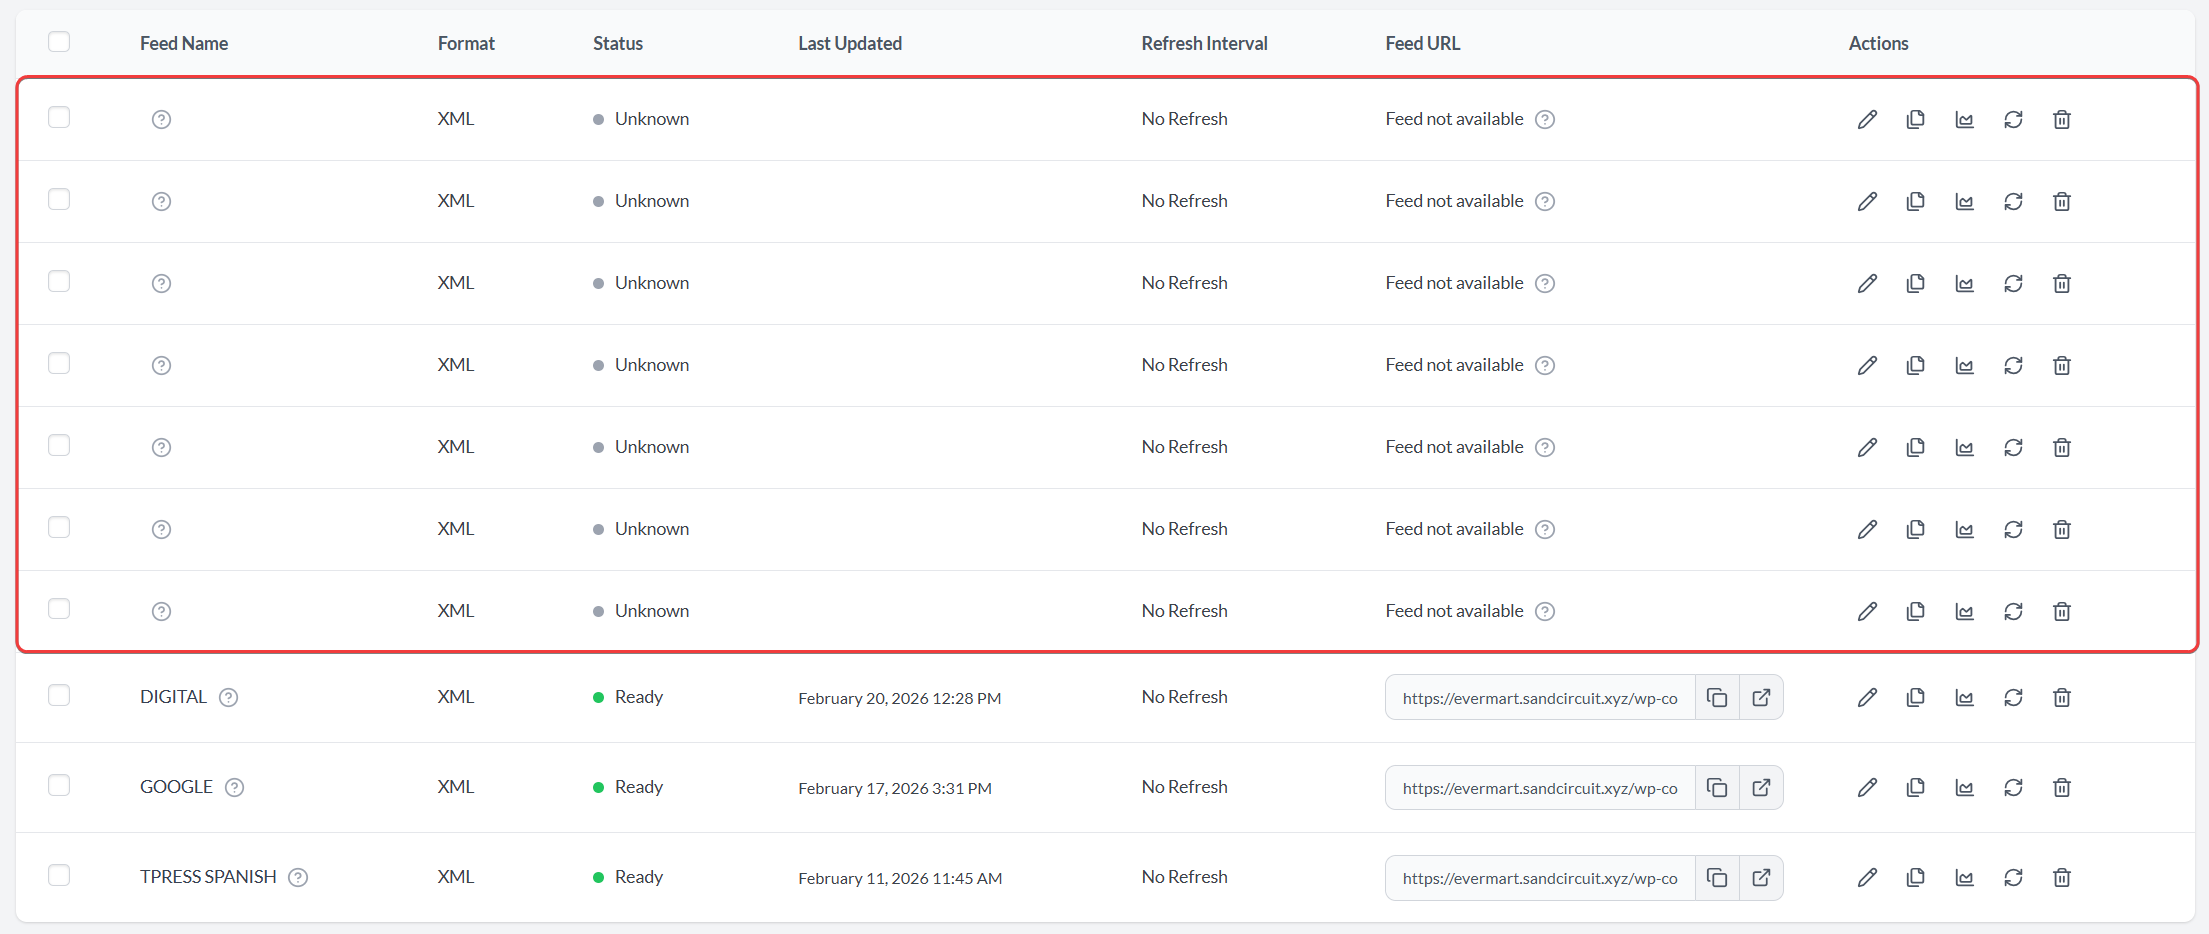
If you notice multiple feeds with no data or a “Feed not available” status, you can quickly remove them.
To clean them up, click the Fix duplicated feed button. This will automatically remove the empty or duplicated entries and keep only the valid feeds.
Use legacy filters and rules
Switches the feed editor back to the older filters and rules interface used by previous plugin versions.
Only enable this if you relied on the legacy filters and rules layout and need it back. New stores should leave it disabled and use the current filters and rules.
Clean up plugin data on un-installation
Removes all plugin-related data from your database when the plugin is uninstalled. Enable this only if you want a complete removal with no leftover settings or feed data. This action cannot be undone, so leave it off unless you’re sure.
System check tab
The System check tab confirms your server is set up correctly for generating feeds and gives you a debug log to share with support. Open it from Product Feed → Settings → System check.
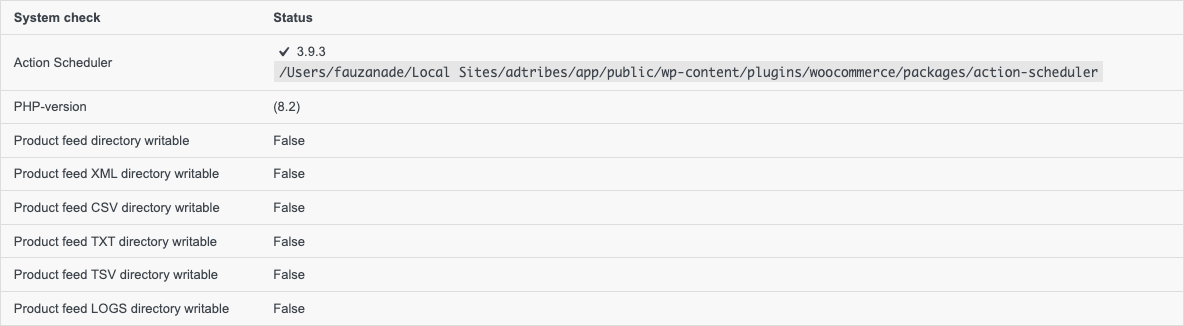
At the top, a System check table lists each requirement and its status, including the Action Scheduler version, your PHP version, and whether each feed directory (XML, CSV, TXT, TSV, and LOGS) is writable. If anything shows a warning or a False status, that’s usually what’s blocking your feeds from generating.
System Report
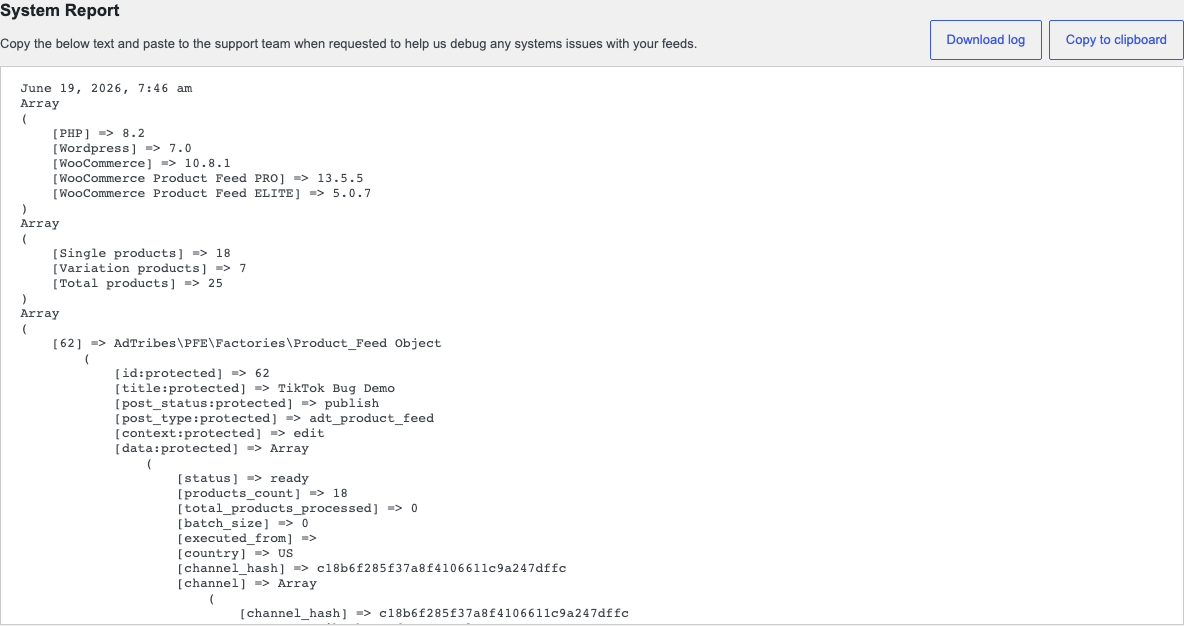
Below the status table is the System Report section. This is a block of diagnostic text the support team uses to debug feed issues on your store. Two buttons sit at the top of this section:
- Copy to clipboard – copies the full system report so you can paste it into a support message.
- Download log – saves the same system report as a file you can attach to a support ticket. Use this when the report is too long to paste comfortably or when support asks for the log as an attachment.
When you contact support about a feed problem, copy or download this report and include it. It tells us your plugin, WordPress, WooCommerce, and PHP versions, plus your product counts and directory permissions, which is usually enough to spot the cause quickly.
Need help?
If you still have questions about any of these settings, we’re happy to help.
- Premium customers can reach our team through the priority support page.
- Free plugin users can post on the WordPress.org community forum.