
Je WooCommerce-catalogus op Idealo, de grootste prijsvergelijkingssite van Duitsland, krijgen betekent meestal dat je handmatig een spreadsheet vol verzend- en betalingskosten moet nabouwen, en deze vervolgens up-to-date moet houden telkens als een prijs verandert. Het Idealo-kanaal in Product Feed Pro genereert de CSV-feed die Idealo verwacht, compleet met alle kolommen voor verzend- en betalingskosten waar de importeur van Idealo naar zoekt, zodat je deze niet telkens opnieuw hoeft te bouwen als je catalogus verandert.
Vereisten
Voordat je je Idealo-feed instelt, zorg ervoor dat je hebt:
| Vereiste | Details |
|---|---|
| Plugin | Product Feed Pro 13.5.8 of hoger. Idealo-ondersteuning vereist geen Product Feed Elite. |
| Feed land | Het Land van je feed moet ingesteld zijn op Duitsland. Het volledige veld-template van Idealo verschijnt alleen wanneer Land Duitsland is. |
| WooCommerce winkel | Producten moeten gepubliceerd zijn en voorraad, prijs en een EAN of GTIN hebben ingesteld |
| Productidentificatoren | Elk product heeft een geldige EAN of GTIN nodig. Idealo gebruikt dit, samen met je merk en titel, om je aanbieding te matchen met zijn catalogus |
| Idealo partneraccount | Een actief Idealo partneraccount is vereist. Idealo heeft geen zelfbedienings-uploadscherm. Je stuurt je feed-URL naar Idealo, en het team van Idealo koppelt deze aan hun kant |
Hoe maak je een Idealo-productfeed
Stap 1: Open de instellingenpagina van de feed
Ga in de zijbalk van uw WordPress-beheer naar Product Feed → Feed maken.
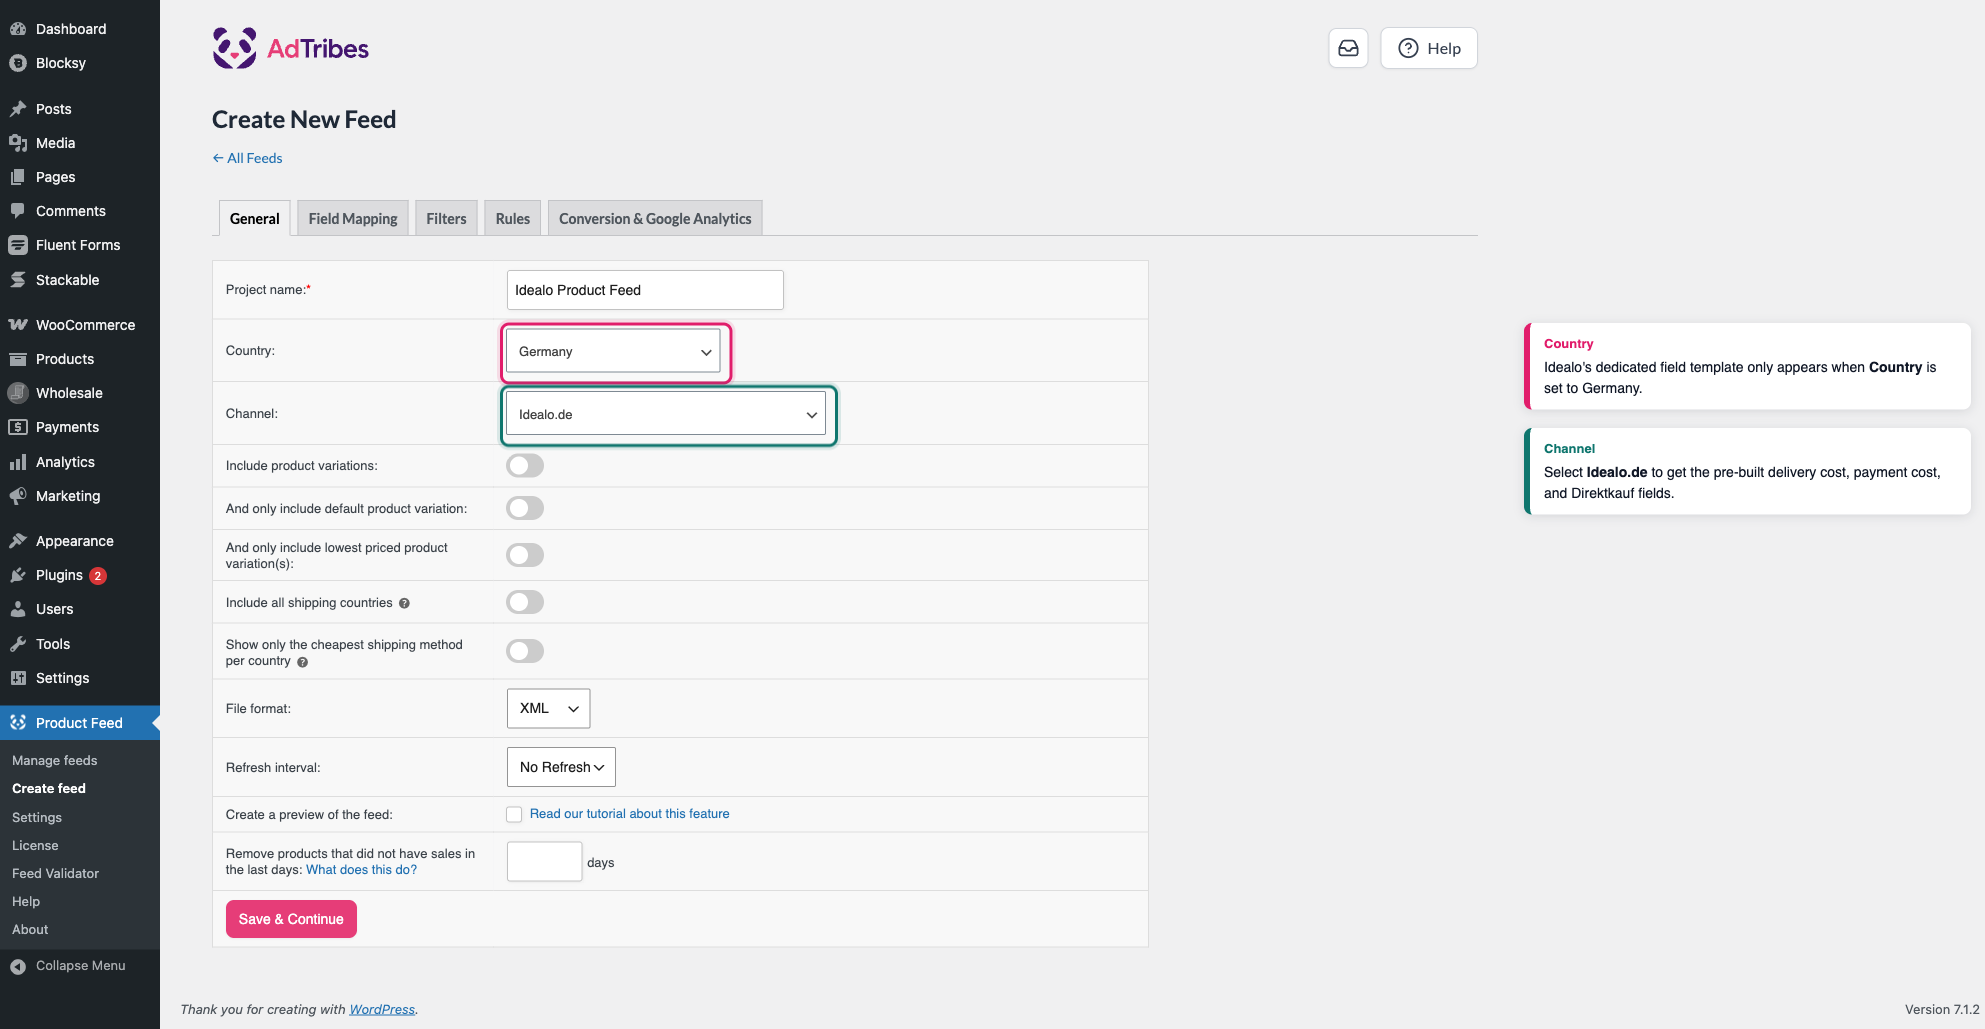
Stap 2: Geef je feed een naam en selecteer Duitsland als land
Op het tabblad Algemeen:
- Voer een naam in voor je feed in het veld Projectnaam, bijvoorbeeld
Idealo Product Feed. - Open de dropdown Land en selecteer Duitsland.
Stap 3: Selecteer het Idealo-kanaal
- Open de dropdown Kanaal en selecteer Idealo.de.
- Selecteer in de dropdown Bestandsformaat CSV. De eigen feed-importeur van Idealo is gebouwd rond een door komma's gescheiden bestand, dus CSV is de veiligste keuze, tenzij je Idealo accountmanager je heeft verteld een ander formaat te gebruiken. De dropdown biedt ook XML, TXT, TSV en JSONL.
- Klik op Opslaan & Doorgaan om naar het tabblad Veldtoewijzing te gaan.
Stap 4: Map de vereiste Idealo.de-attributen
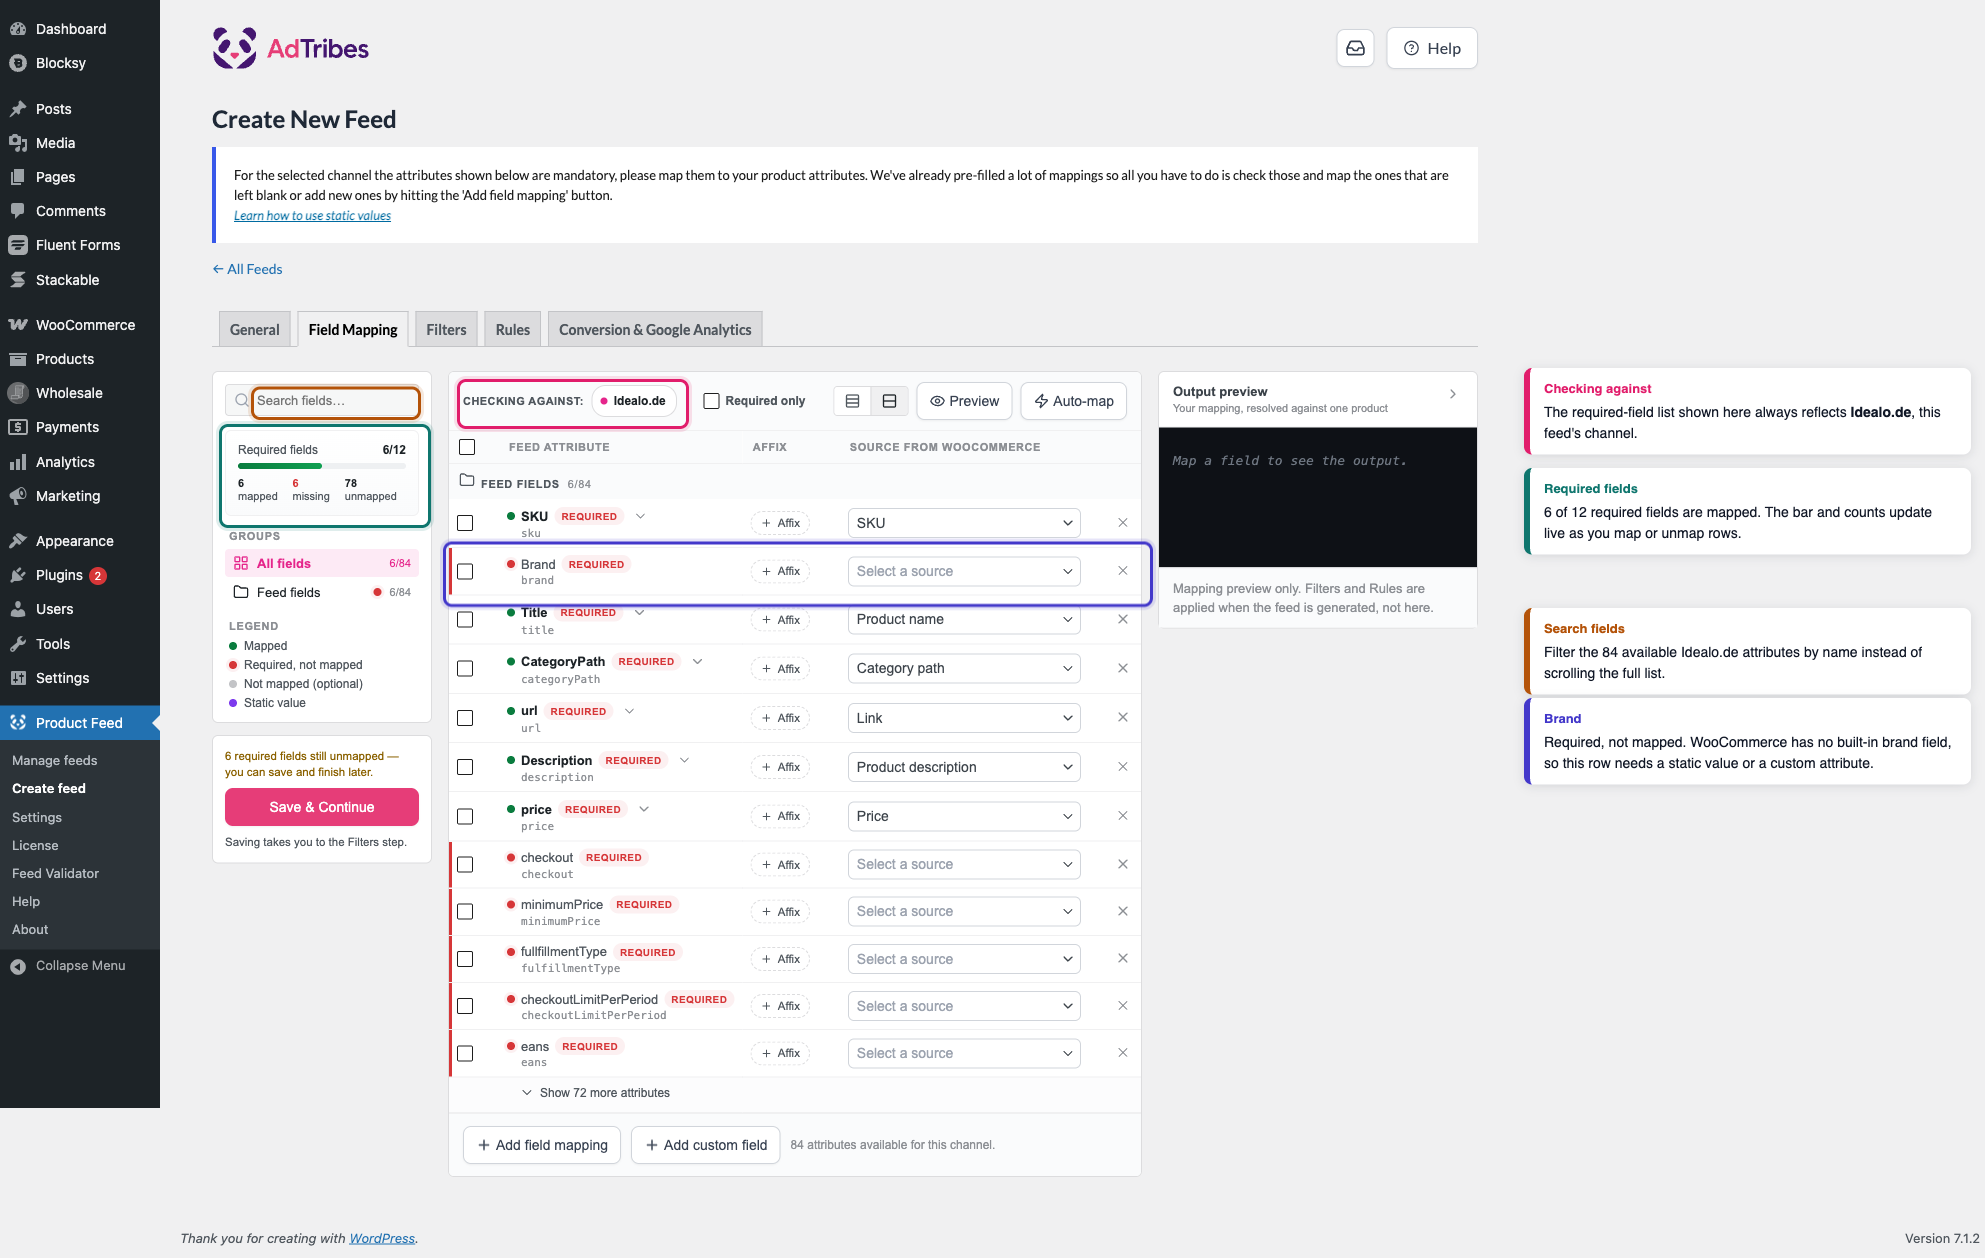
De Controleren tegen badge bovenaan het tabblad Veldtoewijzing bevestigt dat u toewijst tegen de vereisten van Idealo.de. Het paneel Vereiste velden aan de linkerkant volgt uw voortgang (Product Feed Pro vult automatisch verschillende rijen voor), en het vak Zoekvelden erboven filtert de beschikbare attributen van het kanaal op naam.
De tabel toont aan de linkerkant elk Feedattribuut, een optionele Toevoeging om een voor- of achtervoegsel toe te voegen aan de toegewezen waarde, en de kolom Bron uit WooCommerce waar u elk veld toewijst. Bevestig elke vooraf ingevulde rij en vul de rijen gemarkeerd als Vereist met een rode stip voordat u opslaat.
| Idealo.de attribuut | Vooraf ingevuld met | Toewijzen aan | Opmerkingen |
|---|---|---|---|
| SKU | SKU | SKU | Bevestig dat uw WooCommerce-producten een SKU hebben ingesteld |
| Merk | (geen standaardwaarde) | Een statische waarde, of een aangepast attribuut | WooCommerce heeft geen ingebouwd merkveld, dus voer uw merknaam direct in, of wijs toe aan welk aangepast attribuut of pluginveld het ook opslaat |
| Titel | Productnaam | Productnaam | Bevestig dat dit is toegewezen aan uw producttitel |
| CategoryPath | Categoriepad | Categorie pad, of uw eigen categorystructuur | Verzonden naar Idealo als platte tekst, bijvoorbeeld Kleding, Schoenen & Accessoires > Herenkleding > Shorts. Vermijd merknamen, modelnummers of vage termen zoals "korting" in dit veld |
| url | Koppeling | Koppeling | De productpagina waarop shoppers vanaf Idealo terechtkomen |
| Beschrijving | Productbeschrijving | Productbeschrijving | Idealo accepteert hier tot 1000 tekens. Langere beschrijvingen worden afgekapt |
| prijs | Prijs | Prijs | Houd dit toegewezen aan Prijs in plaats van Normale prijs, zodat Idealo uw huidige verkoopprijs toont als een product in de uitverkoop is |
| eans | (geen standaardwaarde) | Globaal uniek id, als het verschijnt in de dropdown Bron uit WooCommerce | Als u WooCommerce's eigen veld GTIN, UPC, EAN of ISBN hebt ingevuld (Productgegevens → Voorraad, WooCommerce 9.2+) op ten minste één product, verschijnt het in de dropdown als een aangepast attribuut met het label Globaal uniek id. Wijs deze rij toe aan dat, of aan welk aangepast attribuut of pluginveld op uw producten de EAN van elk product opslaat. Idealo heeft een geldige EAN nodig om uw aanbieding te matchen met een bestaande catalogusvermelding |
Voor instructies over het toewijzen van velden, het gebruik van statische waarden of het schrijven van aangepaste attribuutlogica, zie Hoe voeg ik een vaste waarde toe aan mijn productfeed?.
Stap 5: Bezorg- en betalingskosten instellen
Idealo heeft minimaal één bezorgkosten en minimaal één betalingskosten in elke feed nodig, zodat het shoppers uw goedkoopste verzend- en betalingsopties kan tonen. Deze rijen zijn niet vereist, dus ze zijn standaard ingeklapt. Typ "bezorging" of een transportnaam in het vak Zoekvelden, of klik op de link Toon 72 meer attributen onderaan de tabel (het aantal op een nieuwe Idealo.de feed), om ze te vinden.
Wijs ten minste één leveringskostenrij toe aan een statische waarde uit uw verzendprijslijst. De beschikbare vervoerders zijn onder andere Deutsche Post, DHL, DHL Go Green, DPD, FedEx, GLS, GLS Think Green, Hermes, UPS, TNT, Trans-o-flex, Spedition (expediteur), Pick point, German express logistics en Download (voor digitale producten). Als een vervoerder niets in rekening brengt, voer dan 0,00 in in plaats van de rij leeg te laten.
Doe hetzelfde voor ten minste één betalingskostenrij. De beschikbare methoden zijn onder andere Creditcard, PayPal, Rembours, Vooruitbetaling, Automatische incasso, Giropay, Factuur, Postwissel, Paysafecard, Sofortüberweisung, Google Checkout, Amazon Payment, Electronical payment standard en Ecotax. Voer 0,00 in voor elke methode die geen extra kosten met zich meebrengt.
Stap 6: Stel de Direktkauf-afrekenvelden in
Met Idealo's Direktkauf-functie kunnen shoppers rechtstreeks via Idealo's eigen afrekenpagina kopen in plaats van uw winkel te bezoeken. Product Feed Pro markeert vier gerelateerde velden als vereist, hoewel ze alleen van belang zijn als u zich heeft ingeschreven voor Direktkauf bij Idealo:
- checkout: of dit product direct te koop is. Als u zich niet heeft ingeschreven voor Direktkauf, wijs dit dan toe aan een statische waarde van
false. - fullfillmentType (weergegeven met de sleutel
fulfillmentTypeeronder): hoe u de bestelling afhandelt, bijvoorbeeld pakketdienst of expediteur. Laat dit op een statische waarde staan die overeenkomt met hoe u verzendt, zelfs als Direktkauf niet actief is. - checkoutLimitPerPeriod: de maximale hoeveelheid die Idealo per dag via Direktkauf kan verkopen. Als Direktkauf niet actief is, is een statische waarde van
0een veilige standaardwaarde. - minimumPrice: de laagste prijs die Idealo via Direktkauf kan aanbieden, als u Idealo toestaat de prijzen binnen een bepaald bereik aan te passen.
Stap 7: Pas filters en regels toe (optioneel)
Gebruik het tabblad Filters om producten uit te sluiten die u niet in de Idealo-feed wilt hebben, bijvoorbeeld producten zonder EAN of met een voorraadniveau onder een minimum. Gebruik het tabblad Regels om waarden te transformeren voordat ze in de feed verschijnen, zoals het afronden van uw verzendkosten om te voldoen aan het verwachte formaat van Idealo. Zie voor gedetailleerde instructies Hoe maak je filters voor je productfeed? en Hoe maak je productfeedregels aan.
Stap 8: Genereer de feed
Klik op Opslaan & Doorgaan om door de resterende tabbladen te gaan. Klik op het tabblad Conversie & Google Analytics op Productfeed genereren om de feedgeneratie te starten. Product Feed Pro verwerkt uw WooCommerce-catalogus en produceert het CSV-bestand.
Zodra de feed klaar is met verwerken, kopieert u de feed-URL van de pagina Beheer feeds.
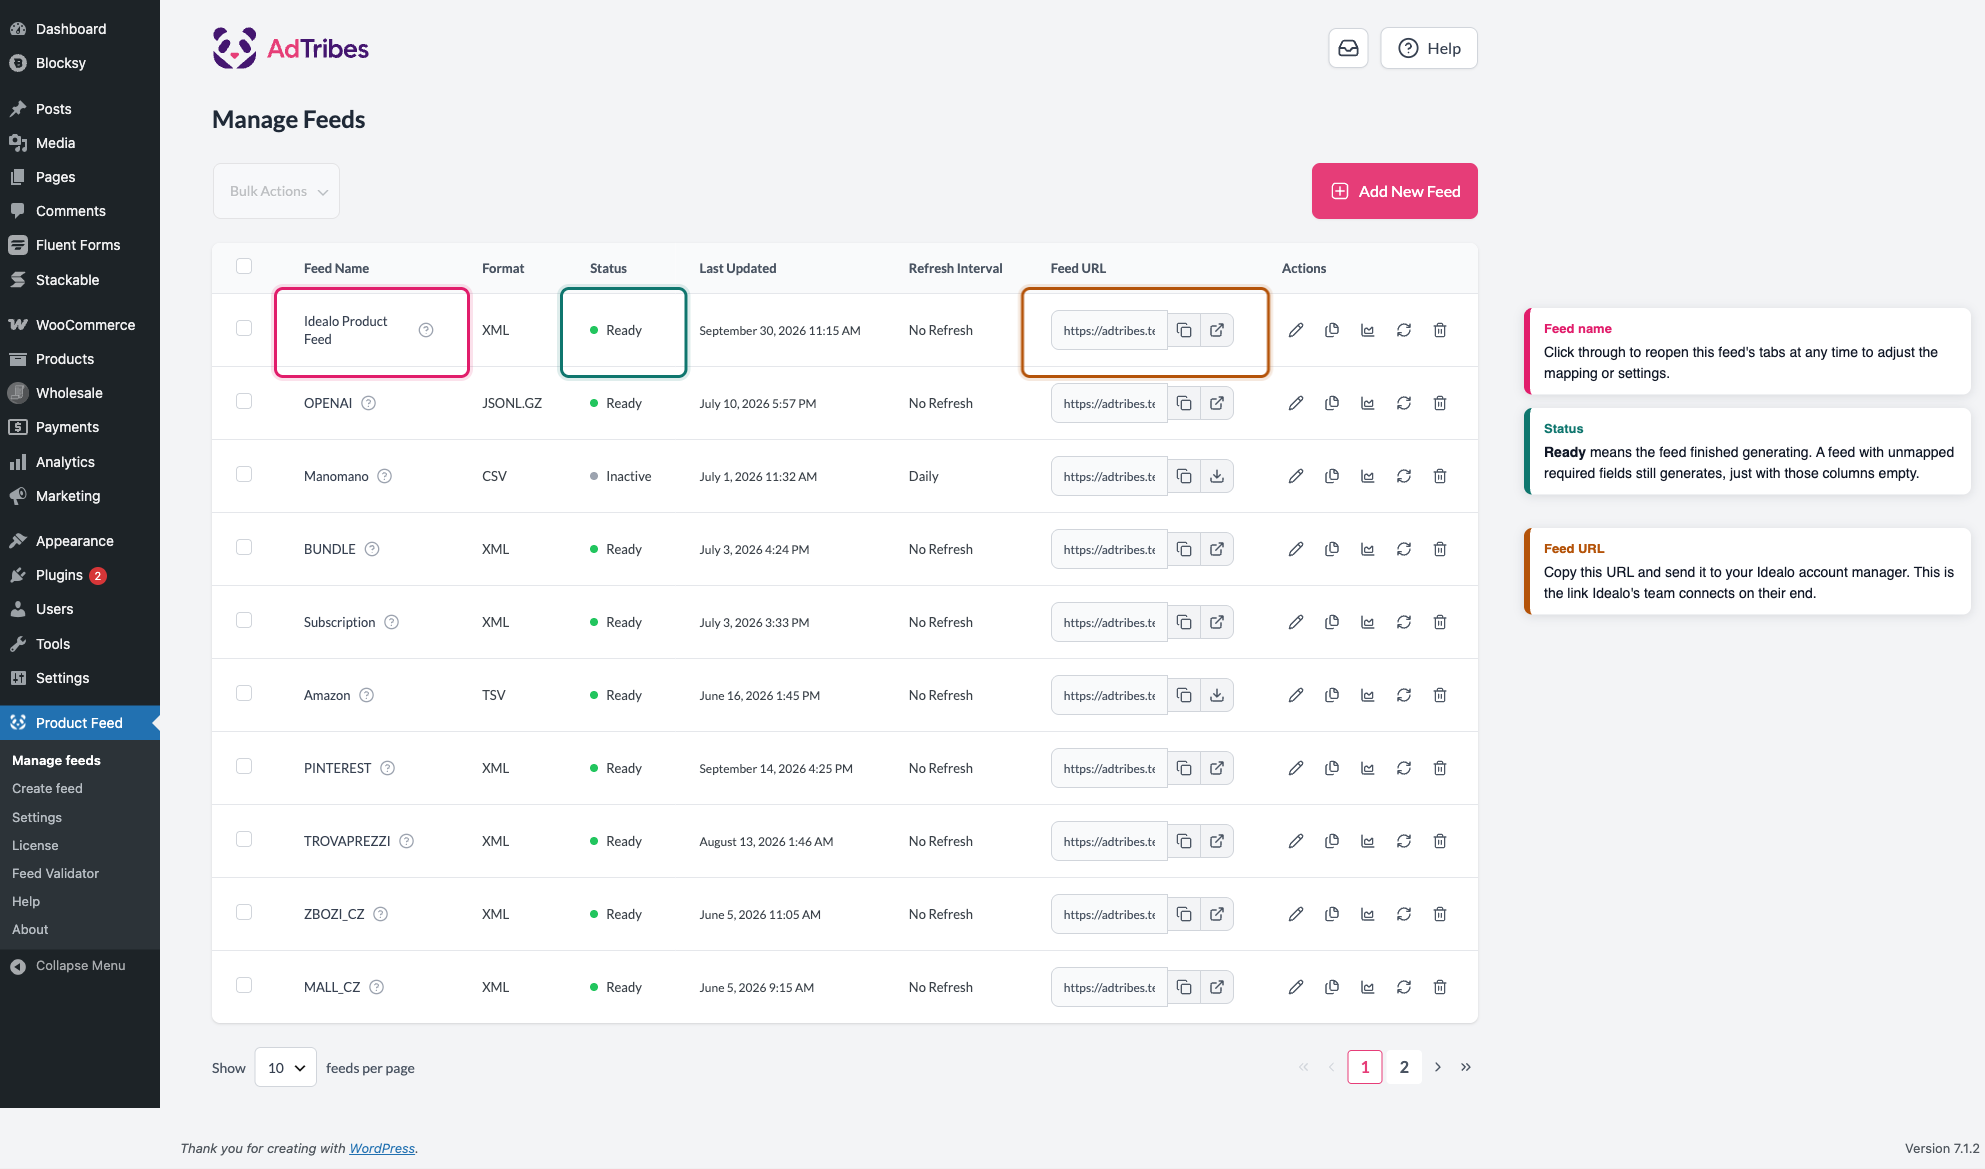
Stap 9: Stuur de feed-URL naar Idealo
Idealo biedt geen self-service uploadformulier zoals sommige andere kanalen. In plaats daarvan:
- Log in op uw Idealo-partneraccount, of neem contact op met uw Idealo-accountmanager als u nog geen portaltoegang heeft.
- Stuur hen de feed-URL die u in Stap 8 hebt gekopieerd.
- Het team van Idealo koppelt de feed aan hun kant en haalt deze in de toekomst op volgens hun eigen schema.
- Vraag uw Idealo-contactpersoon om het resultaat van de eerste import te bevestigen, zodat u afgewezen rijen kunt corrigeren voordat de feed live gaat.
Probleemoplossing
0,00 voor gratis opties, in plaats van de rij niet toegewezen te laten.*.local, localhost, of vergelijkbaar), kan Idealo deze niet bereiken.Veelgestelde vragen
Meer hulp nodig?
Als u Product Feed Elite gebruikt en hulp nodig heeft bij het instellen van uw Idealo-feed, opent u een ondersteuningsticket vanuit uw account.
Als je Product Feed Pro gebruikt, plaats je vraag dan in het WordPress.org supportforum.