
Selling on Bol.com, the Netherlands and Belgium marketplace, alongside your WooCommerce store means keeping your offer data (stock, price, and condition) in sync across two platforms by hand, which gets error-prone fast once your catalog grows. The Bol.com channel in Product Feed Pro generates a CSV or TXT offer file with the exact columns Bol.com expects, so you can upload it to your Partnerplatform account without manually rebuilding a spreadsheet every time your inventory changes.
Prerequisites
Before you set up your Bol.com feed, make sure you have:
| Requirement | Details |
|---|---|
| Plugin | Product Feed Pro 13.5.8 or later. The Bol.com channel doesn’t require Product Feed Elite. |
| Feed country | Your feed’s Country must be set to Netherlands or Belgium. Bol.com doesn’t appear in the Channel dropdown for any other country. |
| WooCommerce store | Products must be published and have stock, price, and an EAN or ISBN set |
| Bol.com Partnerplatform account | An active seller account is required to upload the generated file |
| Product identifiers | Each product needs a valid 13-digit EAN or ISBN. Bol.com uses this to match your offer to an existing catalog listing |
How to create a Bol.com product feed
Step 1: Open the feed setup page
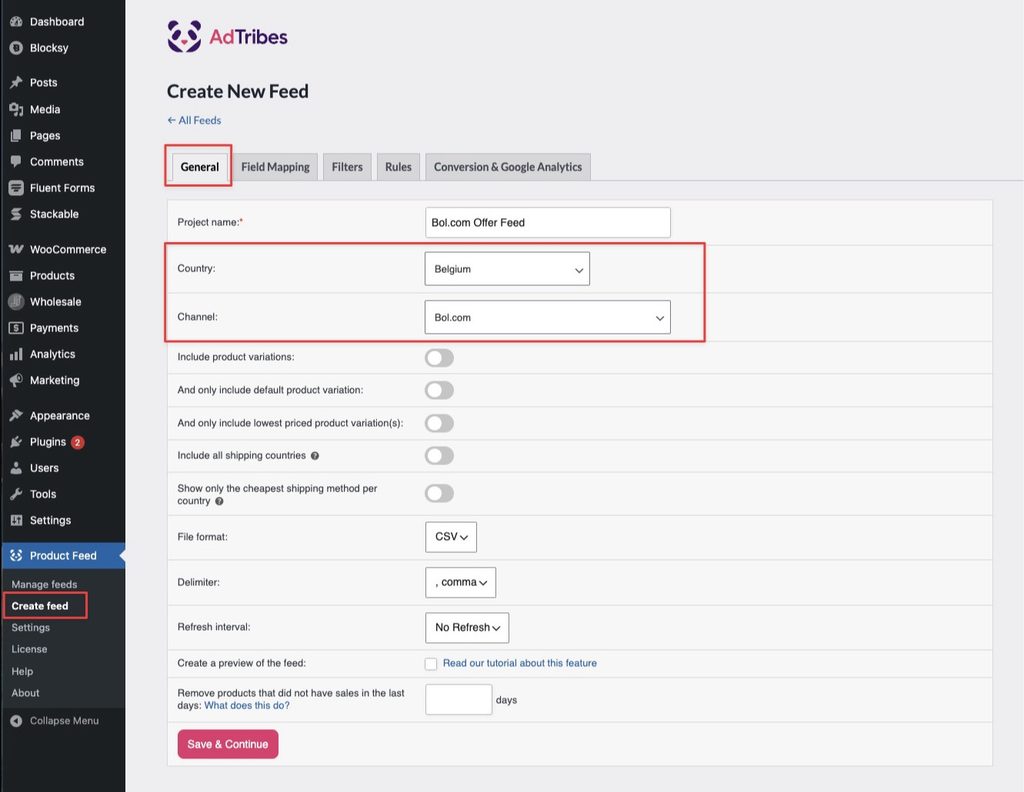
In your WordPress admin sidebar, go to Product Feed → Create feed.
Step 2: Name your feed and select your country
On the General tab:
- Enter a name for your feed in the Project name field, for example
Bol.com Offer Feed. - Open the Country dropdown and select Netherlands or Belgium.
Step 3: Select the Bol.com channel
- Open the Channel dropdown and select Bol.com.
- In the File format dropdown, select CSV. The dropdown also offers TXT. Either works for Bol.com’s offer file, but CSV is the more common choice.
- Click Save & Continue to move to the Field Mapping tab.
Step 4: Map the Bol.com fields
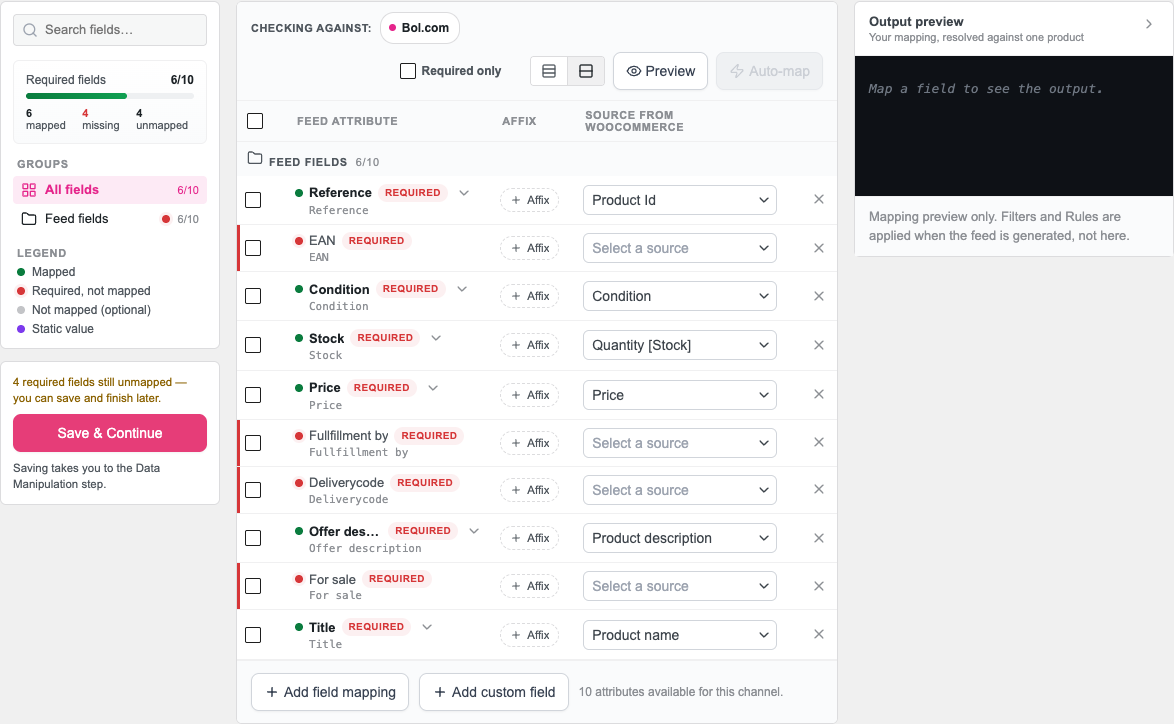
On the Field Mapping tab, the Feed attribute column lists the fields Product Feed Pro maps for the Bol.com channel, Affix lets you add a prefix or suffix, and the Source from WooCommerce column is where you map each field. Confirm each row before saving.
| Bol.com attribute | Pre-filled with | Map to | Notes |
|---|---|---|---|
| Reference | Product Id | Product Id, or your SKU | Your own internal reference for the offer. The WooCommerce internal product ID works fine here, or map it to your SKU instead. |
| EAN | (no default) | Global unique id, if it appears in the Value dropdown | If you’ve filled in WooCommerce’s own GTIN, UPC, EAN, or ISBN field (Product data → Inventory, WooCommerce 9.2+) on at least one product, it appears in the dropdown as a custom attribute labeled Global unique id. Map this row to that. If it doesn’t appear, fill in WooCommerce’s native field, or map to whichever custom attribute or plugin field on your products stores each product’s 13-digit EAN or ISBN. Bol.com rejects offers with an invalid or missing EAN. |
| Condition | Condition | Condition for new items, a static value for secondhand items | Defaults to new unless a product sets its own condition, so leave this mapped for new products. For secondhand items, override it with a static value. Check the instructions tab of your current Bol.com offer file template for the exact accepted values for secondhand conditions. |
| Stock | Quantity [Stock] | Quantity [Stock] | Bol.com expects a stock count here, so leave this mapped to Quantity [Stock]. Enable Manage stock on the product so a quantity is actually available to send; otherwise this column comes through empty. |
| Price | Price | Price | Bol.com expects your selling price here. If you run sales, keep this mapped to the WooCommerce Price field so the current active price is sent. |
| Fullfillment by | (no default) | A static value | Tells Bol.com whether you ship orders yourself or Bol.com fulfils them from its own warehouse. WooCommerce has no field for this, so enter the static value your current Bol.com offer file template’s instructions tab specifies for each option. |
| Deliverycode | (no default) | A static value, or a custom attribute | Tells Bol.com the item’s delivery time. WooCommerce has no field for this either, so enter a static value or map it to a custom attribute that holds your delivery time. |
| Offer description | Product description | Product description | Maps to the full WooCommerce product description. Bol.com only displays this for secondhand items, describing the item’s condition in more detail. |
| For sale | (no default) | A static value, or a WooCommerce field | Enter the static value your current Bol.com offer file template’s instructions tab specifies, or map it to a WooCommerce field that always resolves to an available offer. |
| Title | Product name | Product name | Only used when Bol.com doesn’t already have a catalog listing for your EAN. Bol.com uses this to help create a new listing. |
For instructions on mapping fields, using static values, or writing custom attribute logic, see How To Add Fixed Value To Your Product Feed?.
Step 5: Apply filters and rules (optional)
Use the Filters tab to exclude products you don’t want in the Bol.com feed, for example products without an EAN or below a minimum stock level. Use the Rules tab to transform values before they appear in the feed, such as prepending a prefix to your Reference values so they stay unique across channels. For detailed instructions, see How To Create Filters For Your Product Feed? and How to Create Product Feed Rules.
Step 6: Generate the feed
Click Save & Continue to progress through the Filters and Rules tabs. On the Conversion & Google Analytics tab, click Generate Product Feed to start feed generation. Product Feed Pro processes your WooCommerce catalog and produces the CSV or TXT offer file.
Once the feed finishes processing, copy the feed URL from the Manage Feeds page. You’ll use this URL to get the file into your Bol.com account.

Step 7: Upload the offer file to Bol.com
- Log in to your account at partnerplatform.bol.com.
- Go to Items → Manage offers via Excel.
- Open the feed URL from Step 6 in your browser and save the file to your computer.
- Open the downloaded file and save it as
.xlsxif Bol.com’s upload form requires that format. - Upload the file using the form on that page.
- Bol.com processes the file and shows you a status report with any rows that failed and why.
If your account has an automated offer feed connection set up with Bol.com instead (typically arranged with your account manager for larger catalogs), you can point that connection at the feed URL from Step 6 rather than uploading manually each time.
Troubleshooting
New or one of Bol.com’s secondhand values.*.local, localhost, or similar), Bol.com won’t be able to reach it.FAQ
Need more help?
If you’re using Product Feed Elite and need hands-on help with your Bol.com feed setup, open a support ticket from your account.
If you’re on Product Feed Pro, post your question in the WordPress.org support forum.