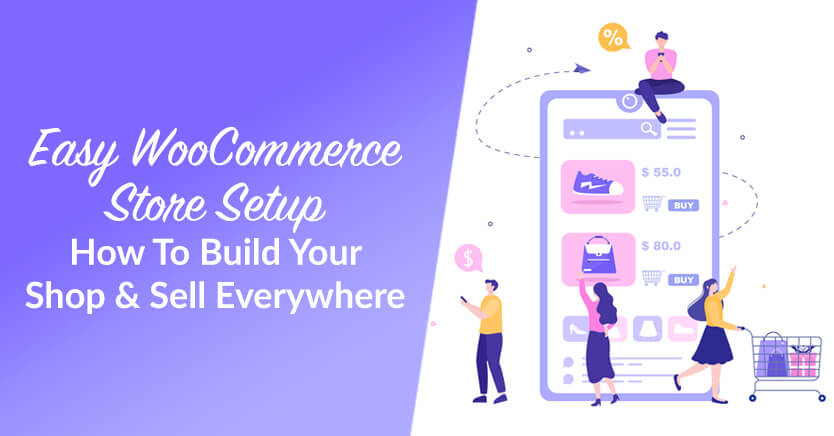
The WooCommerce store setup is one of the first steps to selling online through your own website. It gives store owners full control over how their products are displayed, sold, and delivered.
But the setup isn’t just about launching a basic shop. These days, most sellers also want their products to appear in other places, like Google Shopping, Meta, Pinterest, and TikTok. A good WooCommerce setup helps make that happen without extra work.
For these reasons, this article will walk you through the WooCommerce store setup from scratch. It will also explain how to connect that store to other sales channels using product feeds.
So let’s get right on it!
Table Of Contents
What You Need Before Starting
WooCommerce is a plugin that turns any WordPress website into a working online store. It’s what gives your site the power to handle products, payments, and orders.
Before starting your WooCommerce store setup, it helps to get the groundwork ready. Like prepping ingredients before cooking, a few basics need to be on the table.
These don’t take long to gather. But having them in place saves time and avoids stress later on.
- Hosting and domain name: Your store needs a place to live and a name to go by. Hosting is where your website runs, and your domain is the address people type in. Go for a host that works well with WordPress and can handle online stores.
- WordPress installed: WooCommerce is a plugin for WordPress. So WordPress must be up and running first. Most hosts offer quick WordPress installs with just a few clicks.
- Business basics: Before selling, sort out your store’s name, tax setup, and shipping details. These will show up on invoices and checkout pages. It also helps to know your local tax rules and which countries you’ll ship to.
- Product info ready: Get your product details in order. That means names, prices, images, descriptions, categories, and stock levels. Even if you only have a few items, this step makes the WooCommerce store setup much smoother.
Having these ready makes it faster and easier to set up WooCommerce and build an online store.
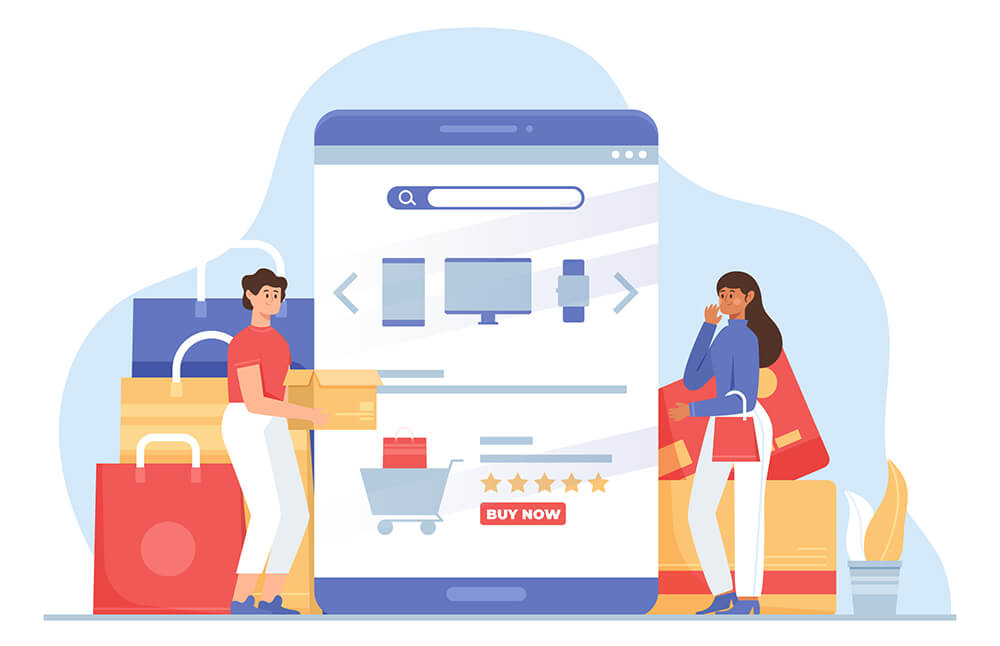
How To Set Up Your WooCommerce Store
The WooCommerce store setup doesn’t need to be overwhelming. Once WordPress is ready, WooCommerce turns it into an online store. Most of the work happens in just a few clicks.
These are the basics to help you launch your store:
1. Install the WooCommerce plugin
Installing WooCommerce is the first step that turns your WordPress site into an online store. Here’s how to do it
- Log in to your WordPress admin dashboard.
- In the left-hand menu, go to Plugins > Add New.
- Use the search bar to look for “WooCommerce.”
- Click the Install Now button on the WooCommerce plugin card.
- Once installed, click Activate to enable the plugin on your site.
Activating WooCommerce adds ecommerce functionality to your site. It also automatically creates key pages like Shop, Cart, and Checkout.
2. Go through the setup wizard
Right after you activate the plugin, the WooCommerce setup wizard will pop up. It helps you set the foundation for your store.
Here’s what to expect:
- Choose your store location, like your country and address.
- Pick the currency you want to use.
- Select what type of products you’ll be selling: physical, digital, or both.
- Decide whether you want to enable automatic tax calculation.
- Set up shipping options, if you’re sending physical items.
- Connect a payment method, like PayPal, Stripe, or cash on delivery.
Each step is short and easy to follow. You can skip parts if you’re not ready and come back later in your settings.
3. Add essential pages
When you activate WooCommerce, it automatically creates the core pages your store needs to function. These include:
- Shop: The WooCommerce Shop page displays your products.
- Cart: This shows what the customer wants to buy.
- Checkout: This handles payments and shipping info.
- My Account: This gives customers access to their orders and details.
These pages allow your customers to browse, buy, and track their orders.
To check if they were created, go to Pages in your WordPress dashboard. You should see them listed there.
If something’s missing or accidentally deleted, don’t worry. You can go to WooCommerce > Status > Tools and click Create default WooCommerce pages. This will restore anything that’s missing.
You can also manually create a page, then assign it in WooCommerce > Settings > Advanced, where each page type (like Cart or Checkout) can be linked.
Customizing these pages with a theme or page builder is optional. However, having them set up is a must before launching your store.
4. Configure store details
Before you start selling, you need to set up the core rules of how your store runs. These include currency, payment, shipping, and tax settings.
Start by going to WooCommerce > Settings. Here’s what to configure:
- Currency: Choose your store’s currency under the General tab. You can also set the currency symbol’s position and decimal format.
- Payment methods: Under the Payments tab, turn on the payment options you want to offer, like PayPal, Stripe, or cash on delivery. Click Set up for each one to connect your accounts or enter your payment details.
- Shipping zones: Go to the Shipping tab to set up shipping zones, or the areas where you’ll deliver products. Then, assign methods like flat rate, free shipping, or local pickup.
- Tax settings: In the Tax tab, you can set up taxes by choosing whether to charge tax and how prices are displayed. You can also configure tax classes and apply different rates based on customer location.
You can also fine-tune settings like store address, selling regions, customer location defaults, email alerts, and measurement units.
These settings directly affect your customer’s checkout experience. Setting them correctly ensures payments go through, orders ship to the right places, compliance with tax laws, and more.
5. Add products
This is where the store starts to take shape. Go to Products > Add New in your dashboard. Enter the product name and a short description that highlights what makes it special.
Set the price, upload high-quality images, and choose a product type: simple, variable, grouped, or external. Use categories and tags to keep things organized. This helps shoppers find what they’re looking for faster.
If you’re selling physical items, enter details like weight and dimensions. For digital goods, uncheck the shipping box. You can also set stock status and inventory levels so you don’t oversell.
Each product listing is like its own mini landing page. Clear info and strong visuals help turn browsers into buyers.

Once these WooCommerce store setup steps are done, your store is ready to open. Everything after this is about refining, testing, and growing.
For a more comprehensive walkthrough on the WooCommerce store setup, check out this WooCommerce tutorial.
Making Your Store Easy To Use And Navigate
A successful WooCommerce store setup also involves building a space that feels easy to move around in. After all, if shoppers get confused or frustrated, they’ll leave your store quickly.
Thus, it’s a good idea to customize your store with small tweaks to layout, design, and menus, as these can change how people shop.
1. Pick a theme made for WooCommerce
Choose a theme for your WooCommerce store that ensures every product page looks clean, loads fast, and shows important info like price, images, and variations clearly. Said theme should also support checkout features and mobile views without needing extra fixes.
Storefront and Astra are two solid examples that are built with WooCommerce in mind.
2. Organize categories and menus
Think of your menu like the signposts in a grocery store. Clear product categories help shoppers know where they’re going.
For example, if you’re selling clothes, break it up into Men, Women, and Kids. Then go deeper, like Shirts, Shoes, or Accessories.
Keep menus short and focused so people don’t get lost.
3. Add filters or sorting
Some people want to browse. Others want to go straight to what they need. Filters let them sort by price, size, color, or rating. It’s like giving them a map instead of making them wander the whole store.
WooCommerce has built-in filter options, and plugins like Product Filters by WooBeWoo add even more control.
4. Make your store mobile-friendly
More people shop from phones than desktops now. If your store looks weird on a small screen, you’ll lose sales fast.
Thus, choose a responsive theme and test everything on mobile, from product pages to the checkout button. A smooth mobile experience can be the difference between a sale and an abandoned cart.

Other helpful touches include using clear fonts, clean layouts, and adding breadcrumbs to help shoppers find their way around.
These design choices may seem small, but they shape how people move through your store. Clear paths, quick loading pages, and mobile-ready layouts keep shoppers focused and clicking.
Connecting Your Store To More Sales Channels
The WooCommerce store setup doesn’t end with just adding products and picking a theme. There’s more to selling than having a pretty storefront. To reach real customers, your store needs to go where the people are.
People scroll, swipe, and shop on different apps every day. Some use Google. Others prefer Facebook or Instagram. A few spend hours on Pinterest or TikTok.
When you connect your store to these platforms, you make sure your products don’t stay hidden. Moreover, you make it easier for shoppers to find and buy from you, even if they never visit your actual site.
1. People shop on different platforms
Not everyone starts shopping from a search bar. Some discover products while scrolling their favorite app. Others see ads or product tags while chatting with friends or watching videos. Being present on those apps gives your store a chance to join the conversation.
2. It increases the chances of being discovered
Displaying your products in more places helps new shoppers discover them, even if they weren’t actively looking. This kind of discovery often leads to impulse buys or visits from curious shoppers.
3. It keeps your products in front of more eyes
The more platforms your store is connected to, the more often people see your products. Some folks need a few reminders before they buy. Seeing your items again on Instagram or Google can help them decide faster.
Adding more channels doesn’t just boost traffic. It gives your products more ways to be seen, clicked, and bought.
How Product Feeds Help With Multichannel Selling
Getting your products in front of more people takes extra steps. This is where product feeds come in.
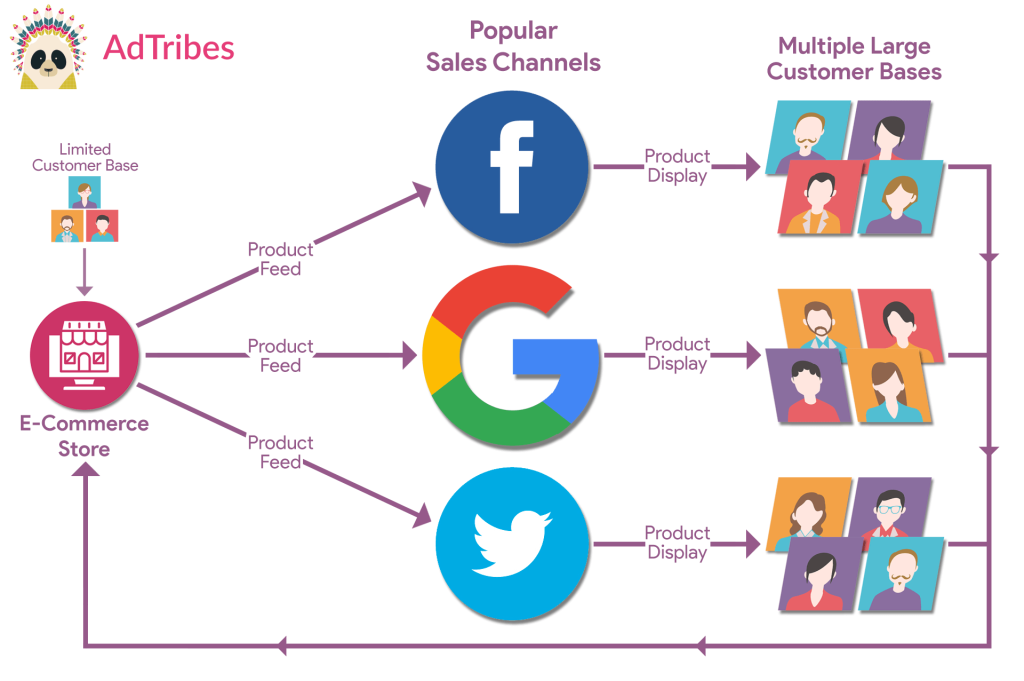
A product feed is a file that contains all of your products’ detailed information, including names, prices, descriptions, images, and more.
But what’s so special about these files? Basically, they:
- Send your catalog to other platforms: Feeds connect your WooCommerce store to sites like Google Shopping, Meta, and TikTok. This helps shoppers find your products wherever they browse online, increasing traffic to your shop and potentially raising your sales. It also makes multichannel selling easier.
- Cut out copy-paste work: You don’t need to recreate listings manually for every platform. The feed copies your product details from your shop and sends them to other sites, saving time and keeping things consistent.
- Help keep product info updated everywhere: When you change a price or update stock in WooCommerce, the feed updates that info across channels—no more fixing listings one by one. This keeps your product details consistent wherever you’re selling and helps avoid mistakes that frustrate customers.
- Reduce the work of managing listings across sites: Instead of logging into multiple dashboards to manage your listings, you work from just one place. The feed handles the updates and syncing in the background for you.
So, how do you create product feeds?
You need a product feed manager. A good example is AdTribes, a WooCommerce plugin that simplifies the creation and management of feeds.
This brings us to…
How to use AdTribes to create product feeds
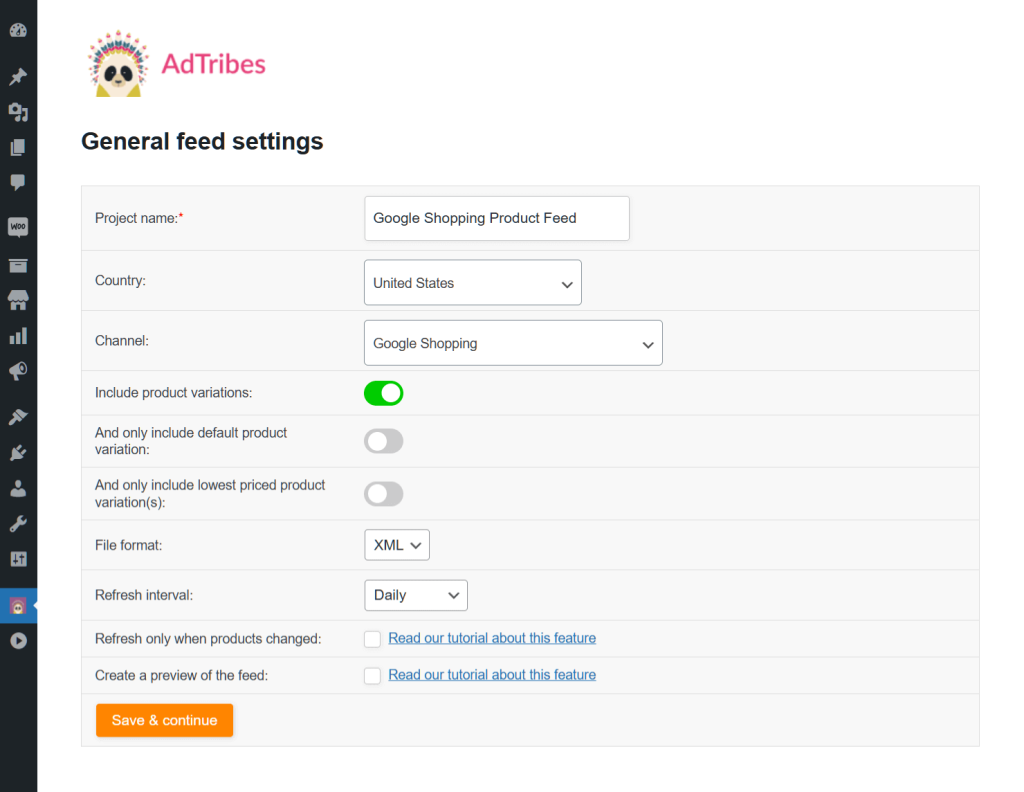
Step 1: General feed settings
This is where you set the basics, such as:
- Your feed’s name
- The target country
- The sales channel (e.g. Google Shopping, Pinterest, or Wish)
- The file format (XML, CSV, TXT, or TSV)
- How product variations are handled
- How often the feed updates (hourly, daily, weekly, or only when something changes in your store)
- Language options (Elite only)
- Currency options (Elite only)
Step 2: Field mapping
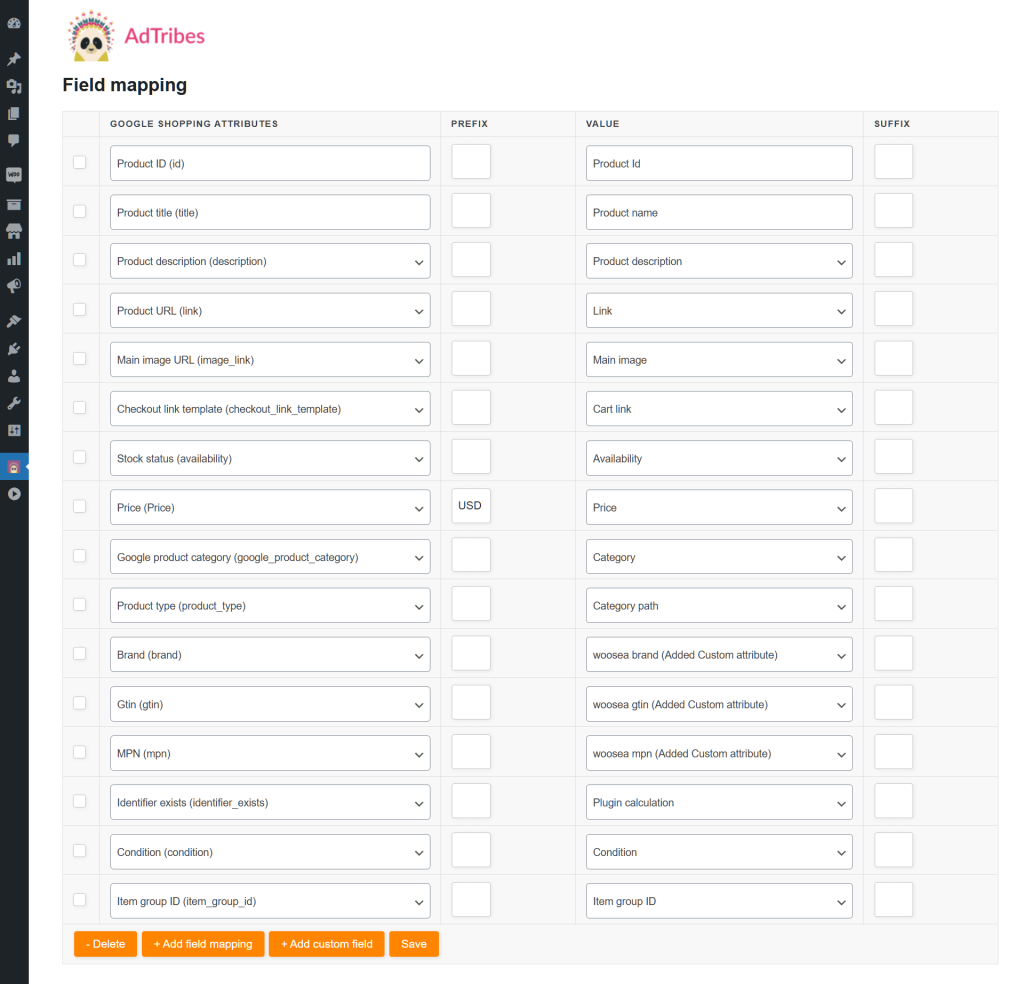
Field mapping matches your WooCommerce product info to the fields required by your chosen sales channel. This helps your listings appear correctly in search results and ads.
When you reach this step, most of the work is already done. Many fields (like “Product title”) are automatically mapped to the right WooCommerce values (like “Product name”).
You’re free to add more fields, define your own, or remove ones you don’t need.
Correct mapping ensures your products are accepted and displayed properly. Mistakes can lead to feed rejections.
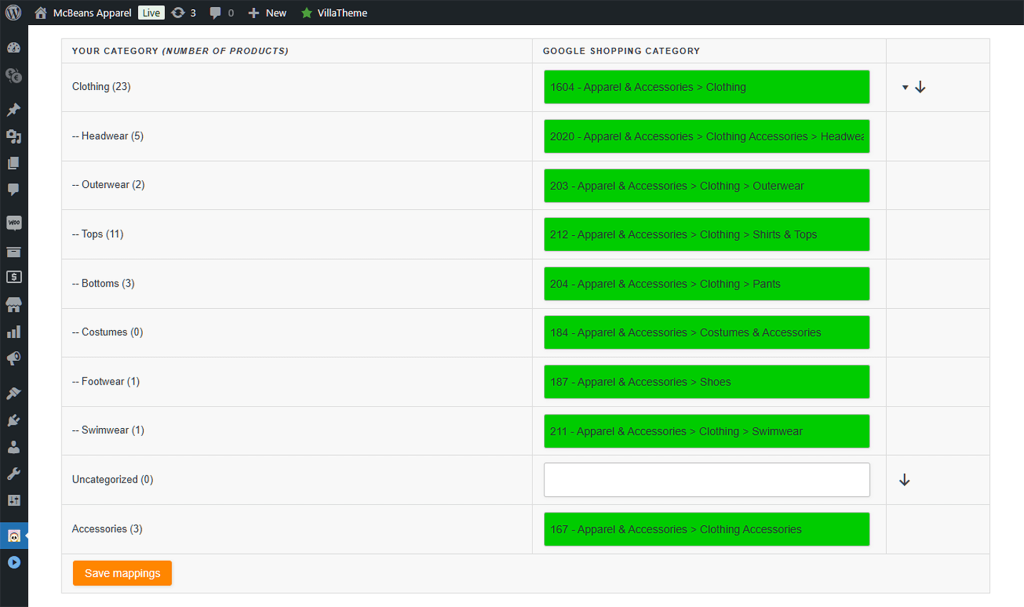
Step 3: Category mapping
Category mapping matches your store’s product categories to the ones used by the channel you’re sending your feed to. It ensures your products show up in the right places, which can improve visibility and search relevance.
Simply match your store’s categories on the left with the channel’s categories on the right. The plugin will help suggest matches as you type.
You don’t have to map every category. However, doing so can help your products reach the right shoppers.
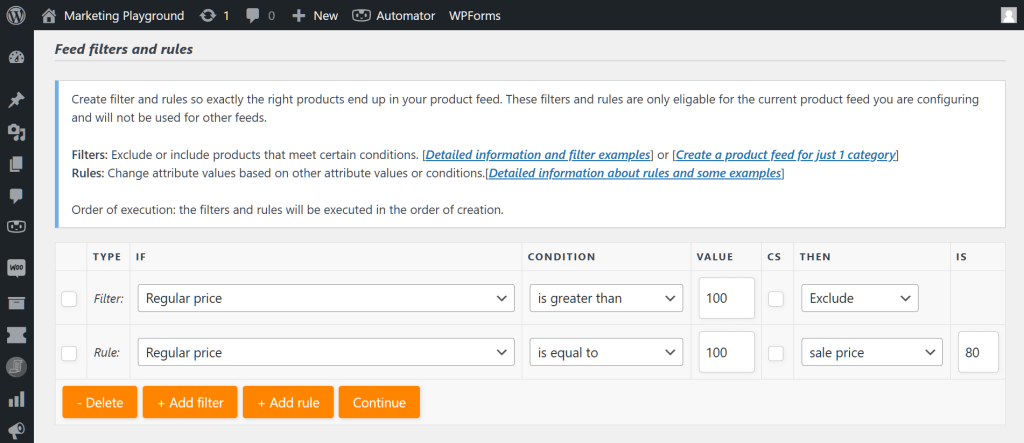
Step 4: Filters and rules
Filters and rules let you control exactly which products appear in your feed and how certain details are shown.
You can set conditions to include or exclude products or update specific product info before it goes into the feed. This gives you more precision, especially for sales events or curated selections.
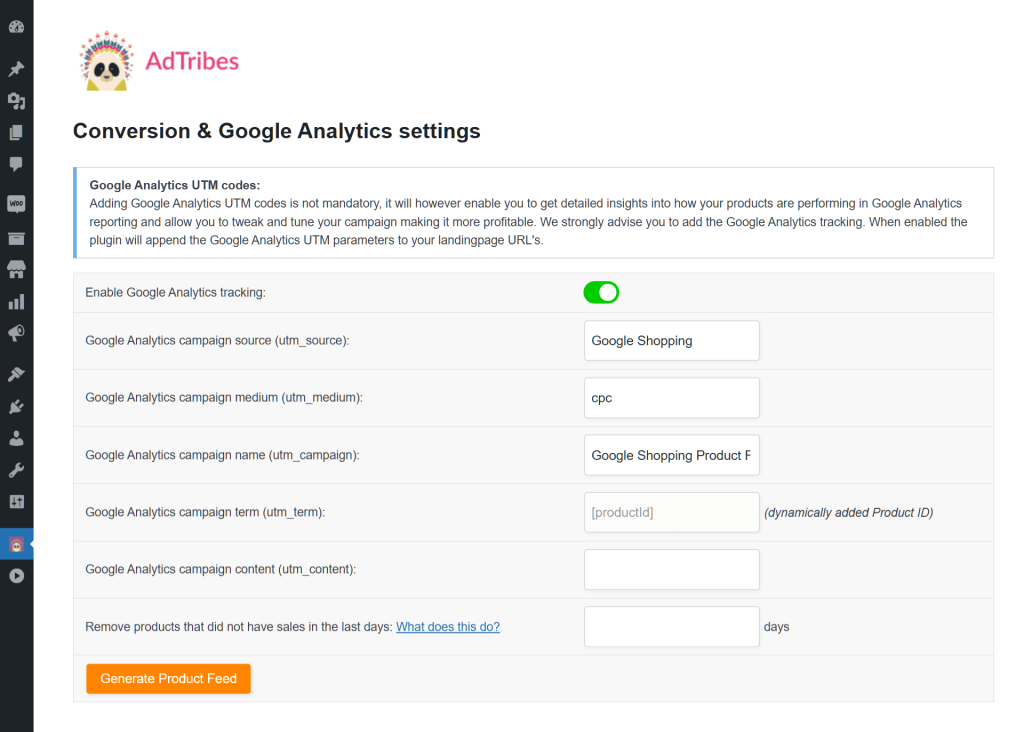
Step 5: Conversion & Google Analytics settings
This step lets you track how your feed performs using Google Analytics. This helps you understand what’s working and where to improve.
To begin, turn on Google Analytics tracking. This will add UTM parameters to your product links so you can follow their performance in Google Analytics. Most fields are pre-filled, so you usually don’t need to change anything.
Once you’re done, click Generate Product Feed to create your feed!
And once you have a product feed, you’re ready to send it to a sales channel so your products can be listed, discovered, and bought by customers across the web.
Want to know more about product feeds? Then check out our detailed guide:
What Is A Product Feed And How Do You Create One? (Ultimate Guide)
For a comprehensive tutorial on meeting a specific channel’s requirements, check out:
Google Shopping Feed Requirements: How To Ensure Your Products Get Featured
Final Tips Before Going Live
Your WooCommerce store setup might look finished, but there’s still one more lap to run. Before switching the lights on and welcoming shoppers, it helps to make sure everything runs as it should.
These last checks can save you from customer complaints and missed sales:
- Test your checkout process: Go through the whole checkout as if you were a buyer. Make sure coupons work, shipping fees show up, and payment actually goes through.
- Double-check mobile version: Most shoppers use their phones. Tap around your site on different screen sizes. If buttons overlap or pages take forever to load, fix them now.
- Set up analytics or tracking: Connect tools like Google Analytics so you can see what’s happening once people arrive. You’ll be able to track visits, clicks, and even abandoned carts. If you’re using AdTribes’ Google Analytics integration, then you’re already set!
- Try a test order: Order one of your own products using a real payment method. This helps you catch weird surprises, like strange email receipts or wrong shipping rates.
- Preview your product feeds: If you’re using product feeds for platforms like Google or Meta, check them. Are your titles showing up right? Are prices accurate? One wrong detail can hurt your visibility.
It might feel like a lot, but these final steps help keep your store from falling apart on launch day. A little extra effort now can save hours of fixing later.
Conclusion
Setting up your WooCommerce store from scratch involves more than just adding products and picking a theme. It’s about creating a solid foundation, making the store easy to use, and connecting it to places where people actually shop.
And with product feeds and tools like AdTribes, you can share your products across multiple channels. This way, you’re not stuck selling on just your site, which means more chances to earn!
To recap, this guide covered the following concepts:
- What you need before starting the WooCommerce store setup
- How to set up your WooCommerce store
- Making your store easy to use and navigate
- Connecting your store to more sales channels
- How product feeds help with multichannel selling
- Final tips before going live
Looking to set up your WooCommerce store and start using product feeds? Explore AdTribes to see how it can help you manage your catalog and reach more shoppers across different sales channels.
FAQs: WooCommerce Store Setup
What are the essential prerequisites before starting a WooCommerce store setup?
Before starting your WooCommerce store setup, you need reliable hosting and a domain name, WordPress installed and running, business basics like store name and tax setup, sorted product information including names, prices, images, and descriptions, and a clear understanding of your shipping and tax rules.
What steps are involved in configuring the store details in WooCommerce?
Configure your store details in WooCommerce by setting your currency, choosing payment methods like PayPal or Stripe, defining shipping zones and methods, and setting tax options. These settings determine how customers pay, where you ship, and how taxes are applied.
In what ways do product feeds assist in multichannel selling with WooCommerce?
Product feeds help by sending detailed product information from your WooCommerce store to various sales platforms like Google Shopping, Meta, and TikTok, eliminating manual listing, keeping information updated across channels, reducing management effort, and increasing product visibility to reach more customers.
