This guide takes you from installing Product Feed Pro to a live feed URL you can submit to Google Merchant Center, Meta, Microsoft Bing or ChatGPT. It walks through each feed tab in order, the setup checklist on the Manage Feeds screen, and the plugin settings.
Key features
- An unlimited number of products and feeds
- 250+ pre-configured feed templates
- Custom feed rules and filters
- Category mapping with Google taxonomy
- Support for variable products
- An OpenAI Product Feed for ChatGPT, exported as JSONL.GZ, CSV.GZ, TSV.GZ or Parquet
Requirements
Before you start, make sure your site has:
- WordPress 5.9 or later
- WooCommerce 4.4 or later, installed and active
- At least one published product, so your first feed has something to export
Installation and activation
To install Product Feed Pro:
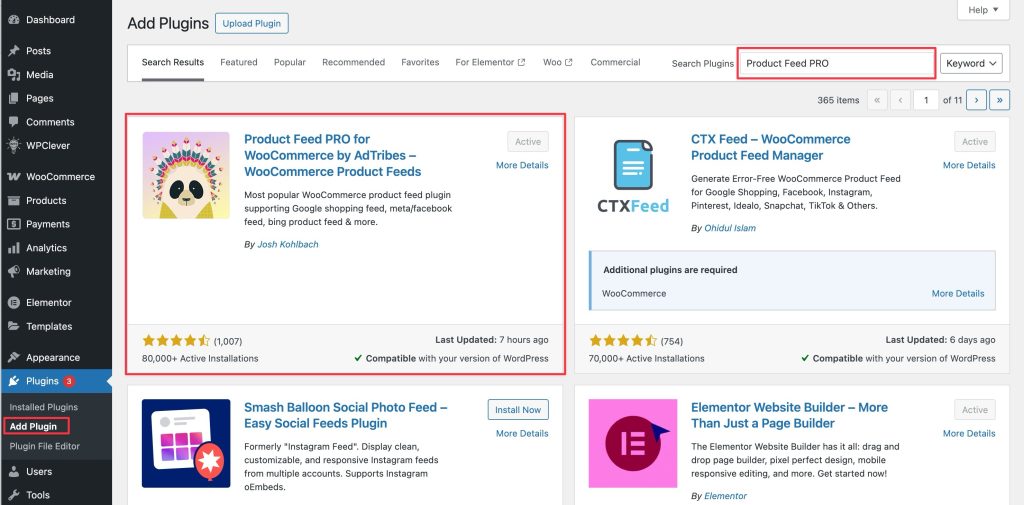
- Navigate to Plugins > Add Plugin in your WordPress dashboard.
- Search for Product Feed Pro.
- Click Install Now, then Activate.
- After activation, a new menu item, Product Feed, appears in your admin sidebar.
Use the setup checklist
On new installs, the Manage Feeds screen shows a setup checklist. It runs an environment check on your store, then walks you through the essentials, starting with your first feed. You can follow it alongside this guide. For details, see How to use the setup checklist in Product Feed Pro.
Create a feed
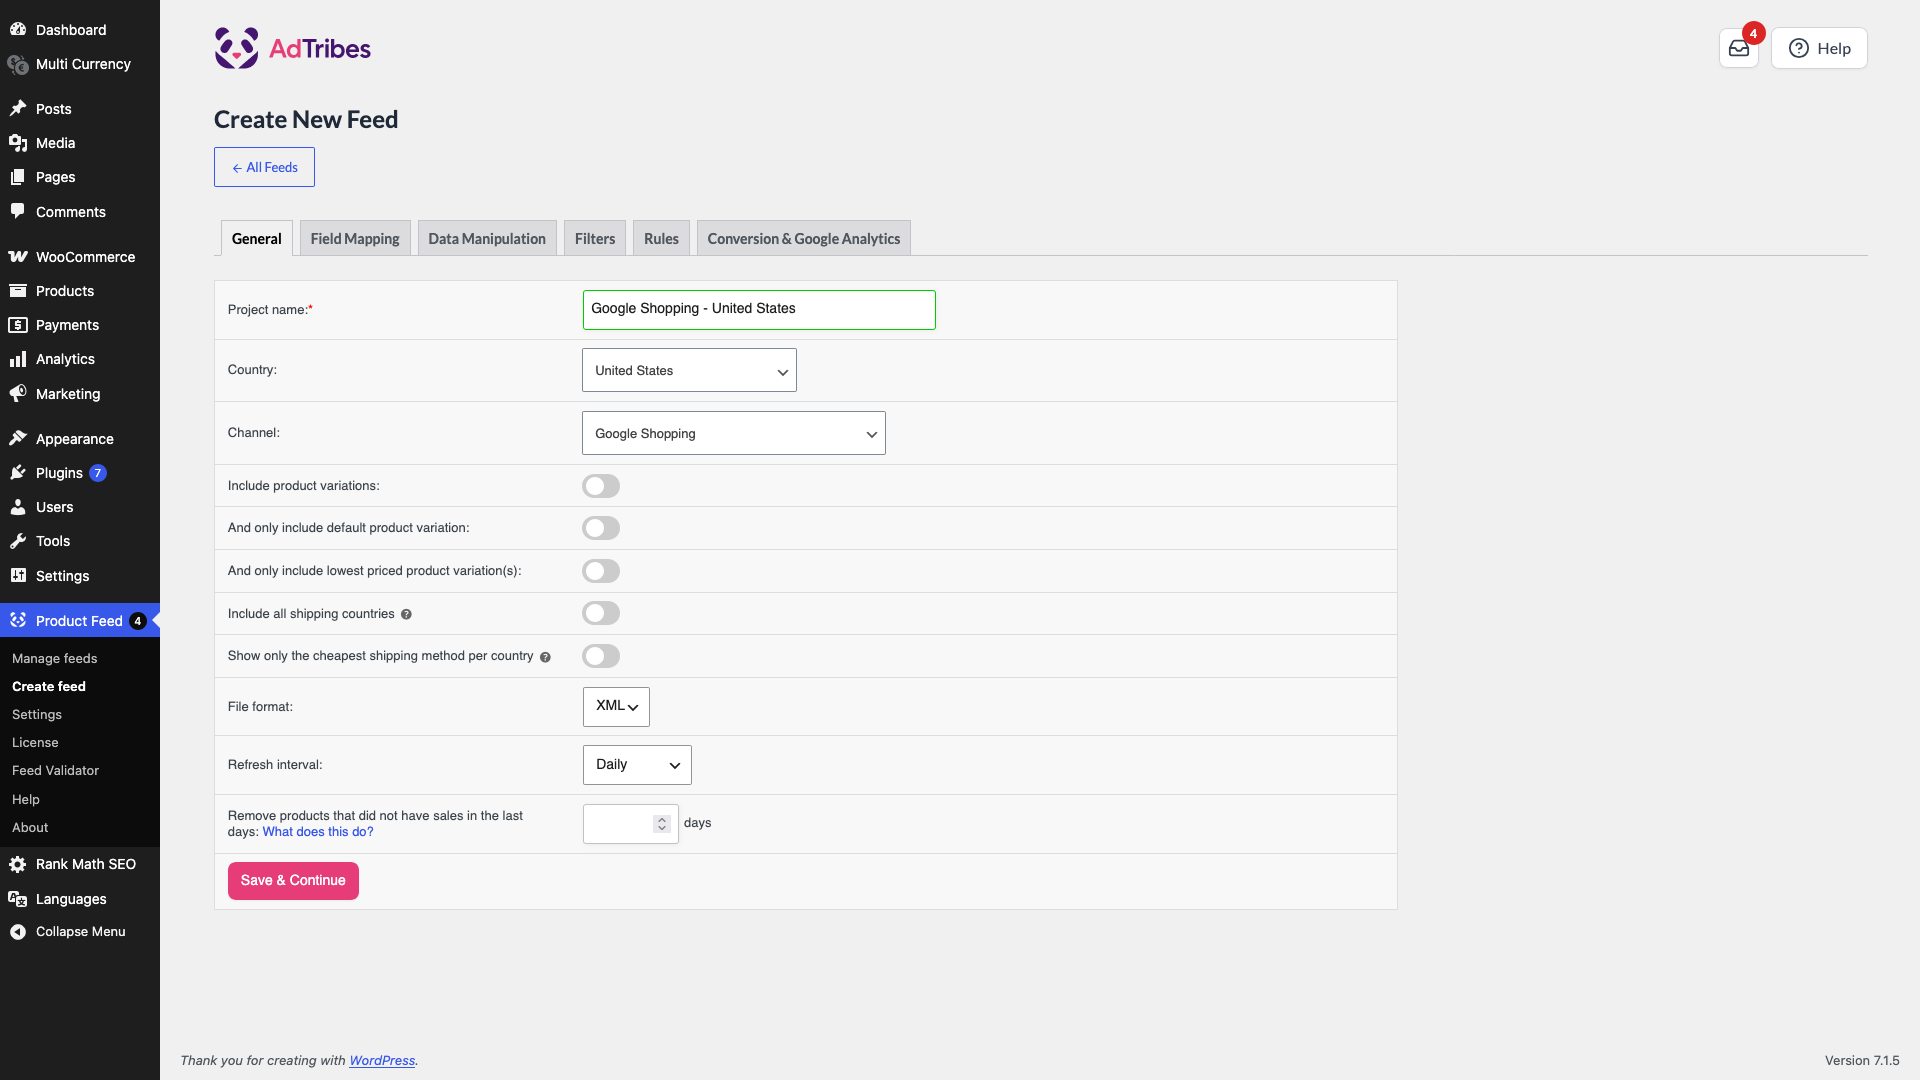
To create a feed, you can directly go to the Product Feed > Create feed screen.
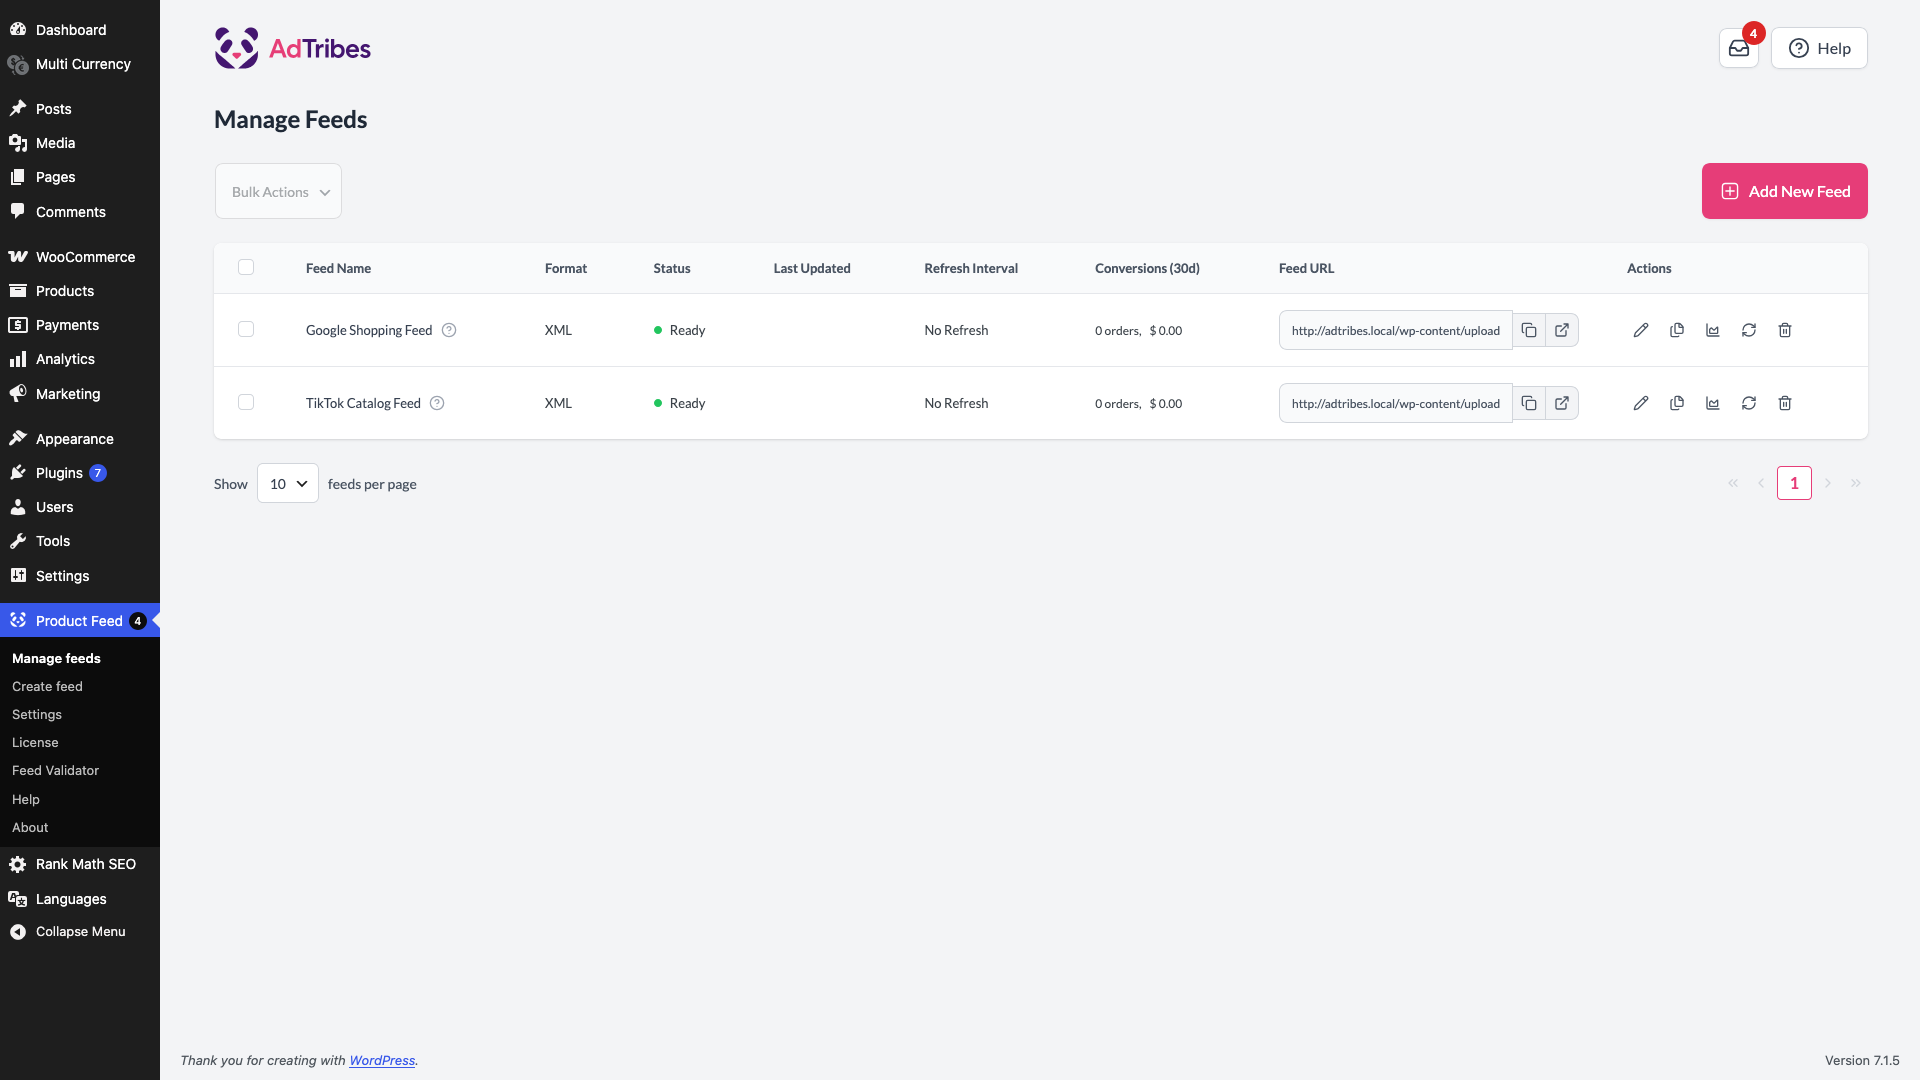
Alternatively, you can go to the Product Feed > Manage feeds screen, then click the Add New Feed button.
Feed configuration: general settings
The General settings tab is the first step in configuring your product feed. This section lets you define the core parameters that control how your feed is built and updated.
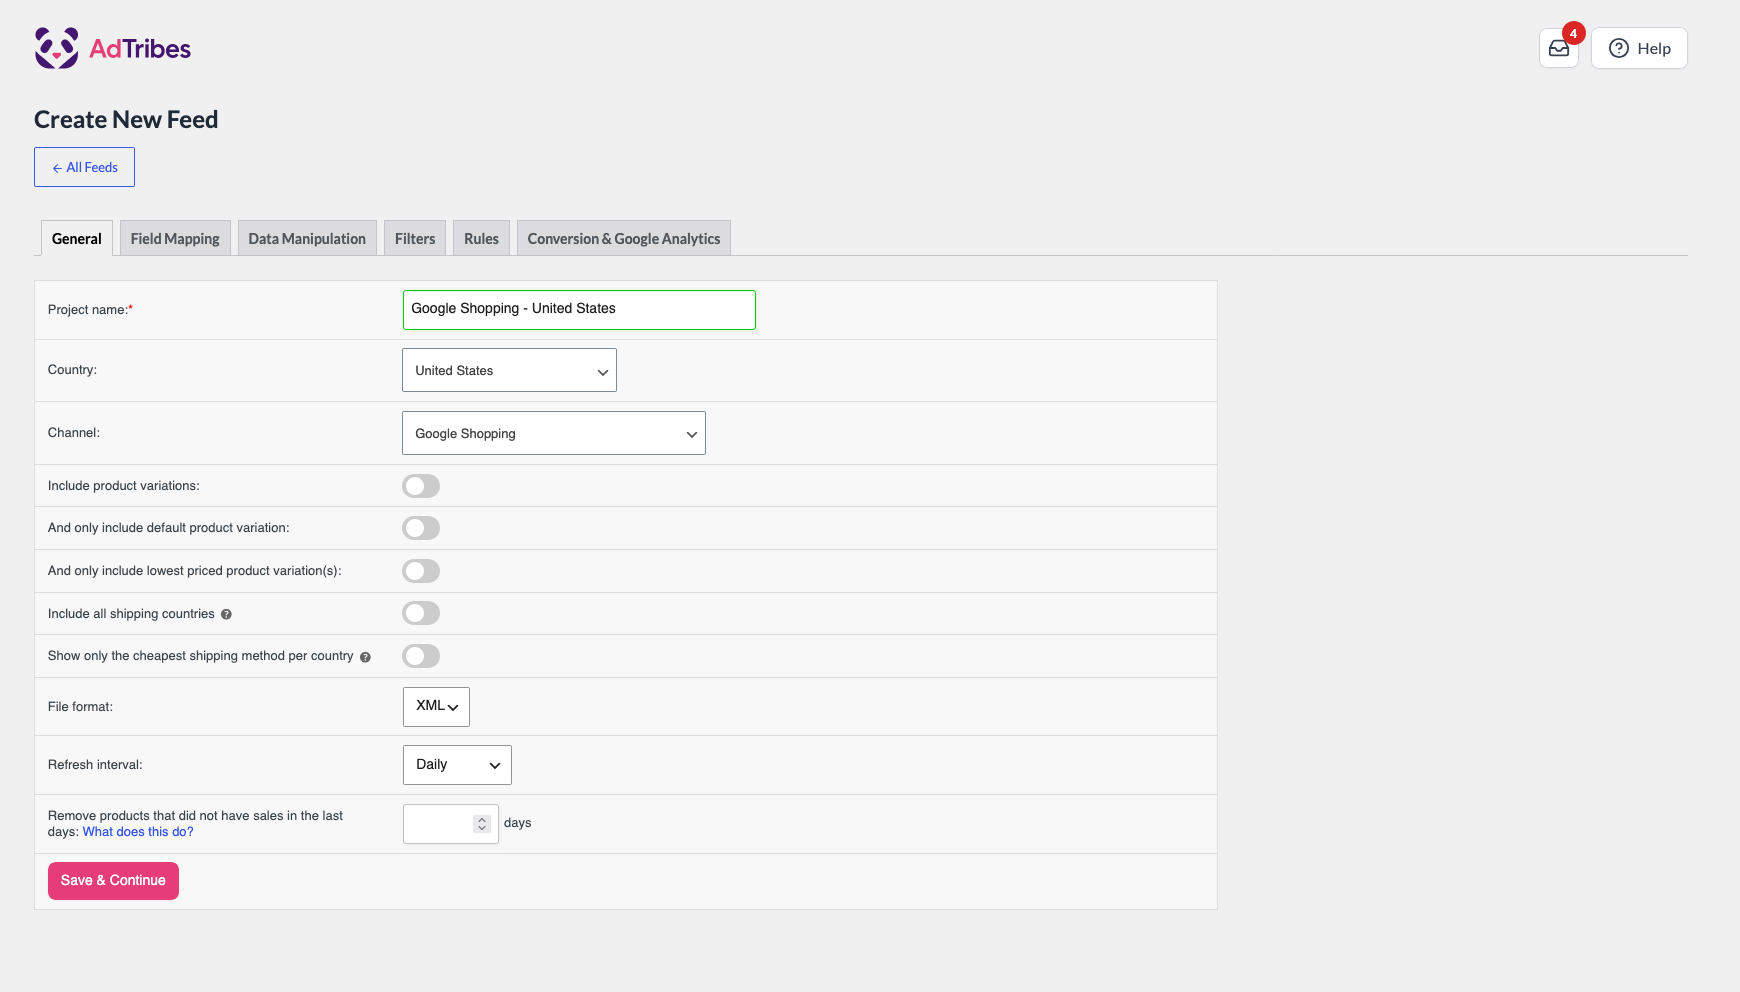
- Project name: Enter a clear and recognizable name for your feed.
- Country: Select the country where your feed will be submitted.
- Channel: Choose the destination channel (e.g., Google Shopping, Facebook, Bing) where your feed will be used.
- Include product variations: Toggle whether to include variations of variable products in the feed.
- And only include default product variation: Enable only when you want to include only the default variation of a variable product.
- And only include lowest priced product variation(s): If you want to offer only the lowest priced variation of a variable product, then enable this option.
- File format: Choose the format for your feed output: XML, CSV, TSV, TXT or JSONL. The OpenAI Product Feed channel uses compressed formats (JSONL.GZ, CSV.GZ, TSV.GZ) or Parquet, which needs the bcmath and zlib PHP extensions on your server.
- Refresh interval: Choose hourly, twice daily or daily. Product Feed Elite adds custom intervals, such as every few hours on chosen days, or weekly.
- Remove products that did not have sales in the last days: Products that did not have sales in the last X days will not be on the product feed. Adjust the number of days (X) to suit your needs.
When you finish the settings above, click Save & Continue.
Turn on only one of And only include default product variation or And only include lowest priced product variation(s). If you turn on both, a variation stays in the feed only when it is both the default and the lowest priced one, so most variations drop out.
Feed configuration: field mapping
The Field Mapping tab sits second, right after General. It lists every attribute your chosen channel accepts, grouped into sets like basic product data, price and availability, product identifiers, shipping and tax, and, on a saved feed that uses the Google product format, shows a preview of the mapped output for a real product from your store.
Work through it in this order:
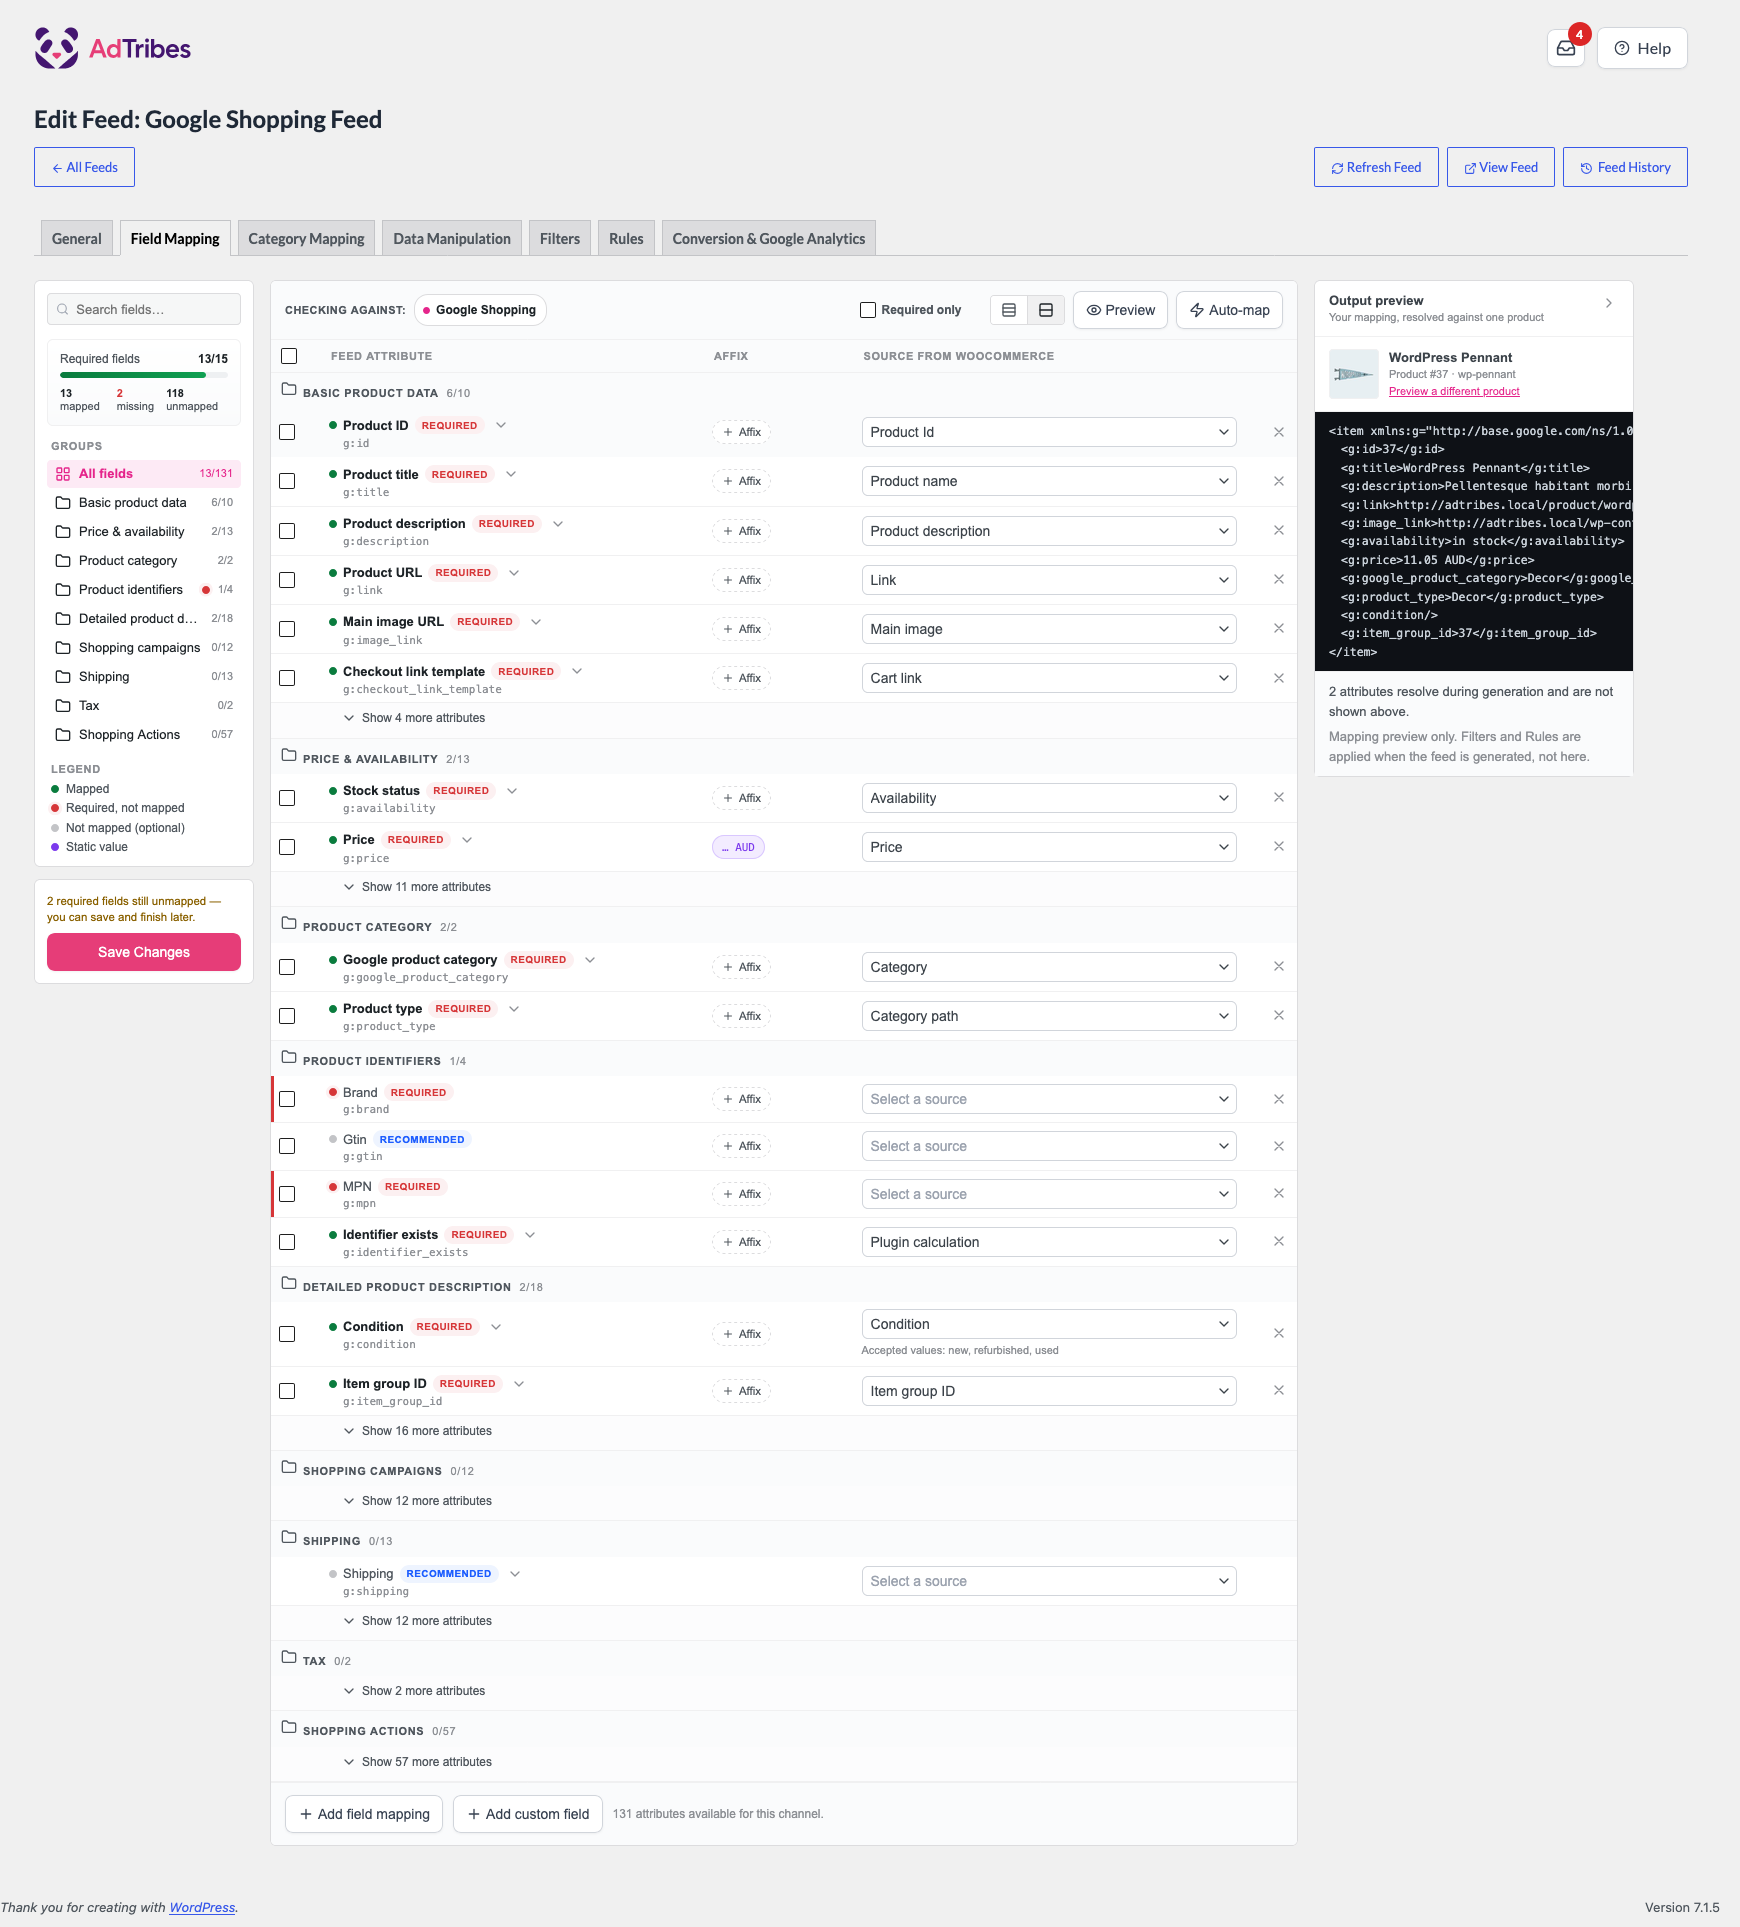
- Check the required-fields counter in the left sidebar. It shows how many of the channel’s required attributes already have a source.
- Click Auto-map to fill suggested sources for fields that are still empty. It asks you to confirm first and leaves anything you’ve already mapped alone.
- On a saved Google Shopping feed, review the output preview on the right. If a price or brand looks wrong, fix its source in the table and the preview updates.
- Select Required only, use the search box, or pick a set in Groups to find the fields that still need attention.
- Click Affix on a row to add a prefix or suffix to its value.
- Set a static value on a row when your store doesn’t hold the data.
- Click Save & Continue. On a saved feed, the button reads Save Changes.
You can save a partly finished mapping and come back later. The output preview appears after you save the feed, and only for channels that use the Google product format, such as Google Shopping.
Even with Auto-map, cross-check your mapping against the official product data specification of your feed channel. Doing so helps you:
- Maximize feed approval success
- Improve product visibility
- Ensure compliance with channel guidelines
Feeds you built in the older mapping format move to the field mapping builder automatically, and a notice confirms it the first time you open the tab. For a full walkthrough, see the upgraded field mapping builder.
We offer dedicated mapping guidance for a few popular channels. You can find those resources below:
- Setting Up Your First Google Shopping Product Feed
- How To Create A Google Local Products Inventory Feed?
- How To Create Google Product Review Feeds?
- How To Create A Product Feed for Skroutz
Feed configuration: category mapping
This step appears for channels that use the Google Product Taxonomy, such as Google Shopping, Bing Shopping, Meta (Facebook and Instagram), Pinterest and TikTok. It does not appear for channels such as Custom Feed or the OpenAI Product Feed. It lets you map your store’s product categories to the matching Google Product Taxonomy category. Proper category mapping helps Google better understand your products, improves visibility in search results, and enhances overall feed performance.
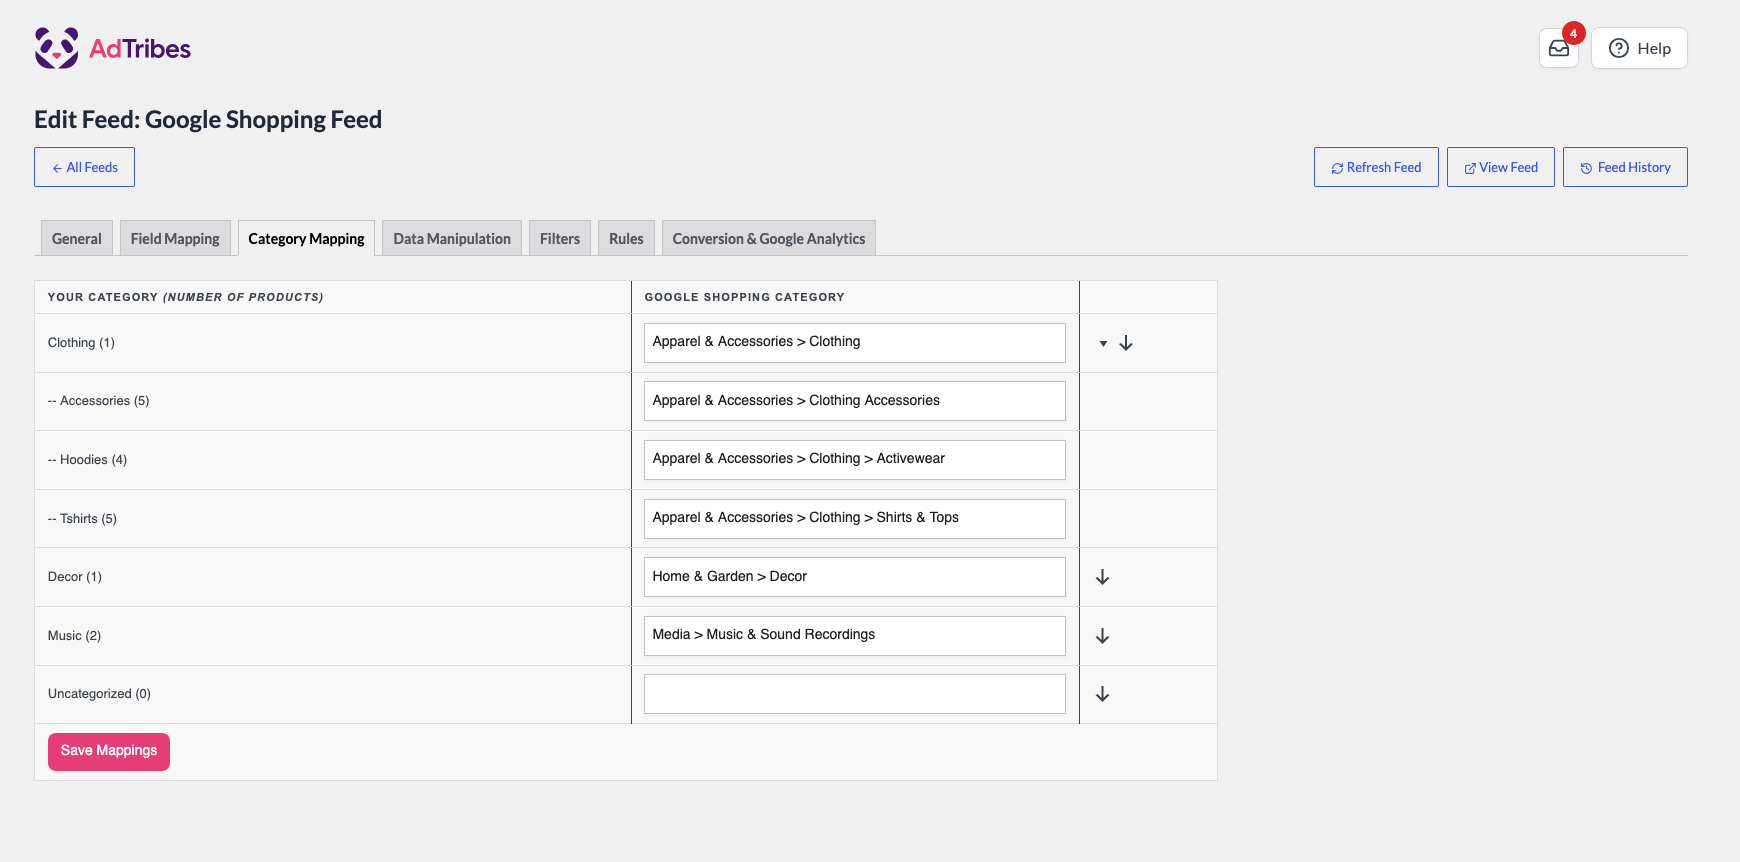
You can find a complete list of Google Product Taxonomy in the Google Product Taxonomy list.
Feed configuration: filters and rules
Product Feed Pro has two tabs for this. Use the Filters tab to choose which products go into your feed. Use the Rules tab to change attribute values before export.
Filters
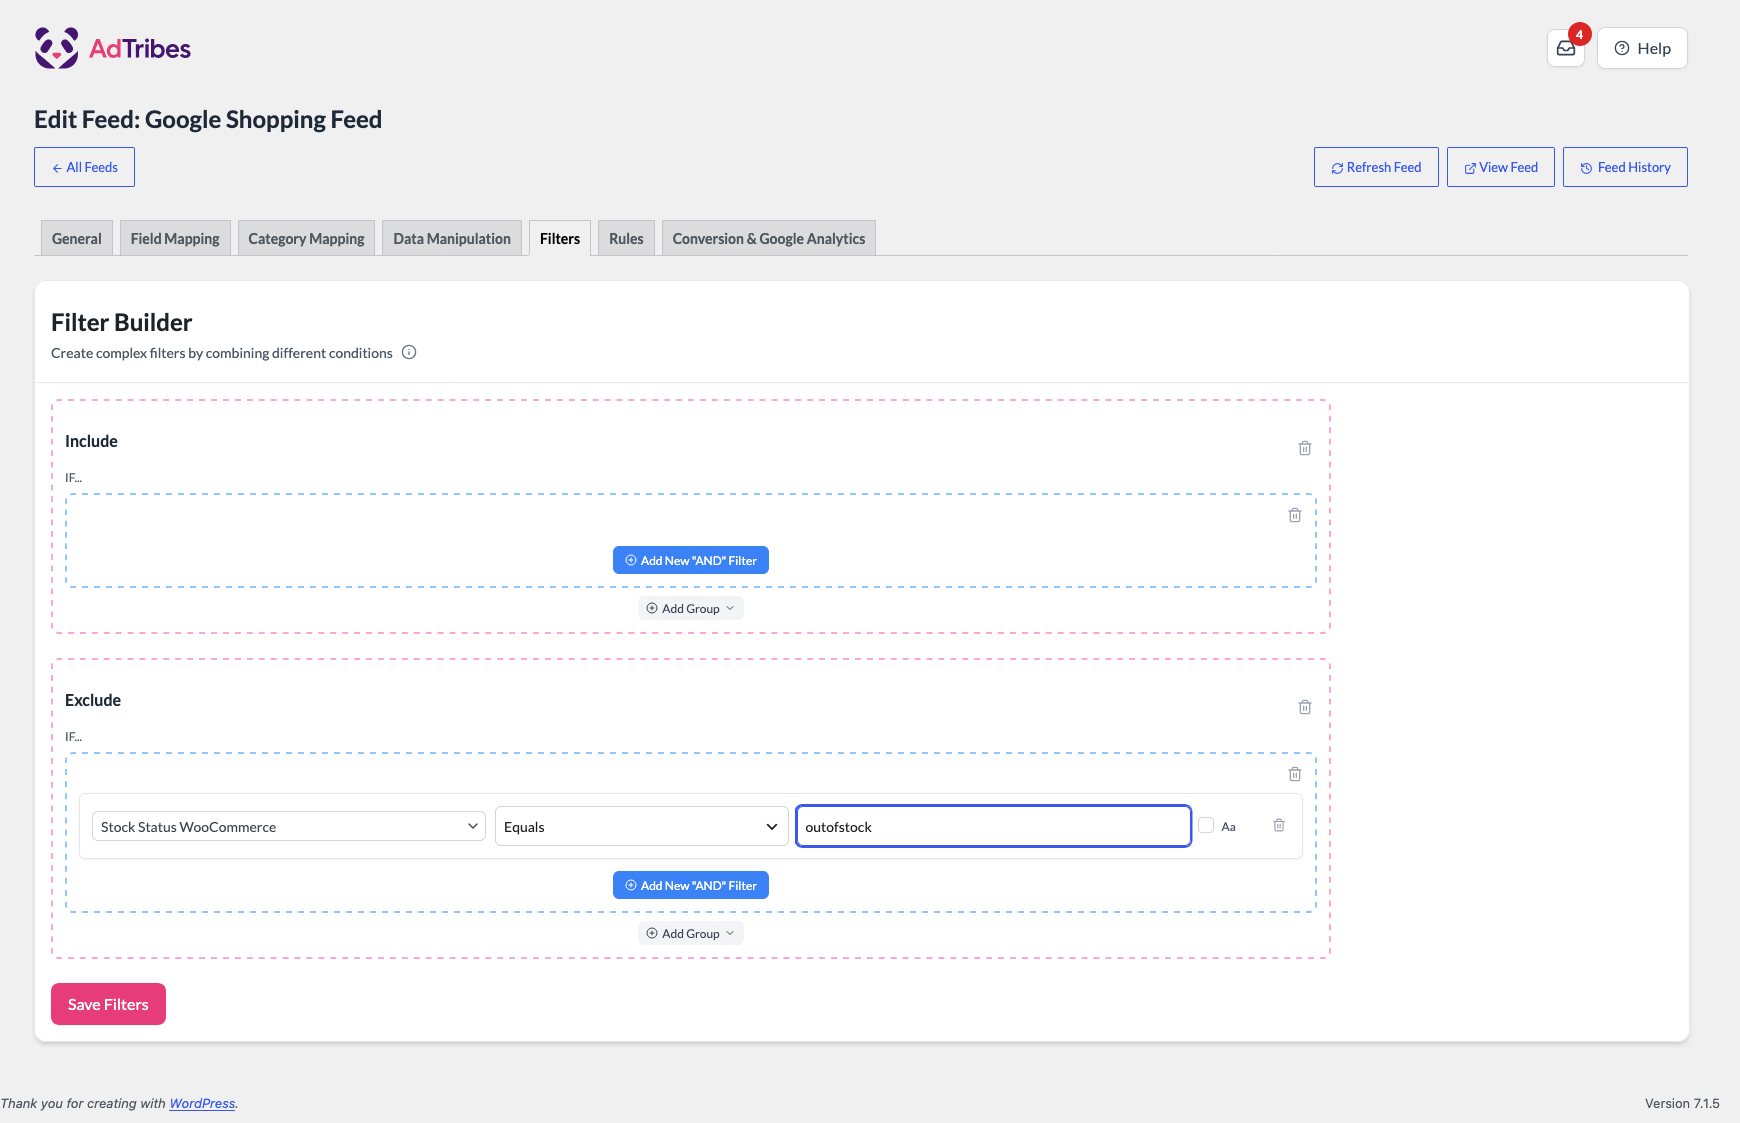
The Filter Builder has an Include section and an Exclude section. Each condition starts with IF…, where you pick a product attribute, a condition, and a value.
- Click Add New “AND” Filter to add another condition to the same group.
- Click Add Group, then choose AND Group or OR Group to add a separate group of conditions.
- Click Save & Continue when you’re done. On a saved feed, the button reads Save Filters.
For example, to keep out-of-stock products out of the feed, add a condition to the Exclude section: pick Stock Status WooCommerce, choose Equals, and enter outofstock.
Rules
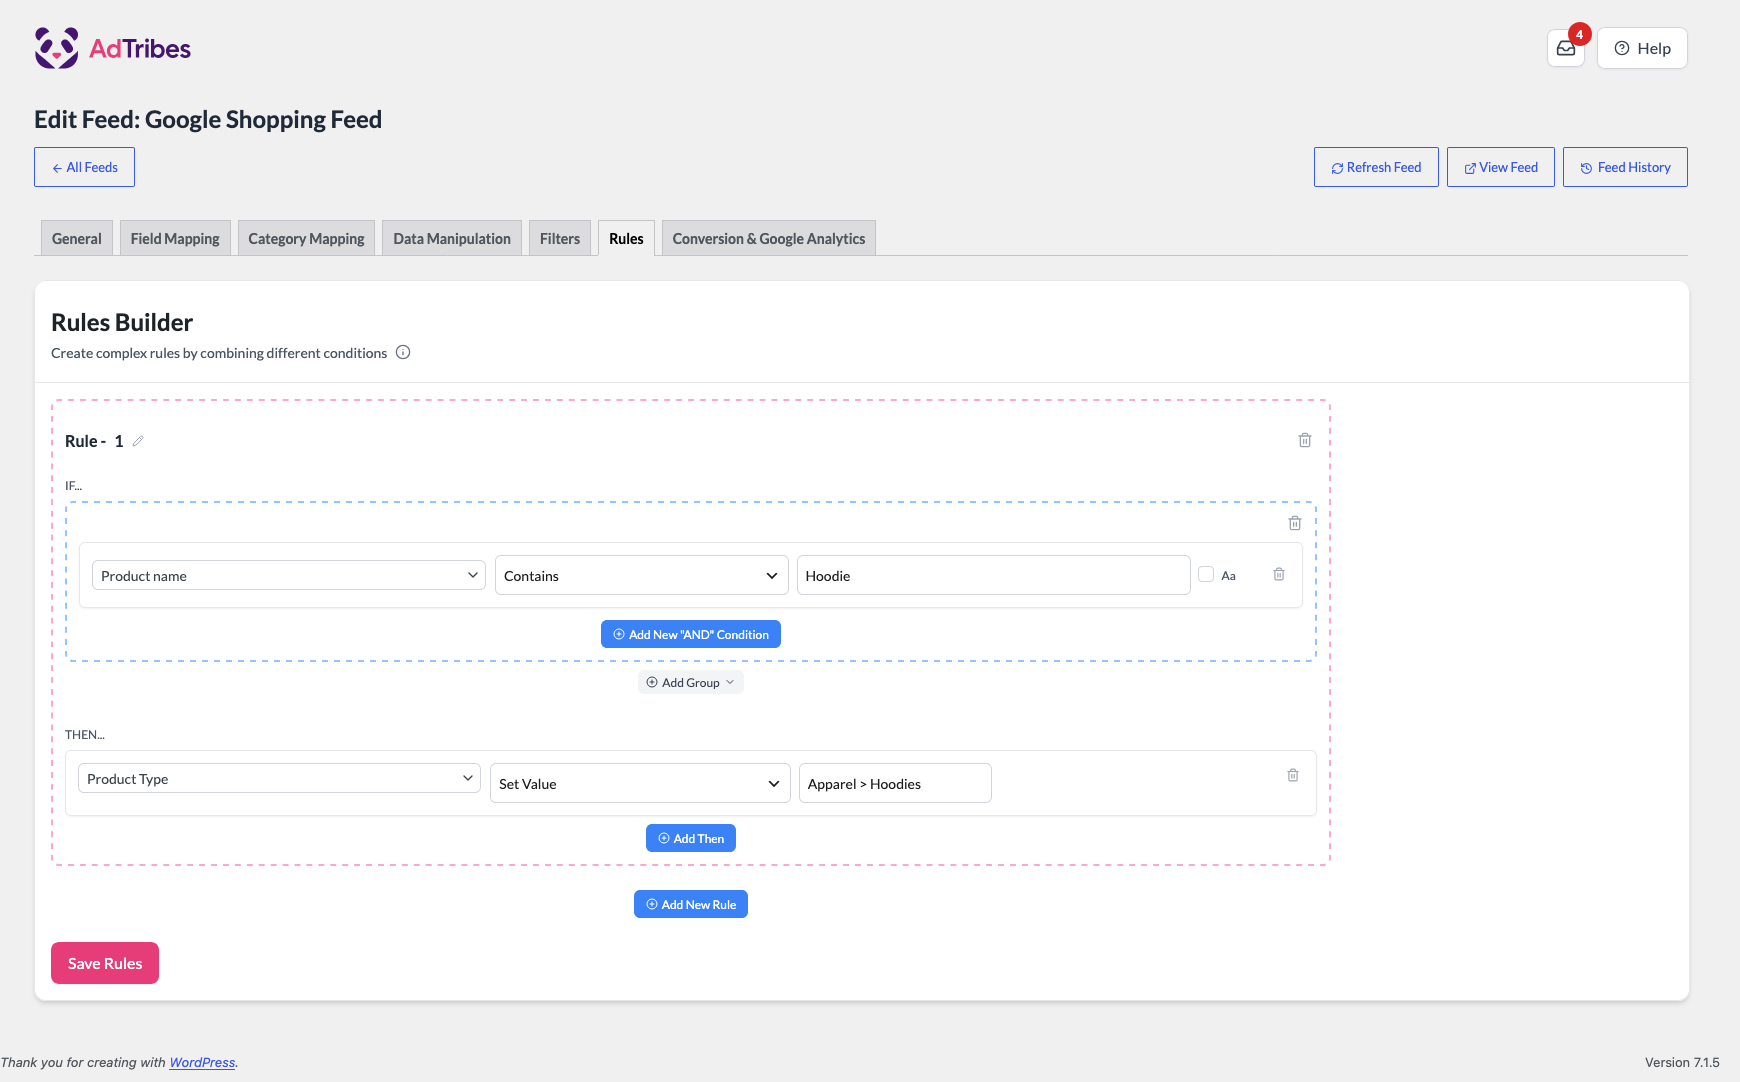
In the Rules Builder, each rule has an IF… part with conditions and a THEN… part with actions. The tab starts with one empty rule, Rule – 1.
- In the IF… part, click Add New “AND” Condition and set the condition, for example Product name Contains Hoodie.
- In the THEN… part, click Add Then and set the action, for example set Product Type to Apparel > Hoodies with Set Value.
- To add another rule, click Add New Rule.
- Click Save & Continue when you’re done. On a saved feed, the button reads Save Rules.
You can find more details in these articles:
Feed configuration: conversion & Google Analytics
The top of the tab shows Attributed orders: the orders, revenue and items sold from this feed in the last 7, 30 and 90 days. Orders are matched on utm_source and utm_campaign with WooCommerce Order Attribution, so UTM tracking must be on.
This tab also adds Google Analytics UTM parameters to the product URLs in your feed. These parameters are essential for accurately tracking traffic and conversions from your campaigns in Google Analytics or GA4.
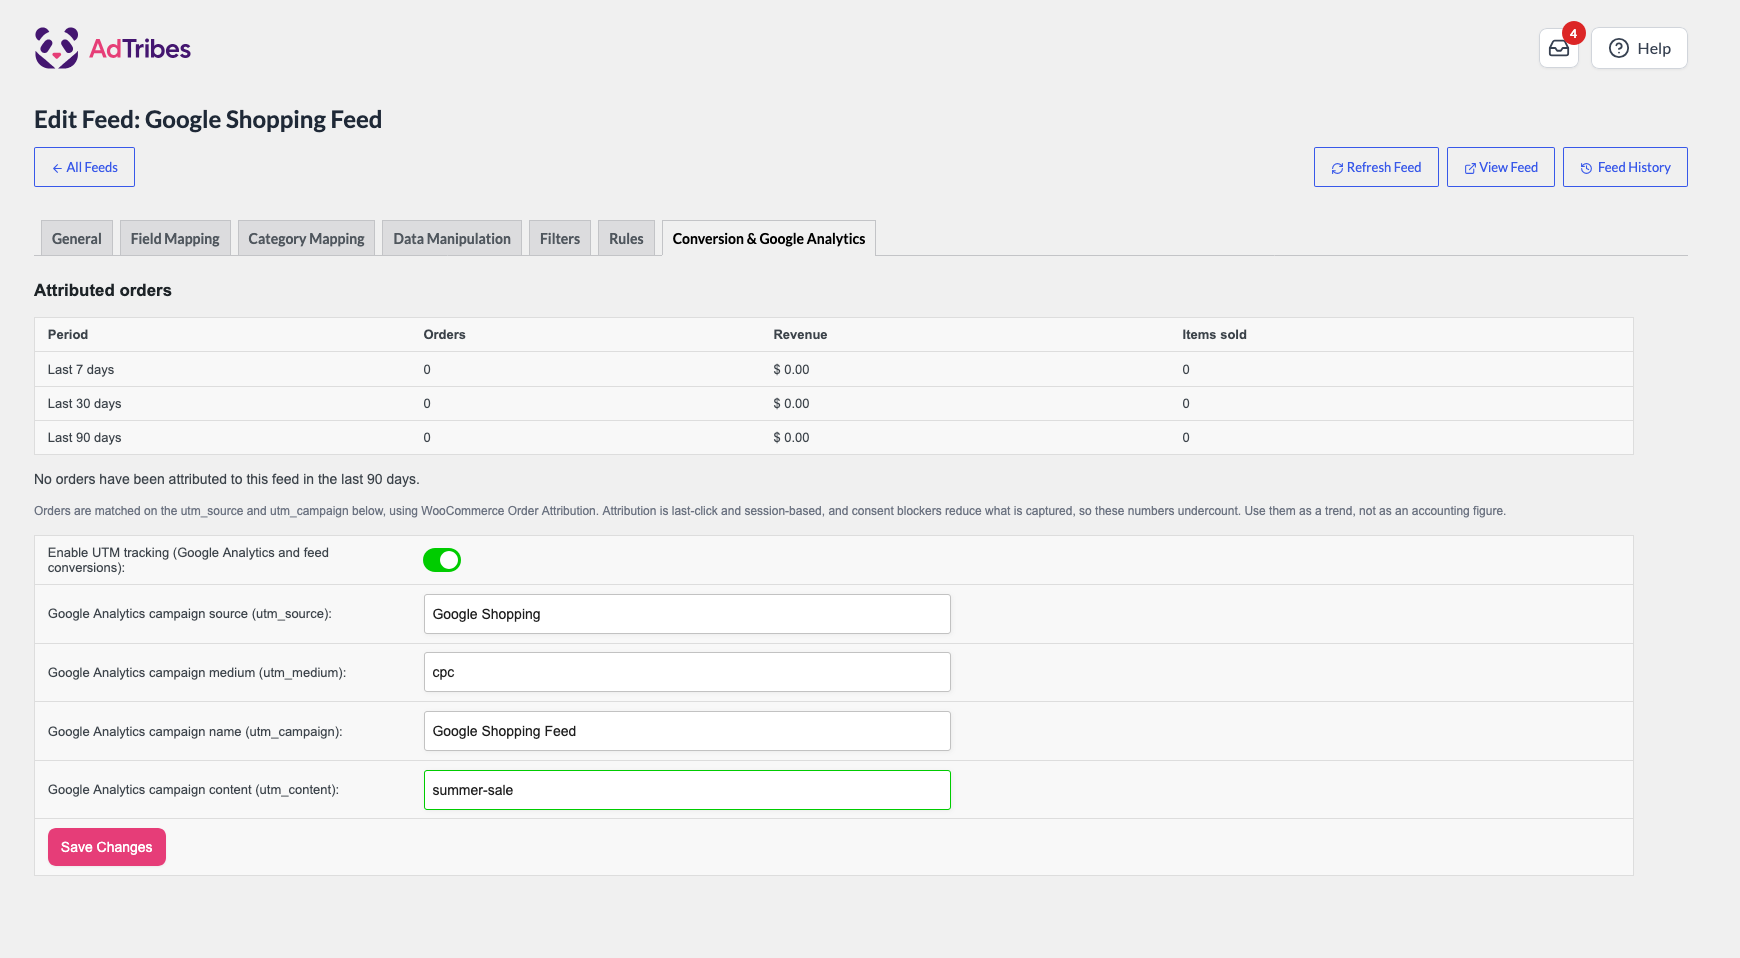
Enable UTM tracking (Google Analytics and feed conversions): When turned on, UTM parameters are added to each product URL in the feed.
The tab has these fields:
| Field | UTM Parameter | Default for a new feed | Purpose |
|---|---|---|---|
| Google Analytics campaign source (utm_source) | utm_source | The channel name, for example Google Shopping | Identifies the traffic source (e.g., Google, Facebook) |
| Google Analytics campaign medium (utm_medium) | utm_medium | cpc | Type of marketing medium (e.g., cost-per-click) |
| Google Analytics campaign name (utm_campaign) | utm_campaign | Your project name from the General tab | Campaign identifier to differentiate between campaigns |
| Google Analytics campaign content (utm_content) | utm_content | Empty | Used to distinguish variations in ads or links |
The utm_term parameter is always set to adtribes on every product URL. You can’t change it.
On a new feed, click Generate Product Feed to build your feed. On a saved feed, the button reads Save Changes.
Feed management
After clicking Generate Product Feed, you’ll be redirected to the Manage Feeds screen. This is your central dashboard to view, organize, and control all your product feeds.
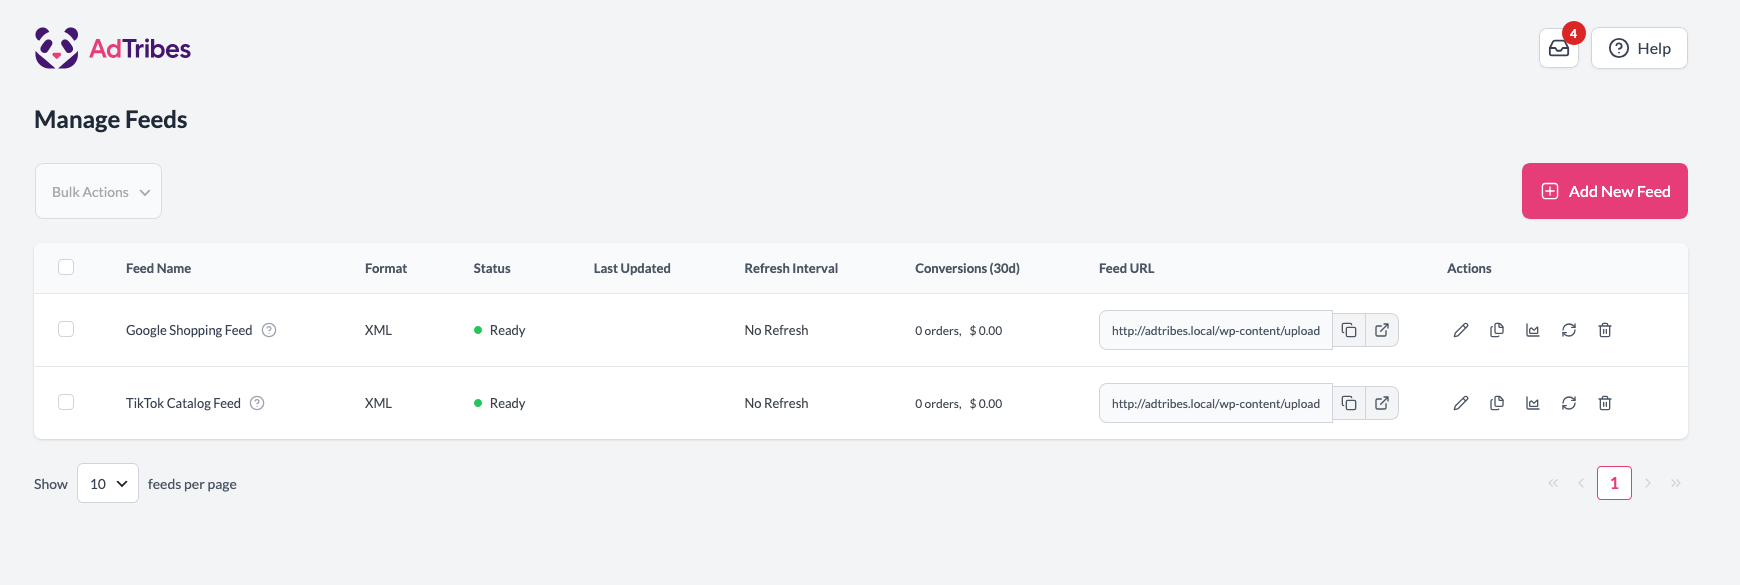
The Manage Feeds screen provides a clear overview of each feed’s status, format, last update, and associated actions.
The actions in each feed row are icons. Hover over an icon to see its name. From this screen, you can:
- Add New Feed: start building a new feed from scratch.
- Edit Feed: change the feed settings, such as field mapping, filters, rules, or UTM tracking.
- Duplicate Feed: copy an existing feed configuration to reuse it for another channel or locale.
- Refresh Feed: regenerate the feed now with the latest product data.
- Delete Feed: remove a feed you no longer use.
- View Statistics: open the statistics for a feed. Product Feed Elite adds this action.
- Copy URL: copy the feed link to submit it to platforms like Google Merchant Center or a Facebook catalog.
Activate or deactivate a feed
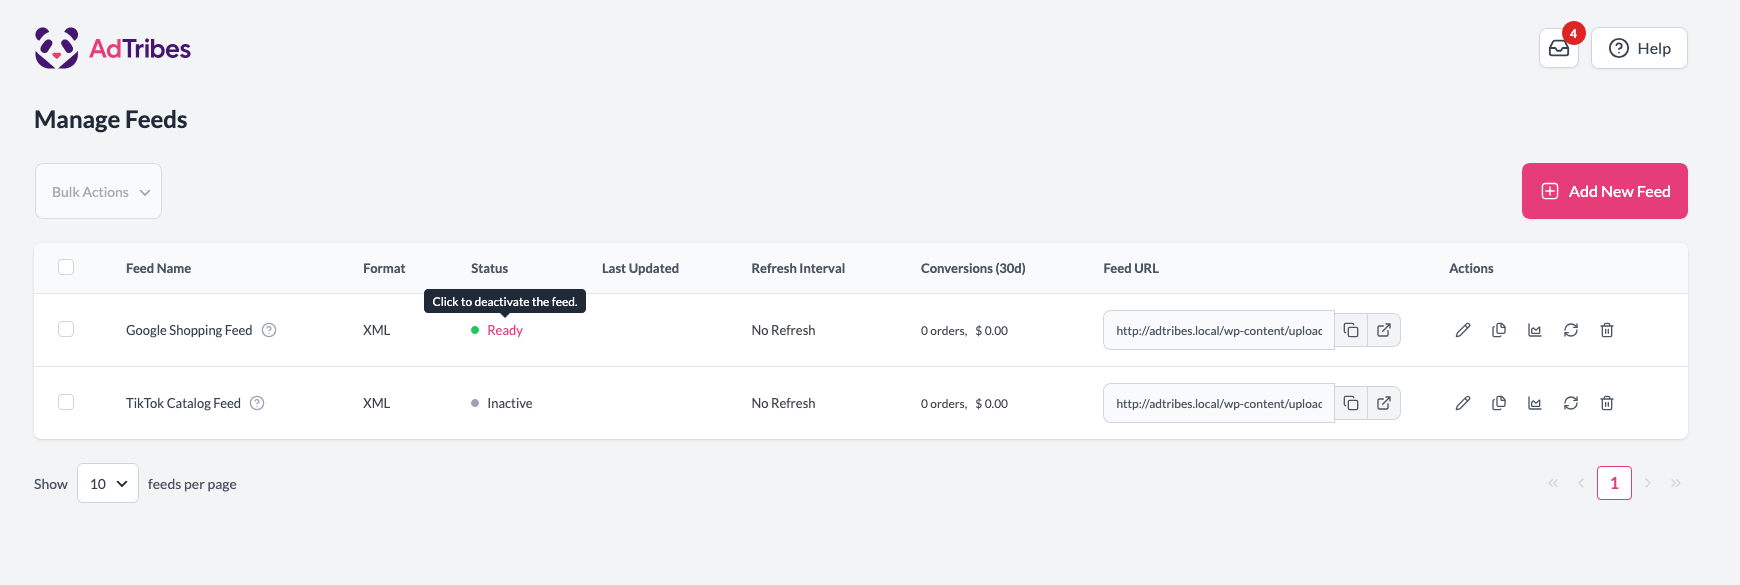
Deactivate a feed when you want to keep its settings but stop it from refreshing on its schedule. You can turn it back on at any time.
- Go to Product Feed → Manage feeds.
- In the Status column, click the status of the feed (Ready or Inactive).
- Confirm the message that asks if you want to deactivate (or activate) the feed.
- A deactivated feed shows Inactive and loses its automatic refresh schedule. Activating it again sets the schedule back up.
- You can only change the status while the feed shows Ready or Inactive. Wait for a Processing feed to finish, or cancel it first.
- To change several feeds at once, select them, then choose Activate or Deactivate from the Bulk Actions dropdown.
Cancel a feed that is processing
If a feed is taking too long or you started a refresh by mistake, you can stop the run.
- Go to Product Feed → Manage feeds.
- Find the feed that shows Processing.
- In the Actions column, click the cancel icon (X). Its tooltip reads Cancel Feed Processing.
- While a feed is processing, Cancel Feed Processing shows in place of Refresh Feed.
- To stop several feeds at once, select them and choose Cancel from the Bulk Actions dropdown.
The Manage feeds screen also shows a few numbers for each feed. To understand the product counts in the help tooltip next to the feed name, see Ultimate guide to scaling feeds for 10K+ products. If a feed shows a batch size limit after a crash, see Batch size configuration to learn how to reset it.
Product Feed Pro settings
Go to Product Feed > Settings. The General tab of the Plugin settings panel offers fine-tuned control over the generation and management of your product feeds. These settings help optimize compatibility with Google Shopping, Facebook Ads, and other platforms.
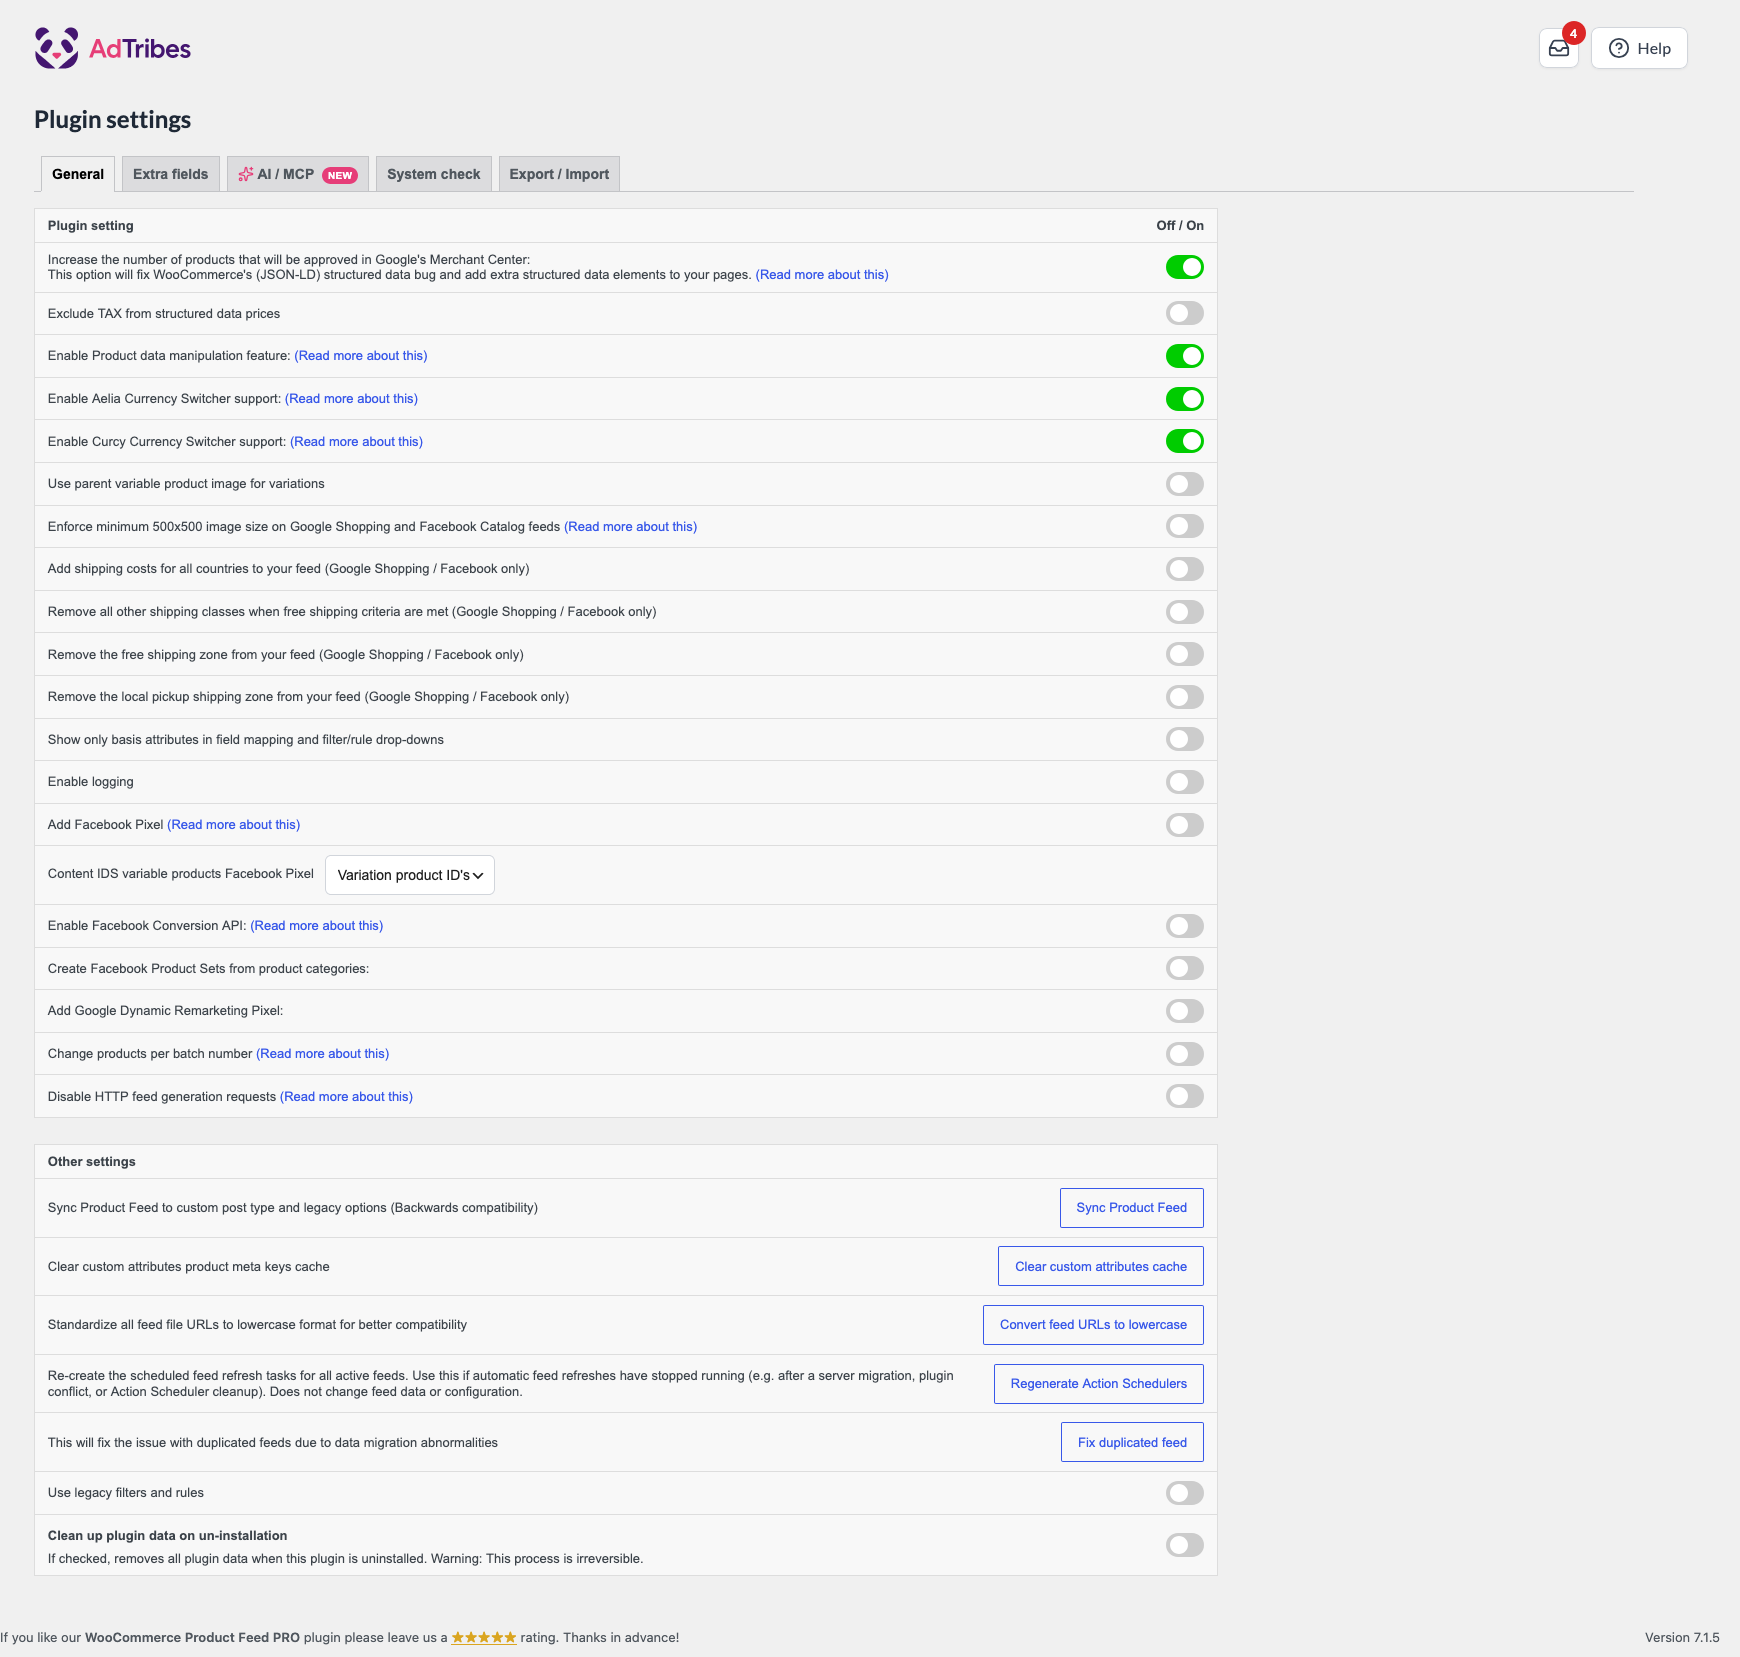
| Setting | Description |
|---|---|
| Use parent variable product image for variations | When enabled, variation products will use the main (parent) product’s image instead of their own. Useful if variations lack individual images. |
| Add shipping costs for all countries to your feed (Google Shopping / Facebook only) | Inserts shipping information for each country in your feed (if configured from WooCommerce > Settings > Shipping), helping ensure complete listing data for international platforms. |
| Remove all other shipping classes when free shipping criteria are met (Google Shopping / Facebook only) | If free shipping is available, this strips out other shipping methods from the feed. |
| Remove the free shipping zone from your feed (Google Shopping / Facebook only) | It removes free shipping methods from feed |
| Remove the local pickup shipping zone from your feed (Google Shopping / Facebook only) | Similar to the above, this removes “Local Pickup” shipping method that are irrelevant for most ad platforms. |
| Show only basis attributes in field mapping and filter/rule drop-downs | Limit attribute list to only those from the latest product for faster loading and less clutter |
| Add Facebook Pixel | Adds the Facebook Pixel to your store pages, using the Pixel ID you enter. This can help track conversions from Facebook Ads. |
| Content IDS variable products Facebook Pixel | Lets you choose between variation product ID’s or parent product ID’s for Facebook Pixel content tracking. |
| Add Google Dynamic Remarketing Pixel | Adds the Google Dynamic Remarketing tag to your store pages, using the conversion tracking ID you enter. Helps track product-specific ad interactions. |
| Change products per batch number | Lets you control how many products are processed per batch during feed generation. Useful for large catalogs or resource-limited servers. |
Advanced features
Need more control? Product Feed Elite builds on Product Feed Pro with product data manipulation, extra fields like GTIN, MPN and EAN, and custom refresh intervals on every plan. Multilingual and multi-currency feeds come with the Feed Translation and Multi-Currency addons on the Plus and Business plans.
Explore All Elite Features here
With the PLUS or BUSINESS plans of Elite, you’ll also gain access to the Feed Validator Tool, which checks your live feed URLs on a schedule (including Google, Facebook and OpenAI feeds) and alerts you to errors before they block your listings.
Learn how to use the Feed Validator Tool
What’s next
- How to set up a Google Shopping product feed
- How to create filters for your product feed
- How to create product feed rules
- Batch size configuration
- How to use the Feed Validator Tool
Need help?
If you have a question or run into any issues, we’re here to help.
- Premium users: Open a support ticket
- Free users: Visit our community forum