What is a product feed? We’ve seen many store owners have a hard time getting more buyers—until they start using product feeds. It’s a shame more entrepreneurs don’t know how helpful this tool can be!
A product feed is a complete list of your online store’s products that sales channels use to show to their customers. But how does this help get hundreds or even thousands more people to see your store? And what part do giants like Google, Facebook, and Bing play in increasing your store’s views, visits, and sales?
Today, we’ll cover everything you need to know about product feeds. Plus, we’ll give you a step-by-step guide on how to use AdTribes, an effective product feed plugin for WooCommerce, to create, manage, and upload your feed.
So, what is a product feed? Let’s find out!
Table Of Contents
- What Is A Product Feed?
- 1. Can product data feeds benefit your business?
- 2. What can you do with product data feeds?
- 3. What do product data feeds contain?
- 4. How do product data feeds work?
- 5. How do you ensure a channel accepts your product data feed?
- 6. What do product data feeds look like?
- 7. Which formats are available for product data feeds?
- How To Create A Product Feed
- How To Manage A Product Feed
- How To Upload Your Product Feed To A Channel
- Conclusion
What Is A Product Feed?
Also known as a product data feed or shopping feed, a product feed is a file containing an e-commerce business’ organized list of products and their details, allowing each product to be featured, promoted, or compared through online sales channels such as Google Shopping or Facebook.
A single feed can contain information on thousands of products and their various attributes. These attributes usually include product titles, product images, and more.
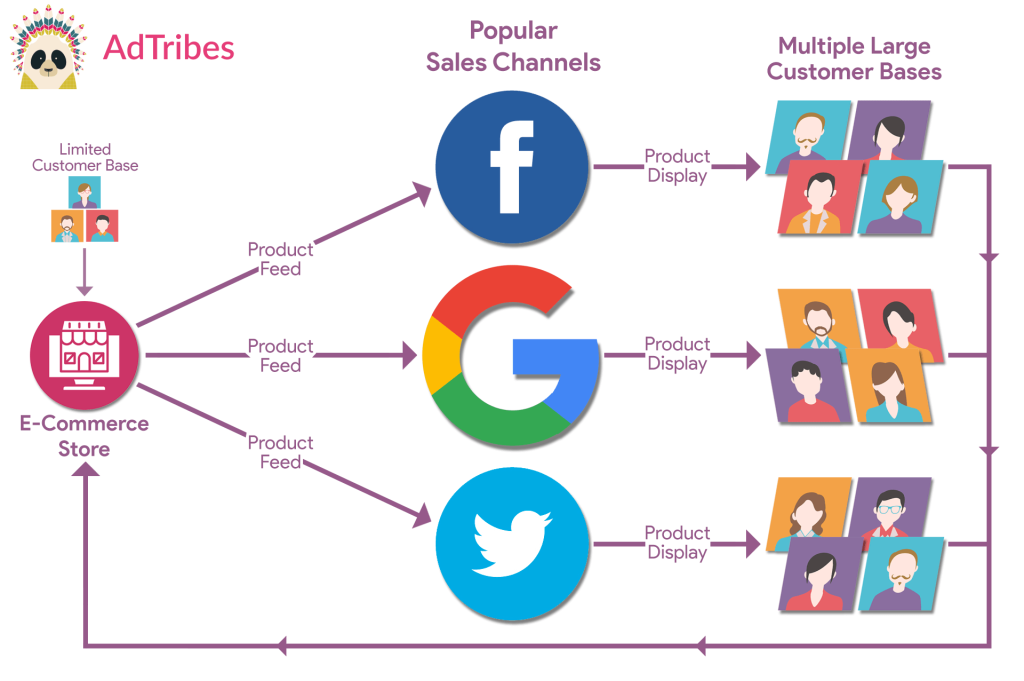
Typically, a business sends this feed to sales channels such as social media platforms, search engines, and comparison shopping sites. These channels then showcase the products to their respective customer bases. As a result, the business reaches a wider audience.
Product data feeds can be a massive boon to your e-commerce business. Which brings us to…
1. What are the benefits of product data feeds?
While “What is a product feed?” is an important question, it’s just as crucial to know why you should create product feeds.
Product feeds can bring several benefits to your business. In this article, we’ll focus on the three most important ones:
i. Boost your reach, visibility, traffic, and sales.
Product data feeds help you showcase your products clearly on many different platforms. This means more people can see them, visit your website, and make a purchase.
For example, you can create a Google Shopping feed and use it on Google Shopping. This lets your products show up Google’s shopping results, not just on your own website. Thus, you can attract more shoppers to your store, potentially boosting your sales.
Here’s a sampling of the many popular channels that can share your feed with their enormous customer bases:
- Google Shopping
- Bing Shopping
- Snapchat
- TikTok
- Shopping.com
- Wish
- idealo
- Kogan
- PriceGrabber
- Kelkoo
ii) Automate product catalog updates
Product feeds are generally dynamic. This means changes to stocks, prices, and other details are updated automatically across all your sales channels. This helps keep your product listings accurate without needing to update them manually.
Therefore, product feed automation saves you time and effort, so you can focus on other important parts of your business.
iii) Keep your product listings accurate
By keeping your product catalog accurate, product feeds can boost customer satisfaction, improving loyalty and sales.
Also, because your product feed is the main source of information for sales channels, it’s extremely important that everything in it is accurate. When platforms like Facebook and Google see detailed and correct info in your feed, they’re more likely to accept it and show your products to shoppers.
2. What can you do with product data feeds?
You can do a lot with product data feeds, including:
- Advertise on Google, Facebook, Instagram, and other shopping channels big and small.
- Offer products on marketplaces to enhance their visibility and accessibility.
- Initiate campaigns that show your ads to people who have viewed your products before.
- Share data with retailers and distributors for seamless site updates.
- … and more!
3. What do product data feeds contain?
A product data feed normally contains product information represented by attributes such as:
- Titles
- Descriptions
- Prices
- Images
- Availability
- SKU (Stock Keeping Unit)
- Brands
- … and more!
In addition, feeds can include information about your products’ categories.
4. How do product data feeds work?
Every sales channel has unique guidelines and specifications regarding the product details you should include in your product data feed. Therefore, when you submit a feed, the receiving platform closely examines it to ensure it meets these requirements. If it does, said platform can then exhibit your products in various ways, including:
- Product listings on category pages
- Recommendations based on user behavior
- Responses to customers’ search queries
- Sponsored placements or ads
- Integration into social media posts or ads
5. How do you ensure a channel accepts your product data feed?
What is a product feed’s likelihood of getting accepted by a particular shopping channel? It all depends on the quality of your feed. Thus, make sure to:
- Supply the sales channel with all the product data it requires
- Provide accurate, updated information about your products
- Use relevant keywords
- Share content of superior caliber
Remember: the more you optimize your product feed, the sooner you can sell more!
6. What do product data feeds look like?
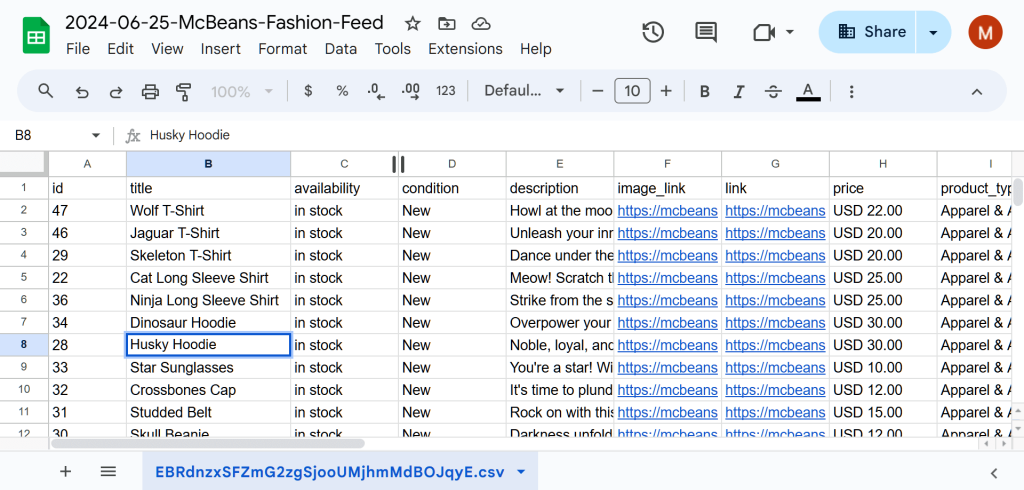
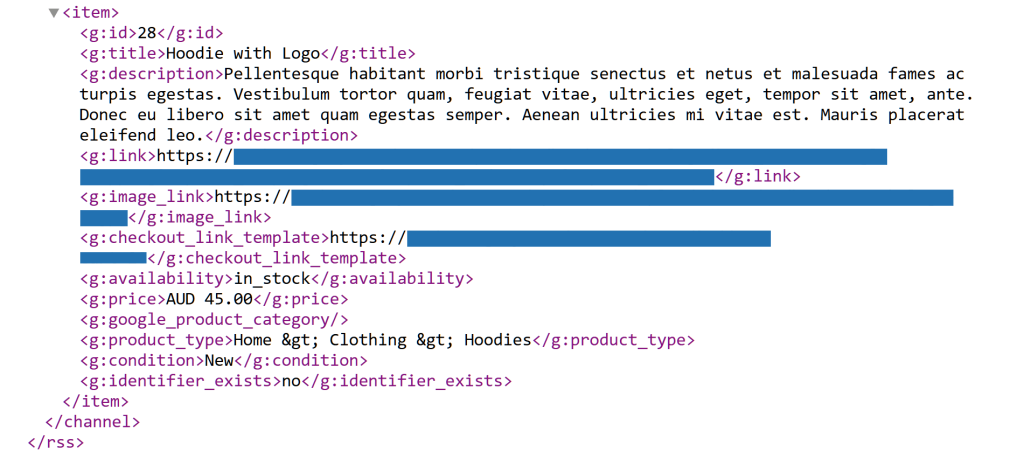
Product data feeds usually come in formats such as XML, CSV, or TXT, containing essential details like product names, descriptions, prices, and more. Each product is represented by a set of attributes, organized in a way that sales channels can easily read and display.
For example, when opened in spreadsheet software, a CSV file shows columns for each attribute and rows for each product:
On the other hand, an XML file commonly appears as a structured text document with tags that define the data’s hierarchy and attributes:
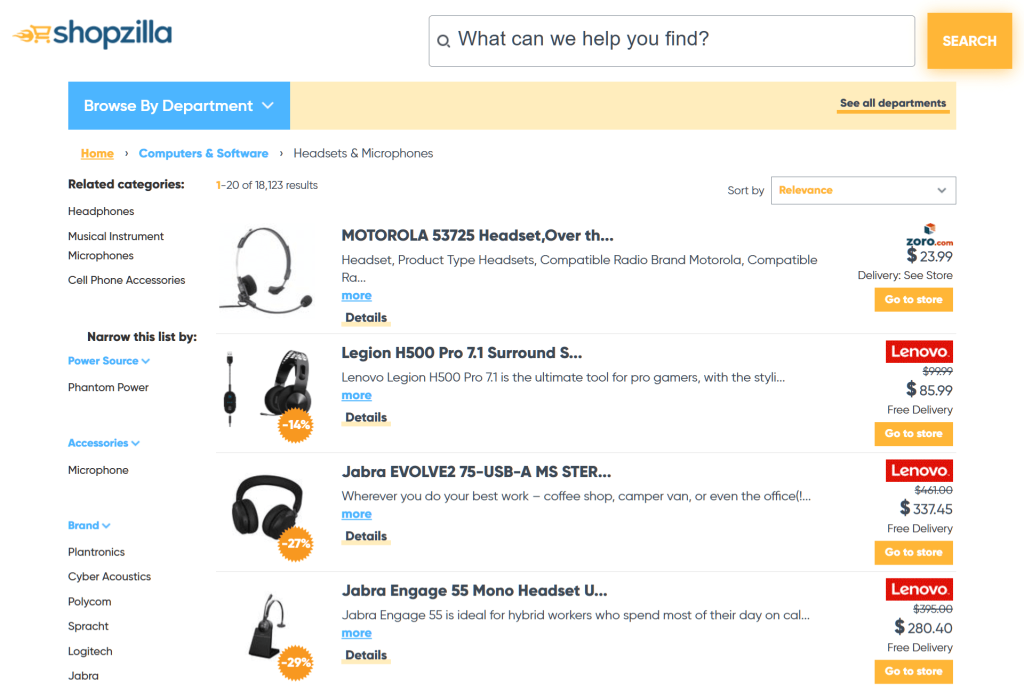
But what does a product data feed look like once a sales channel displays it?
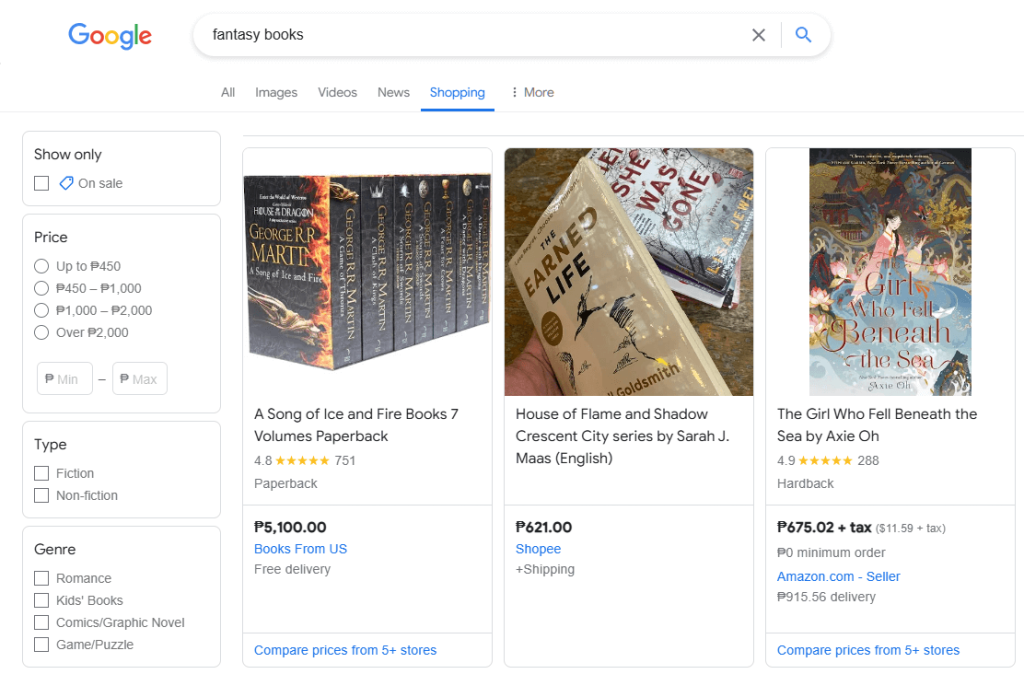
Your feed’s appearance depends on the sales channel exhibiting it. However, feeds generally look like product listings:
7. Which formats are available for product data feeds?
Feeds usually assume the following formats:
How To Create A Product Feed
A product data feed extends your WooCommerce store’s reach, allowing more shoppers to see and purchase your offerings. The question is: How do you create one?
First things first, you must use a reliable tool. For this guide, we’ll use AdTribes, a top-notch product feed plugin for WooCommerce. This not only lets you create feeds, but also use product feed management tools to make sure your product catalog is showcased effectively on different sales channels.
AdTribes offers a free and premium version. While both come with many awesome tools, the latter boasts additional features allowing you to enhance your product data feeds even further.
Accessing AdTribes
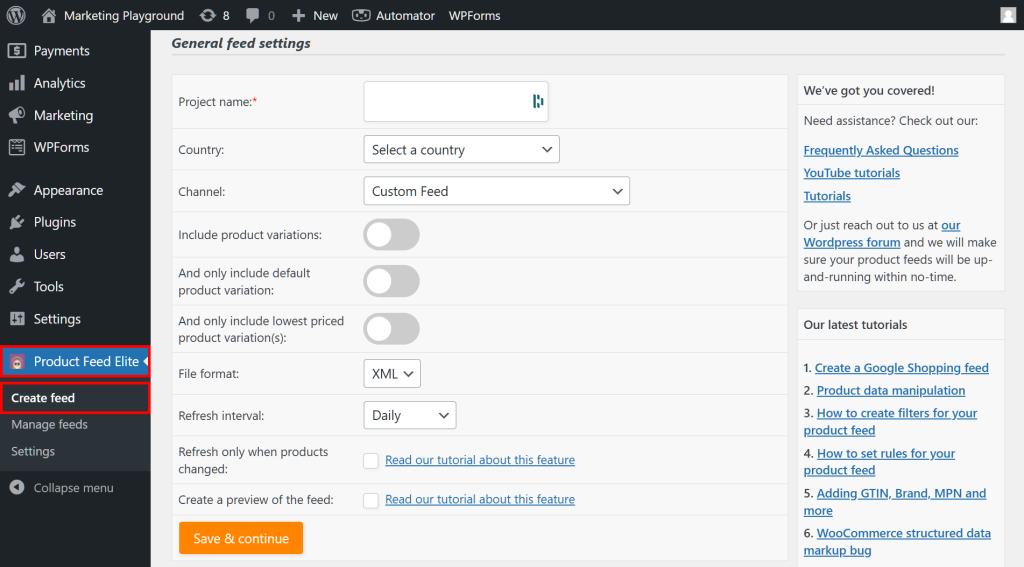
To access AdTribes, navigate to your WordPress dashboard and find Product Feed Pro if you’re using the free version, or Product Feed Elite if you’re using the premium one.
You’ll notice that you have three options:
- Create feed
- Manage feeds
- Settings
For this guide, we’ll focus on Create feed but touch on Manage feeds, as well. So go ahead and click Create Feed!
To create a feed, you need to implement five steps. In each step, you must configure the settings of a feed’s main aspect.
Step 1. General feed settings
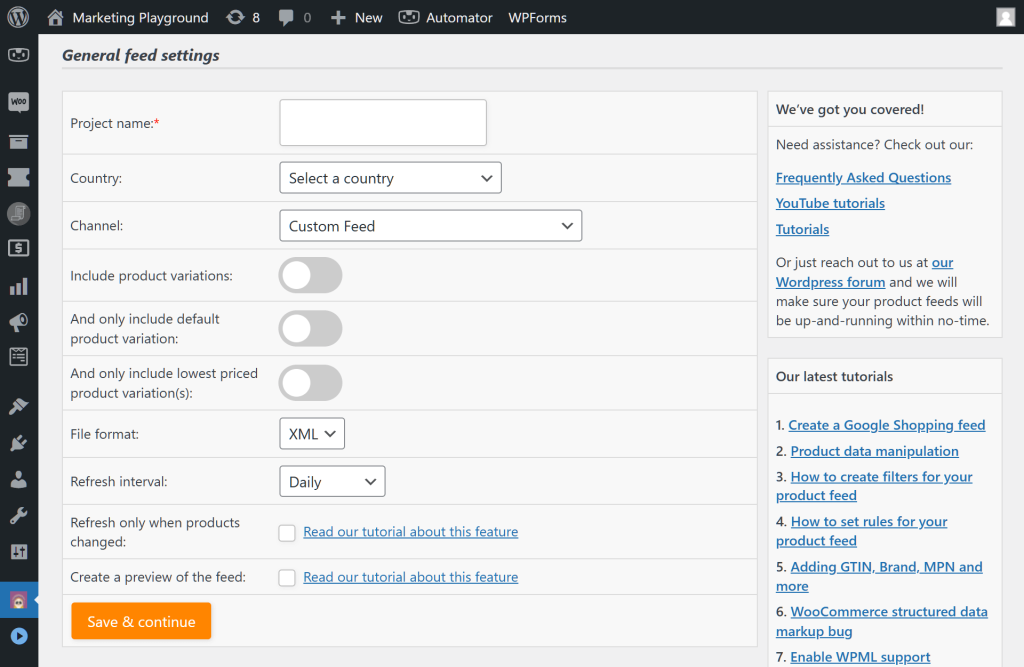
The General feed settings page lets you configure your feed’s fundamental details, including its name, channel, format, and more.
Let’s explore each detail!
i. Project name
Here, you can give your product feed a name. Since you’ll likely create many feeds for your store, we recommend making each project name unique. In addition, it’s a good idea for each name to indicate what the feed concerns.
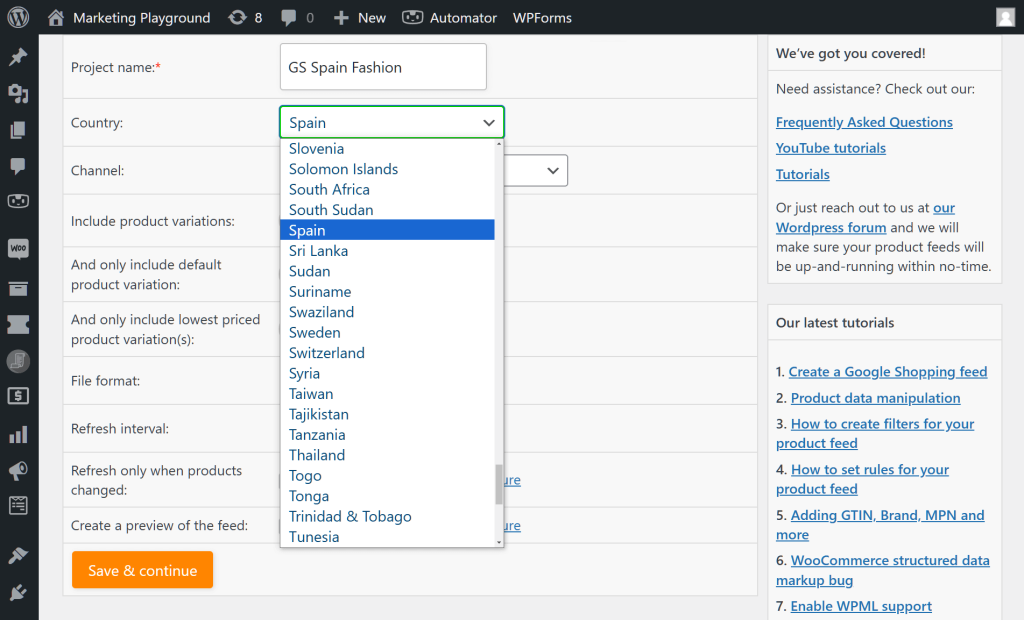
For example, if you’re creating a Google Shopping product data feed for the Spanish market, you could enter “GS Spain” in the Project name entry field. Furthermore, if you want this feed to feature only fashion items, you could name it “GS Spain Fashion.”
Take note: the Project name must be between 3 and 30 characters long.
ii. Country
What is a product feed? It’s a strategy that lets you target specific markets with your offerings. And you can get the ball rolling by choosing the country where you want to show your product listings.
Upon clicking the Country option’s dropdown menu, you’ll gain access to a huge list of countries. Simply click your preferred country.
For example, in the image above, we picked Spain.
Take note that your selected country will affect the next detail’s list of options…
iii. Channel
To focus your market further, you must choose the channel where your product listings will appear.
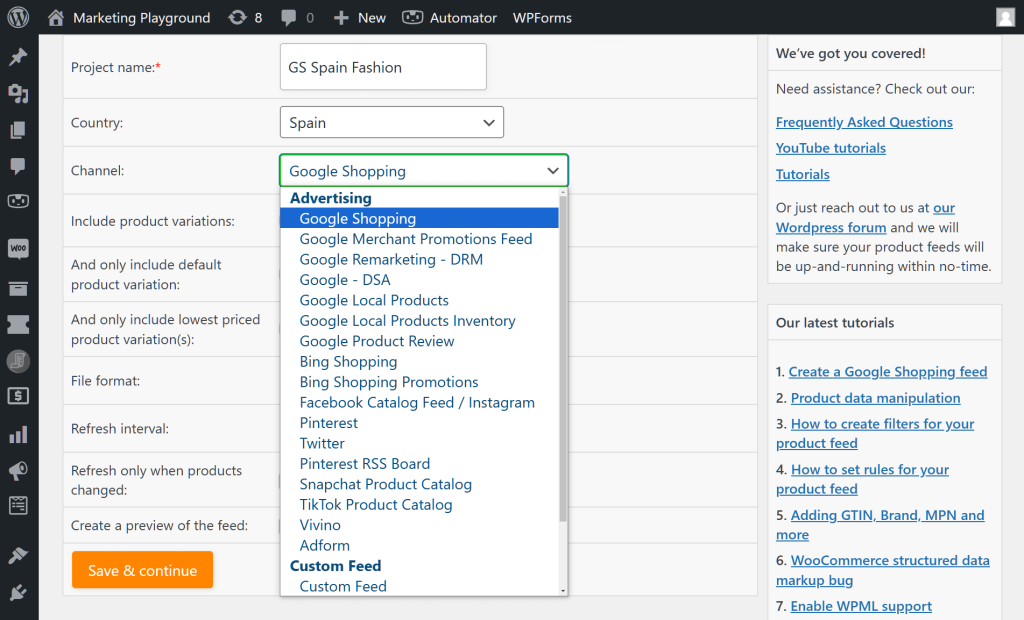
Clicking the Channel option’s dropdown reveals all the channels available in your selected country. In other words, this list will change based on your chosen country.
For our example, we’ll select Google Shopping.
iv. Include product variations
By default, WooCommerce allows you to create two types of products: simple and variation products.
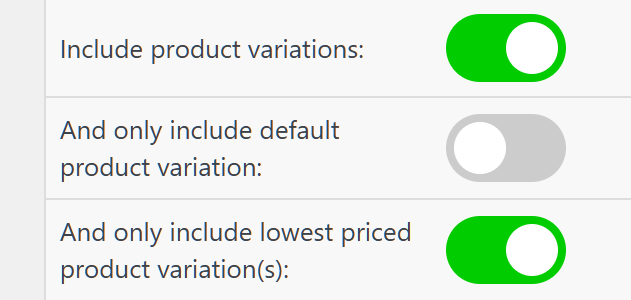
Do you wish for your product data feed to exhibit both types? Then enable this option by toggling it on.
v. Only include default product variation
While you can have more than one variation per product, it’s often a good idea to set one of them as default. So, what must you do if you want your feed to show this default variation only? Simple: enable this option. For more information, check out this document.
Take note: For this option to work, you must enable Include product variations.
vi. Only include lowest-priced product variation(s)
What if you haven’t set the default variation but don’t want your feed to include all variations? Basically, you can enable this option to showcase only your lowest-priced variations. Read this document to know more.
Take note: For this option to work, you must enable Include product variations.
vii. File format
A product data feed file format is a way of encoding product information to be stored in a computer file and to be read by a channel.
The plugin lets you create feeds in various file formats, including:
- XML
- CSV
- TXT
- TSV
To choose a format, click the File format dropdown and click your preferred format. We recommend XML as it’s the most reliable.
viii. Refresh interval
If you wish, you can instruct the plugin to update your feed at regular intervals. The Refresh interval dropdown contains the following options:
- Daily
- Twice daily
- Hourly
- Weekly
- No refresh
The interval you pick should depend on how much activity your store sees. Do you sell products or change prices multiple times a day? Then we recommend updating hourly. Otherwise, the other options should do.
Do you want to enjoy the convenience of automated product feeds? Then use this option!
ix. Refresh only when products changed
You can enable this option by ticking its checkbox.
This option can be used instead of Refresh interval. Basically, it updates your product data feed only when you make any change to your feed, such as when you add new products, change prices, etc.
For more information, read this document.
x. Feed preview?
When you enable the Create a preview of the feed option by ticking its checkbox, the plugin generates a sample of your product data feed containing only 5 products. This is useful if you want to quickly generate a feed to see if any changes you’ve made to its settings produce the desired effect.
However, we don’t recommend creating a preview of a live feed, as you can end up presenting only 5 products to shoppers. Instead, you should preview a deactivated copy of a feed. We discuss how to copy feeds further below.
For more information on feed previews, read this document.
xi. Extra options for Elite users
Product Feed Elite users get to enjoy a couple of extra options. For example, you can enable language and currency switcher integrations. These let you change the language and currency of your products to better suit the country you picked for your feed.
Check out this blog post to know more about the WPML integration, and this blog post if you’re curious about the Curcy Currency Switcher integration.
xii. Save & continue
Once you’re done configuring the General feed settings, click the Save & continue button to proceed to the next phase of product data feed creation!
Step 2. Field mapping
Field mapping ensures the right product details are sent to sales channels in the correct format they expect. This helps your products show up properly in search results or ads. In short, you need proper field mapping to create an optimized product feed
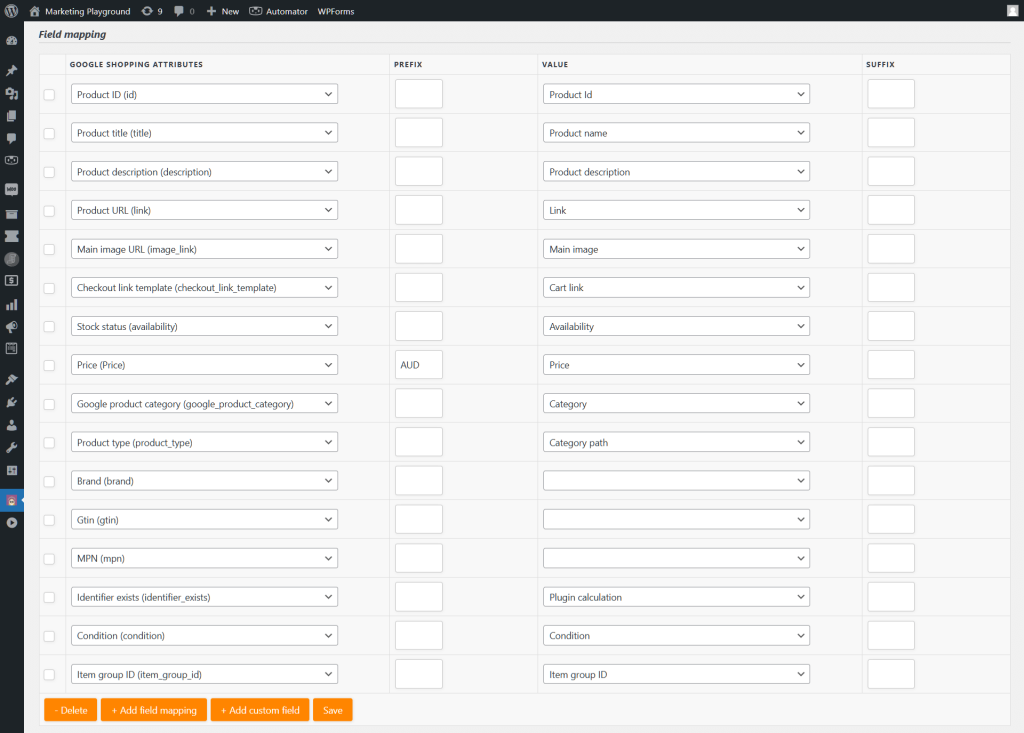
The field mapping phase involves mapping your chosen channel’s attributes to your WooCommerce attributes. In other words, you must match the former’s Attributes with the latter’s Values.
So, how do you map fields? Basically, you must select a detail from the channel’s Attribute dropdown, and then pick the corresponding detail from the Value dropdown.
Thankfully, the plugin does most of the work for you by default. This is why, when you reach the Field Mapping page, your channel’s Attributes already have matching Values. For example, in the image above, Google’s “Product title (title)” is mapped to WooCommerce’s “Product name.”
By matching fields with attributes, you allow the marketing channel to understand data about your products. As a result, the channel accepts your products and features them on its platform. On the other hand, inaccurate mapping can cause errors, ultimately leading to the channel rejecting your products.
In addition, make sure to enter appropriate prefixes and suffixes wherever applicable. For example, for the “Price (Price)” field, we should change the prefix from AUD to EUR since we picked Spain for our feed.
Now, let’s discuss your other field mapping options.
i. + Add field mapping
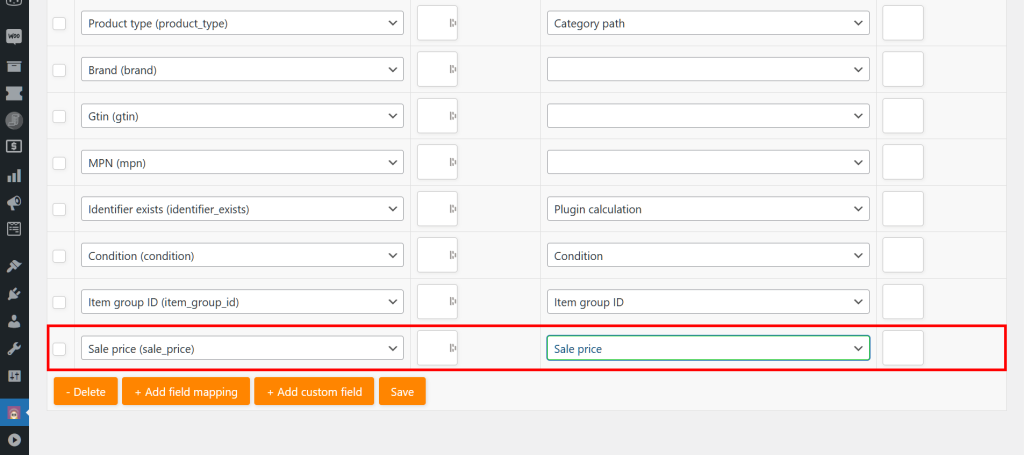
If you want to add an extra field, click the + Add field mapping button. This adds an empty field to the page’s list of fields. You must then choose your desired new channel Attribute as well as its equivalent Value from their respective dropdowns.
For instance, in the image below, we picked the Google Shopping Attribute “Sale price (sale_price)” and its matching Value “Sale price.”
ii. + Add custom field
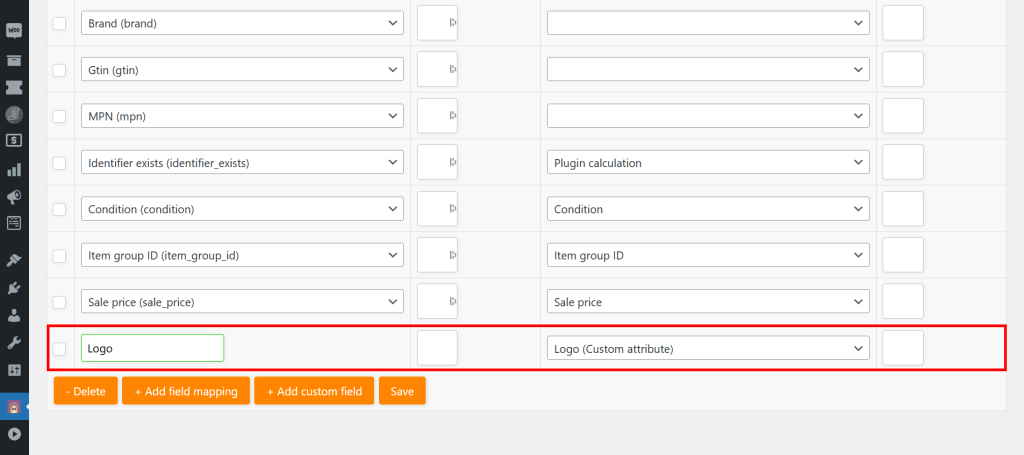
If you want to add your own unique fields, click the + Add custom field button.
First, enter the name of your custom attribute in your channel’s newly created empty Attribute entry field. Then, select the Value you want it to match with.
For example, in the image below, we created the unique Google Shopping Attribute “Logo.” Then, we selected the Value “Logo (Custom attribute).”
Take note: when naming your custom attribute, make sure not to use white spaces, as these aren’t allowed.
iii. Delete
Do you want to delete one or more certain fields? Then tick their checkboxes followed by the Delete button. This removes them and their corresponding details from the list of fields.
Take note: the default fields appearing on the Field mapping page are required by most channels including Google. Thus, we don’t recommend deleting them.
iv. Static values
Let’s say all your products have a common detail that you want your feed to include. For example, if every product you’re selling is blue, you can add “blue” as your “Static value.”
Continuing with our example, you must first choose the channel Attribute “Color (color)” from the dropdown. Then, you must pick “Static value” from the Value dropdown. As shown below, this changes the Value dropdown to an entry field, where you can write “blue.”
Now, your feed will include “blue” as a detail that’s common to all your products.
v. Extra fields for Elite users
You may have noticed that a few of the Value entry fields on the Field mapping page are empty. This is because some product attributes (including Brand, Gtin, and MPN) are exclusive to Product Feed Elite users.
For example, in the image below, we used our status as Elite users to map the Google Shopping Attributes “Brand (brand),” “Gtin (gtin),” and “MPN (mpn)” to the Values “woosea brand (Custom attribute),” “woosea gtin (Custom attribute),” and “woosea mpn (Custom attribute)” respectively.
Check out this document for more information on this feature.
vi. Save
Once you’re satisfied with your field mapping, click the Save button to move on to the next phase!
Step 3: Category mapping
What is a product feed’s category mapping phase? It’s the step that ensures your products are placed in the right categories. This helps people find them faster and improves their relevance, making it crucial to feed optimization.
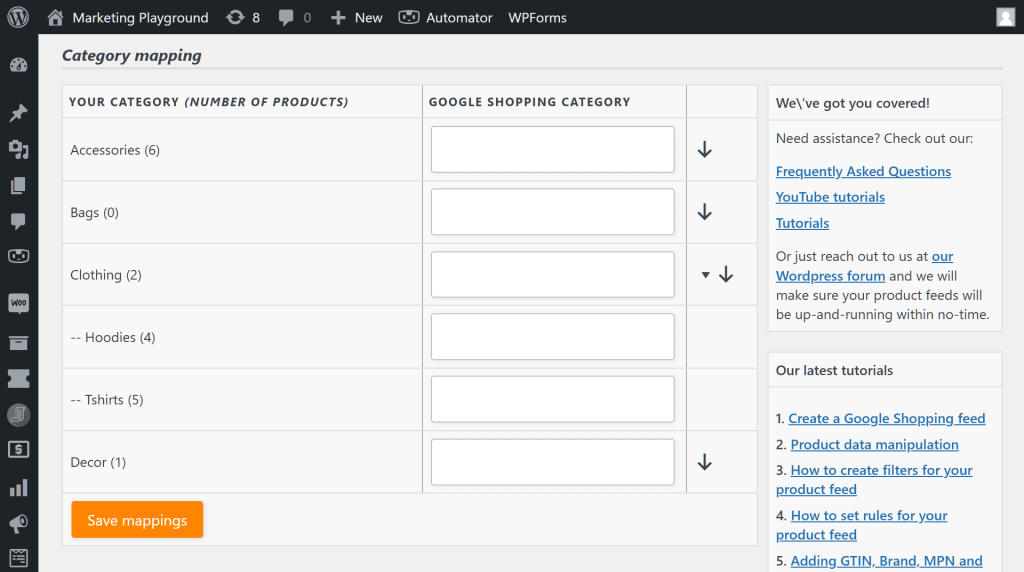
Basically, it involves mapping your product categories to the appropriate product categories of your preferred channel.
On the left side are your WooCommerce store’s categories. On the right are your preferred channel’s categories. To map the former to the latter, enter at least 4 characters (include spaces) in one of the latter’s entry fields. The plugin will then automatically suggest categories you could use. Simply pick the one that’s most appropriate for your product category.
For example, Google has various product categories and subcategories, which are listed here. If your WooCommerce store has an “Accessories” category, you can map it to the following Google category:
167 – Apparel & Accessories > Clothing Accessories
Alternatively, you can choose something even more well-defined, such as:
502988 – Apparel & Accessories > Clothing Accessories > Hair Accessories > Hair Pins, Claws & Clips
While most channels don’t require you to map all your categories, we strongly recommend doing so. This will enhance the chances of your products being shown to the right customers. As a result, it could improve your sales.
When you’re happy with your category mapping, click the Save mappings button to continue to the next step.
Step 4: Feed filters and rules
Filters and rules allow you to manipulate your feed to exhibit only specific products or change details about these products. This is extremely helpful if you want precise control over the information your feed displays.
Let’s explore our options.
i. Feed filter
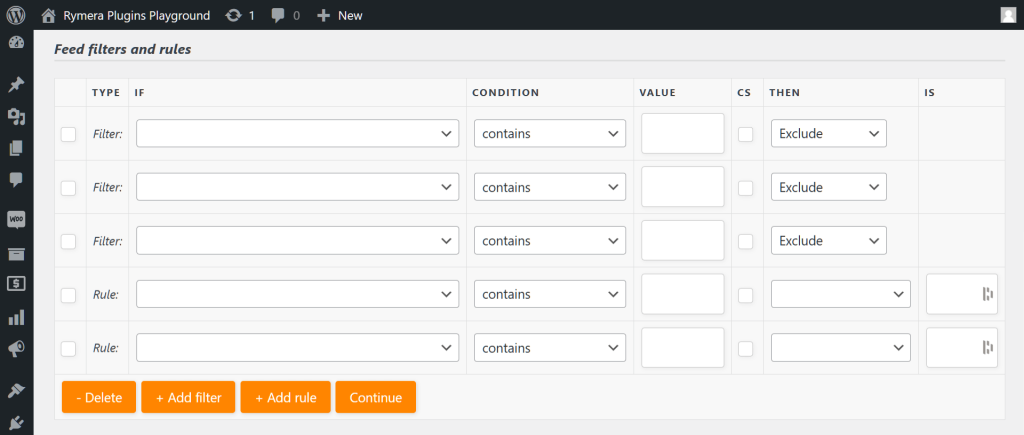
To create a filter, click the + Add filter button. But what is a filter and how do you use one?
A filter either:
- Excludes products you don’t want your product data feed to display
- Includes only those products you want your product data feed to display
It takes the form of an if-then statement, creating a condition that determines whether to include or exclude a product.
For example, in the image below, we essentially tell the plugin, “If the product’s price is less than 10 Euros, then exclude it from the feed.” As such, our feed will only show products that are priced at 10 Euros and above.
In the next example, we tell the plugin, “If the product has a sale price, then include only this product in the feed.” Basically, we’ll end up with a feed that only showcases discounted products. This is useful for highlighting special deals during major sales events like Christmas, Black Friday, Halloween, and more.
Take note: while you can create multiple filters, they act as AND statements instead of OR statements. Moreover, if you use both “Include only” and “Exclude” filters, make sure the first filter is “Include only.”
For more information and examples, read this document as well as this one.
ii. Feed rule
Click the + Add rule button to create a rule. You can create multiple rules.
So, what is a product feed rule? Basically, rules change specific products’ details and values so that the feed presents these new details and values instead of the original ones.
Also assuming the form of if-then statements, rules can be used to change product prices, names, categories, etc.
In the example below, we tell the plugin, “If the product’s price is exactly 10 Euros, then change its sale price to 5 Euros.”
In this next example, we tell the plugin, “If the product name contains the word ‘Costume,’ then change its Google category to 184 (Apparel & Accessories > Costumes & Accessories).”
For more information and examples, check out this document.
iii. Delete
Do you want to delete a filter or rule? Then tick its checkbox followed by the Delete button.
iv. Continue
Are you done finalizing the filters and rules for your feed? Then click the Continue button to proceed to the next step!
Step 5: Conversion & Google Analytics settings
We’re almost done!
However, before we create our feed, keep in mind that it helps to be able to track the results of your campaign. After all, knowing how well your feed is performing informs your decisions about which strategies to implement. For example, it could help you determine what items sell well, allowing you to make feed adjustments that can lead to more profit.
This is where the Conversion & Google Analytics settings page comes in.
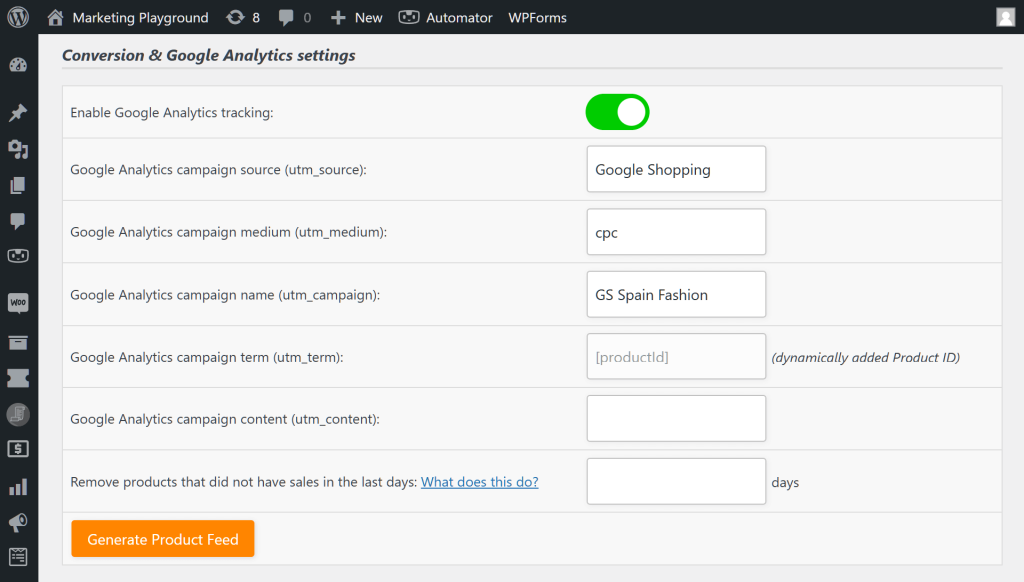
To track your feed’s performance, toggle on Enable Google Analytics tracking. This adds Google Analytics UTM parameters to your product URLs.
You can set the values for these UTM parameters in the provided fields. Most of them are already filled up, so you don’t really have to change anything.
Furthermore, you can remove non-performing products after a set amount of time. Simply enter the preferred number of days in the entry field.
And that’s it! When you’re ready to generate your feed, click the Generate Product Feed button!
How To Manage A Product Feed
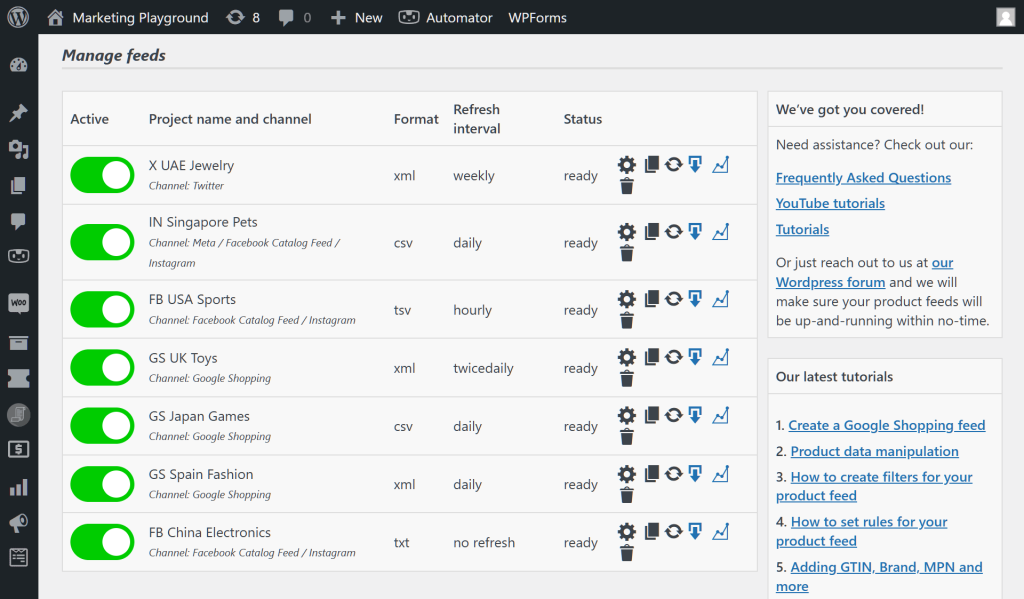
The moment you generate a feed, you’ll be immediately redirected to the Manage feeds page. This contains a list of all the feeds you’ve created.
You can deactivate or reactivate feeds by toggling the buttons on the left side of the page on or off.
See those symbols on the right side? Those are your product data feed management options. Let’s examine each of them!
i. Project settings

Use this option to reconfigure various aspects of your feed and access your feed URL.
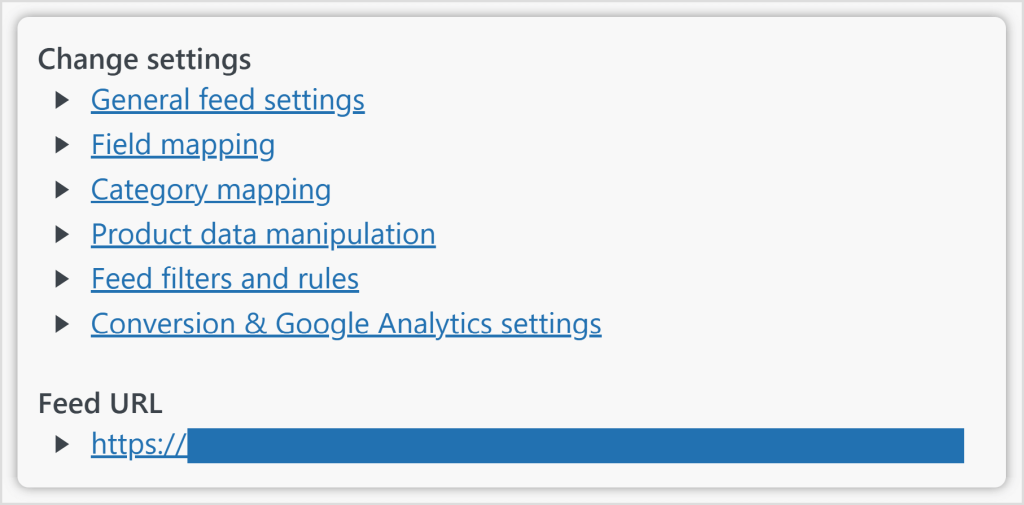
Clicking the gear icon provides you with the following options:
As shown above, most of the product feed management options let you return to the various phases of feed creation. For example, you can rename your feed, modify its field mapping, add or remove filters or rules, and more.
However, there’s a new option: Product data manipulation. This is a powerful feature that lets you transform data in unique ways. Learn more about it here.
In addition, clicking the icon supplies you with the feed’s URL. You can download this feed to your PC or open it in a new tab.
ii. Copy project

This simply creates a copy of your selected product feed. Please note that you need to refresh your browser for the process to complete. The copy will appear at the bottom of the feed list.
iii. Manually refresh product feed

Click this icon to manually refresh your feed. How long the refresh takes depends on the size of the feed; the more product data it contains, the longer the refresh period.
iv. Download product feed

Use this icon to download the feed (in your preferred file format) to your PC. Alternatively, it can open the feed in a new tab in your browser.
v. Amount of products in product feed

Clicking this icon opens a new tab containing a graph. This graph presents the number of products in the chosen feed for the last 30 updates, recorded after each scheduled and/or manually triggered refresh.
vi. Delete project and product feed

This deletes your selected feed.
How To Upload Your Product Feed To A Channel
What is a product feed for if you don’t submit it to a sales channel?
Remember: you need to upload your feed to a platform for it to showcase your products to shoppers. In this section, we’ll teach you how to do just that.
We’ll use Google Merchant as our example.
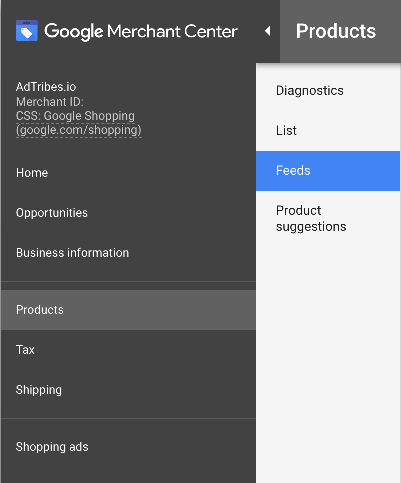
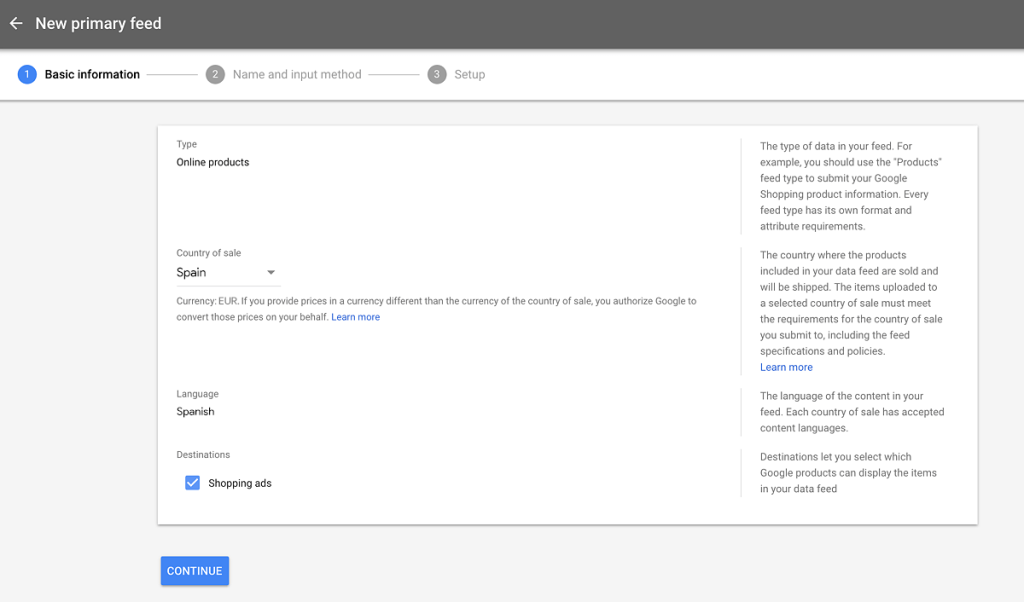
Log in to your Google Merchant Center account. Then, click Products > Feeds and add a primary feed.
Next, select your country of sale and language:
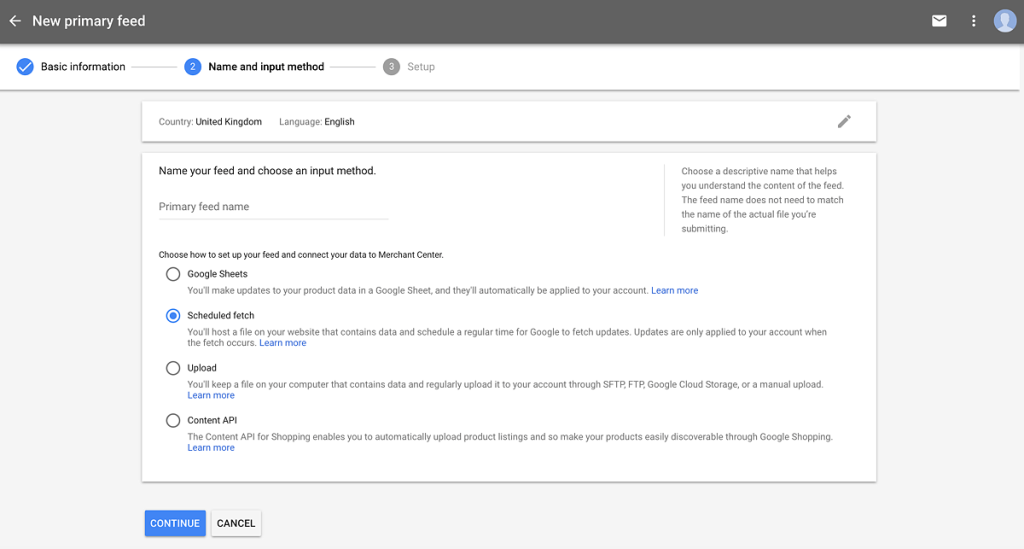
Then, select the Scheduled Fetch option.
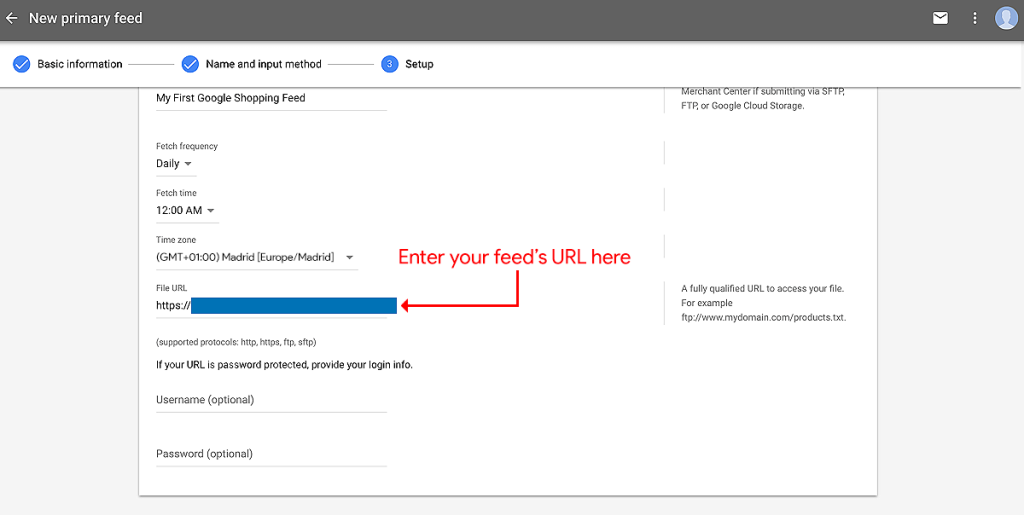
Now, specify the frequency and timing for Google to fetch your product feed. Then, paste the URL of your product feed in the File URL field:
And that’s it! You’ve just created your first product data feed and informed a sales channel where to retrieve your products from.
Congratulations! The sales channel is now ready to exhibit your products to its customers!
Conclusion
So, what is a product feed? It’s a detailed list of your products that you can share with platforms like Google and Facebook so that they can showcase said products to their customers. In other words, it’s a powerful strategy that can drastically boost your reach, traffic, and sales, thus ensuring the growth and success of your e-commerce business.
In this article, we discussed the following crucial concepts about product feeds:
- I. What is a product feed?
- Can product data feeds benefit your business?
- What can you do with product data feeds?
- What do product data feeds contain?
- How do product data feeds work?
- How do you ensure a channel accepts your product data feed?
- What do product data feeds look like?
- Which formats are available for product data feeds?
Furthermore, we gave you a step-by-step tutorial on how to create, manage, and upload a product data feed:
- II. How to create a product feed
- III. How to manage product feeds
- IV. How to upload your product feed to a channel
We hope we’ve answered the question, “What is a product feed?” If you’d like to know more, leave a comment below!
Frequently Asked Questions
What is a product feed?
A product feed is a file that lists all the products from your online store, along with important details like the name, price, image, and description of each item.
This file helps you share your products with other sales channels like Google Shopping, Facebook, TikTok, and more. Instead of adding products one by one to each channel, the feed sends all the info at once and keeps it updated for you.
What are the benefits of product feeds?
Product feeds help you reach more shoppers, save time with automatic updates, and keep your listings accurate so sales channels accept and promote your products.
Which sales channels can you send your product feeds to?
You can send your product feeds to many popular sales channels, such as Google Shopping, Facebook, Instagram, Bing Shopping, Pinterest, X, Snapchat, TikTok, Wish, Kogan, PriceGrabber, and Kelkoo.
